
Osprey
自動處理明確事項,深入調查模糊情況。 Osprey 是一套安全規則引擎與調查介面,可大規模即時處理事件。
平台將事件串流傳送至 Osprey,由人工撰寫的規則在每個事件抵達時進行評估,並自動採取行動、為相關實體套用 Labels,以及將 Verdicts 與自訂 Effects 傳送回平台系統。分析人員接著可以查詢結果、繪製圖表、辨識模式、展開調查,再將發現轉化為新規則。Osprey 最初由 Discord 內部開發,用來對抗平台上的垃圾訊息、濫用、機器人及自動化腳本,後來開放原始碼,協助面對類似挑戰的其他平台。
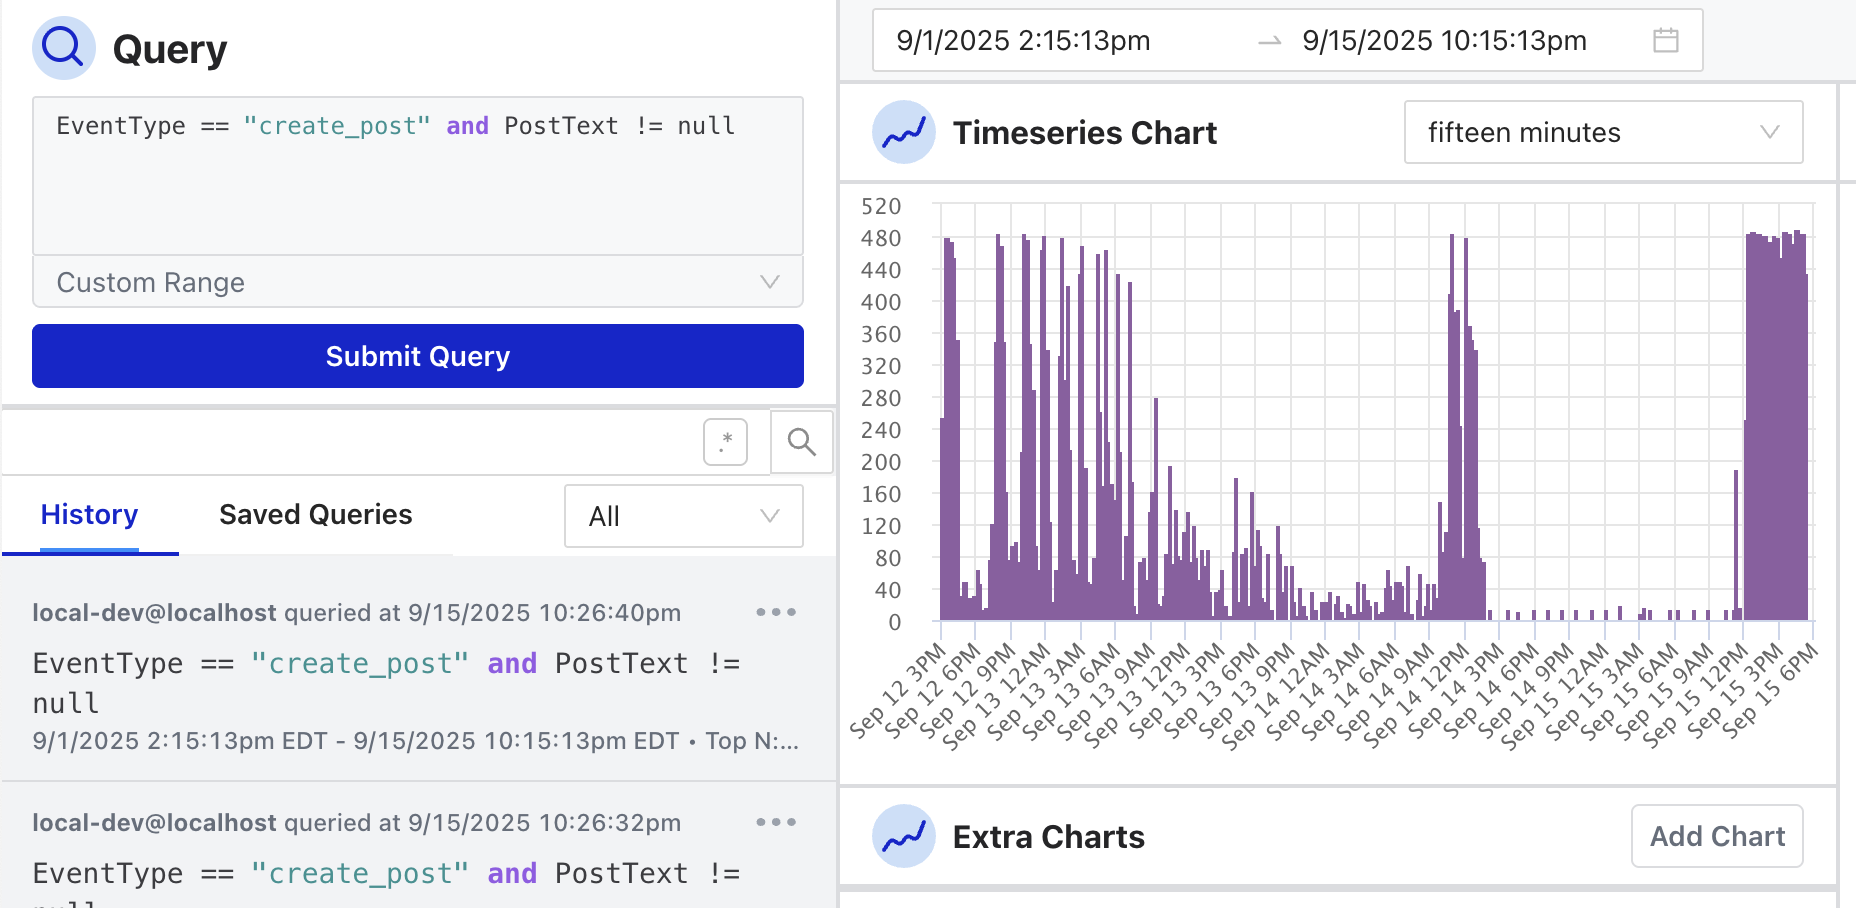
規則使用 Osprey 的結構化規則語言 SML 撰寫,並可用使用者自訂函式 UDFs 擴充。若提供 labels service backend,Osprey 可以在事件之間為實體套用 Labels 來追蹤狀態。以 Postgres 為 backend 的範例請見 labels_service.py。
Osprey 適合希望探索、測試並整合至平台事件應變與調查流程的工程師及信任與安全團隊。更多背景請見使用者研究與角色。
試用 Osprey
若已安裝支援 Compose v2 的 Docker,可用單一 command 啟動包含範例資料的完整技術堆疊,並在預先填入查詢條件的頁面開啟介面。
./demo.sh
也可以在尚未 clone repository 的情況下執行下列 command。
curl -sSL https://raw.githubusercontent.com/roostorg/osprey/main/demo.sh | bash
安全提醒
直接將網路取得的 script 傳入 shell 前,應先下載並檢查內容及來源版本。正式環境不應使用示範設定或範例憑證。
Getting Started 指南說明 demo 啟動的服務、可在介面中嘗試的操作,以及關閉全部服務的方式。其他文件位於 roostorg.github.io/osprey/latest。
採用團隊
目前使用 Osprey 的團隊包括下列組織。
 |  |  |
|---|
若正在使用 Osprey,並希望將專案或組織加入清單,可提出 pull request。
開發
開發環境與工作流程請見開發指南,其中也列出變更必須通過的 lint、type checking 與 pre-commit hooks。
參與社群
除了撰寫程式碼,也可以審查 pull requests、在 issues 與 discussions 回答問題、提供領域專業意見、教授教學活動或改善文件。
- 加入 Discord server
- 訂閱 newsletter,取得公告與相關資訊
- 在 Bluesky 或 LinkedIn 追蹤 ROOST
ROOST 的全名是 Robust Open Online Safety Tools。這個非營利組織匯集主要科技公司與慈善組織的專業、資源及投資,為 AI 時代建立可擴充且能互通的安全基礎設施。
徵求意見
Osprey 是可實際運作的系統,仍持續改善。可先在本機試用、連接自己的資料、撰寫規則,再回報使用情境中欠缺的部分。專案目前特別希望了解下列事項。
- 與既有平台基礎設施整合時遇到的挑戰
- 在不同事件量與規則複雜度下的效能特性
- 所需但目前欠缺的偵測能力或回應行動
- 能讓團隊更容易採用 Osprey 的 API 改善項目
這些意見會直接影響未來的優先順序,協助社群建立更實用的信任與安全工具。
致謝
Discord 使用 Osprey 快速偵測及移除會讓使用者面臨風險的新型態危害。為了減少其他平台從頭建立類似工具的成本,ROOST 與 Discord 和 internet.dev 合作開放 Osprey 原始碼,供有需要的團隊使用。
歡迎使用 Osprey
Osprey 是為信任與安全團隊設計的開放原始碼規則引擎與調查介面。平台將事件串流傳送至 Osprey,由規則即時評估每個事件,分析人員則可查詢、繪製圖表並根據結果採取行動。Osprey 最初在 Discord 開發,目前於 Bluesky 正式環境運作,現由 ROOST 與社群共同開放開發。原始碼與專案資訊請見 GitHub 上的 Osprey。
上游文件依不同角色與需求分成幾份指南。
- 使用者指南 說明調查介面的使用方式,包括查詢事件、標記實體及執行批次工作
- 開發指南 說明如何建立本機開發環境並修改 Osprey
- 整合指南 說明如何讓資料進出 Osprey,並透過 Plugins 擴充功能
- 基本概念 說明 Osprey 與相關文件使用的基本概念及術語
Osprey 文件具有版本區分。其他版本可由官方文件索引進入。
若想快速了解 Osprey,可先參考開發指南中的 Getting Started。該章節提供單一 command 的示範流程,能在幾分鐘內以即時範例資料啟動完整技術堆疊。
繁中工作區狀態
本頁已完成第一輪翻譯,完整使用者、整合、規則與開發指南仍在處理中。尚未完成的章節暫時連往固定版本的英文官方文件。
參與貢獻
Osprey 是 ROOST 與社群共同建立的開放原始碼專案。建立更安全的線上空間需要多元觀點與專業,專案歡迎各種形式的參與。
初次參與時,建議先完成下列事項。
除了撰寫程式碼,也可以審查 pull requests、回答問題、提供意見、籌辦或教授教學活動,以及改善文件。
回報問題
發現問題或有功能建議時,可採取下列步驟。
取得協助
如需 Osprey 協助或想聯絡社群,可以採取下列方式。
- 在社群中開啟 discussion
- 加入 Discord server,與貢獻者及採用團隊交流
基本概念
Osprey 監看平台上持續發生的事件串流,讓每個事件即時通過規則,並記錄發現的結果,供分析人員查詢及採取行動。本頁定義其他文件與介面使用的術語。這些概念依資料流經 Osprey 的順序排列,後面的概念會建立在前面的概念上,建議依序閱讀。
文件中的範例以使用者可以建立貼文的小型社群網站為情境。同樣的概念也能套用到其他讓人們彼此互動的平台。
Events 與 actions
平台上發生的任何事情,例如註冊帳號、建立貼文、傳送訊息或回應內容,都可以在發生時作為 event 傳送至 Osprey。每個 event 都有名稱,例如 create_post,以及平台一併傳送的 JSON 資料,例如作者的 user ID 與貼文文字 hello world。
Note
您也可能遇到 action 這個術語。Osprey 的 submission API 與規則引擎過去將每個傳入 event 稱為 action,因此查詢列使用
ActionName篩選,而介面的即時動態則稱為 Event Stream。在這個脈絡中,兩者指的是同一件事,也就是傳入一個 event,並記錄一個ActionName。
Features
Feature 是規則從每個 event 擷取的具名值,例如 PostText、UserId 或 AccountAgeSeconds。查詢以 Features 為對象,規則定義的每個 Feature 都能依名稱查詢。名稱以底線開頭的 Feature 屬於例外,只供定義該 Feature 的規則檔案內部使用。
以 hello world 貼文為例,規則可能擷取 UserId、PostText 與 EventType 作為 Features。
Entities
Entity 是能在平台上唯一識別某個對象的 Feature,例如 user ID、電子郵件地址或 IP 位址。Entities 會宣告類型,例如 User,讓 Osprey 知道許多 Events 中的哪些值指向同一個對象。這項識別能力讓 Labels 得以運作,也讓介面能在選取 Entity 後,開啟 Osprey 已知的完整資料檢視。
在本頁範例中,UserId 應宣告為 Entity。同一位使用者會多次發文,而 Osprey 需要記住這位使用者。
Rules
Rule 是以 Osprey 規則語言 SML 撰寫、針對 Features 判斷的具名條件。每個 event 抵達時都會通過 Rules 評估。Rule 本身只回傳 True 或 False,而回傳值也能像其他 Feature 一樣查詢。若 Rule 依賴的 Signal 不存在,則回傳 None。Rules 可以連接至 Effects。
以本頁範例來說,Rule 可能判斷「event 是建立貼文,而且貼文文字包含 hello」。
Rules 會以程式碼形式與 Osprey 本身一同放在 Osprey 部署環境中。詳情請見英文官方文件的撰寫規則章節。
Effects
Effect 是 Rule 符合條件後,除了完成評估之外所執行的動作,例如停用使用者、為 Entity 新增 Label 或宣告 Verdict。Effects 會記錄在 event 的執行結果中,讓調查人員事後仍能確認 Osprey 做了什麼以及採取行動的原因。
當 demo 中的 ContainsHello Rule 符合 hello world 貼文時,會觸發兩個 Effects,包括停用作者,以及為該作者新增 meow Label。
Labels
Label 是持續存在於多個 Events 之間的 Entity 標記,也可以視為 Osprey 的記憶。Rules 可以透過 Effect 新增或移除 Labels,也能檢查既有 Labels,讓過去的決定影響後續判斷,例如「若貼文作者先前已被標記為垃圾訊息發布者,則標示這篇貼文」。也可以透過介面為單一 Entity 或批次 Entities 手動新增及移除 Labels。
Labels 包含名稱、適用的 Entity types,以及 positive、negative 或 neutral 的 connotation。Labels 在調查中的使用方式請見 Labels。
Verdicts
Verdict 是呼叫端等待回覆時,Osprey 提供的答案。多數部署會從 Queue 將 Events 傳入 Osprey,再以相同方式讀取結果;服務也可以同步提交 event 並取得回覆。Rules 會宣告 Verdict strings,並連同套用的 Labels 回傳給呼叫端。若部署只以非同步方式消費結果,可能不會直接處理 Verdict,但仍可在介面所記錄的 event Features 中看到它。
Results 及呈現位置
每個處理完成的 event 都會產生執行結果,包括擷取的 Features、符合條件的 Rules,以及觸發的 Effects。結果會建立索引以供查詢,介面中的調查功能都使用這些資料。查詢列能依 Feature 篩選結果,例如 ContainsHello == True;圖表能依時間彙整;Top N 能依任一 Feature 分組;Event Stream 則會逐筆呈現正在發生的 Events。點選 Entity 後,可以查看目前的 Labels 及該 Entity 在平台上的歷史。
引擎如何將結果傳送至這些檢視及平台自己的系統,取決於開發團隊控制的資料管線。詳情請見英文官方文件的資料流章節。
接下來的閱讀方向
執行 demo 後,可以用即時範例資料嘗試這些概念。接著閱讀調查了解查詢流程,或在準備自動化自己的判斷時前往英文官方文件的撰寫規則章節。
使用者指南
Osprey 是供安全團隊使用的網頁式調查與管理介面。使用者可以即時查詢 event 資料、視覺化趨勢、為 Entities 套用 Labels、管理 Rules 與 Features,以及執行批次操作。若尚不熟悉 Events、Features 與 Labels 等術語,請先閱讀基本概念。
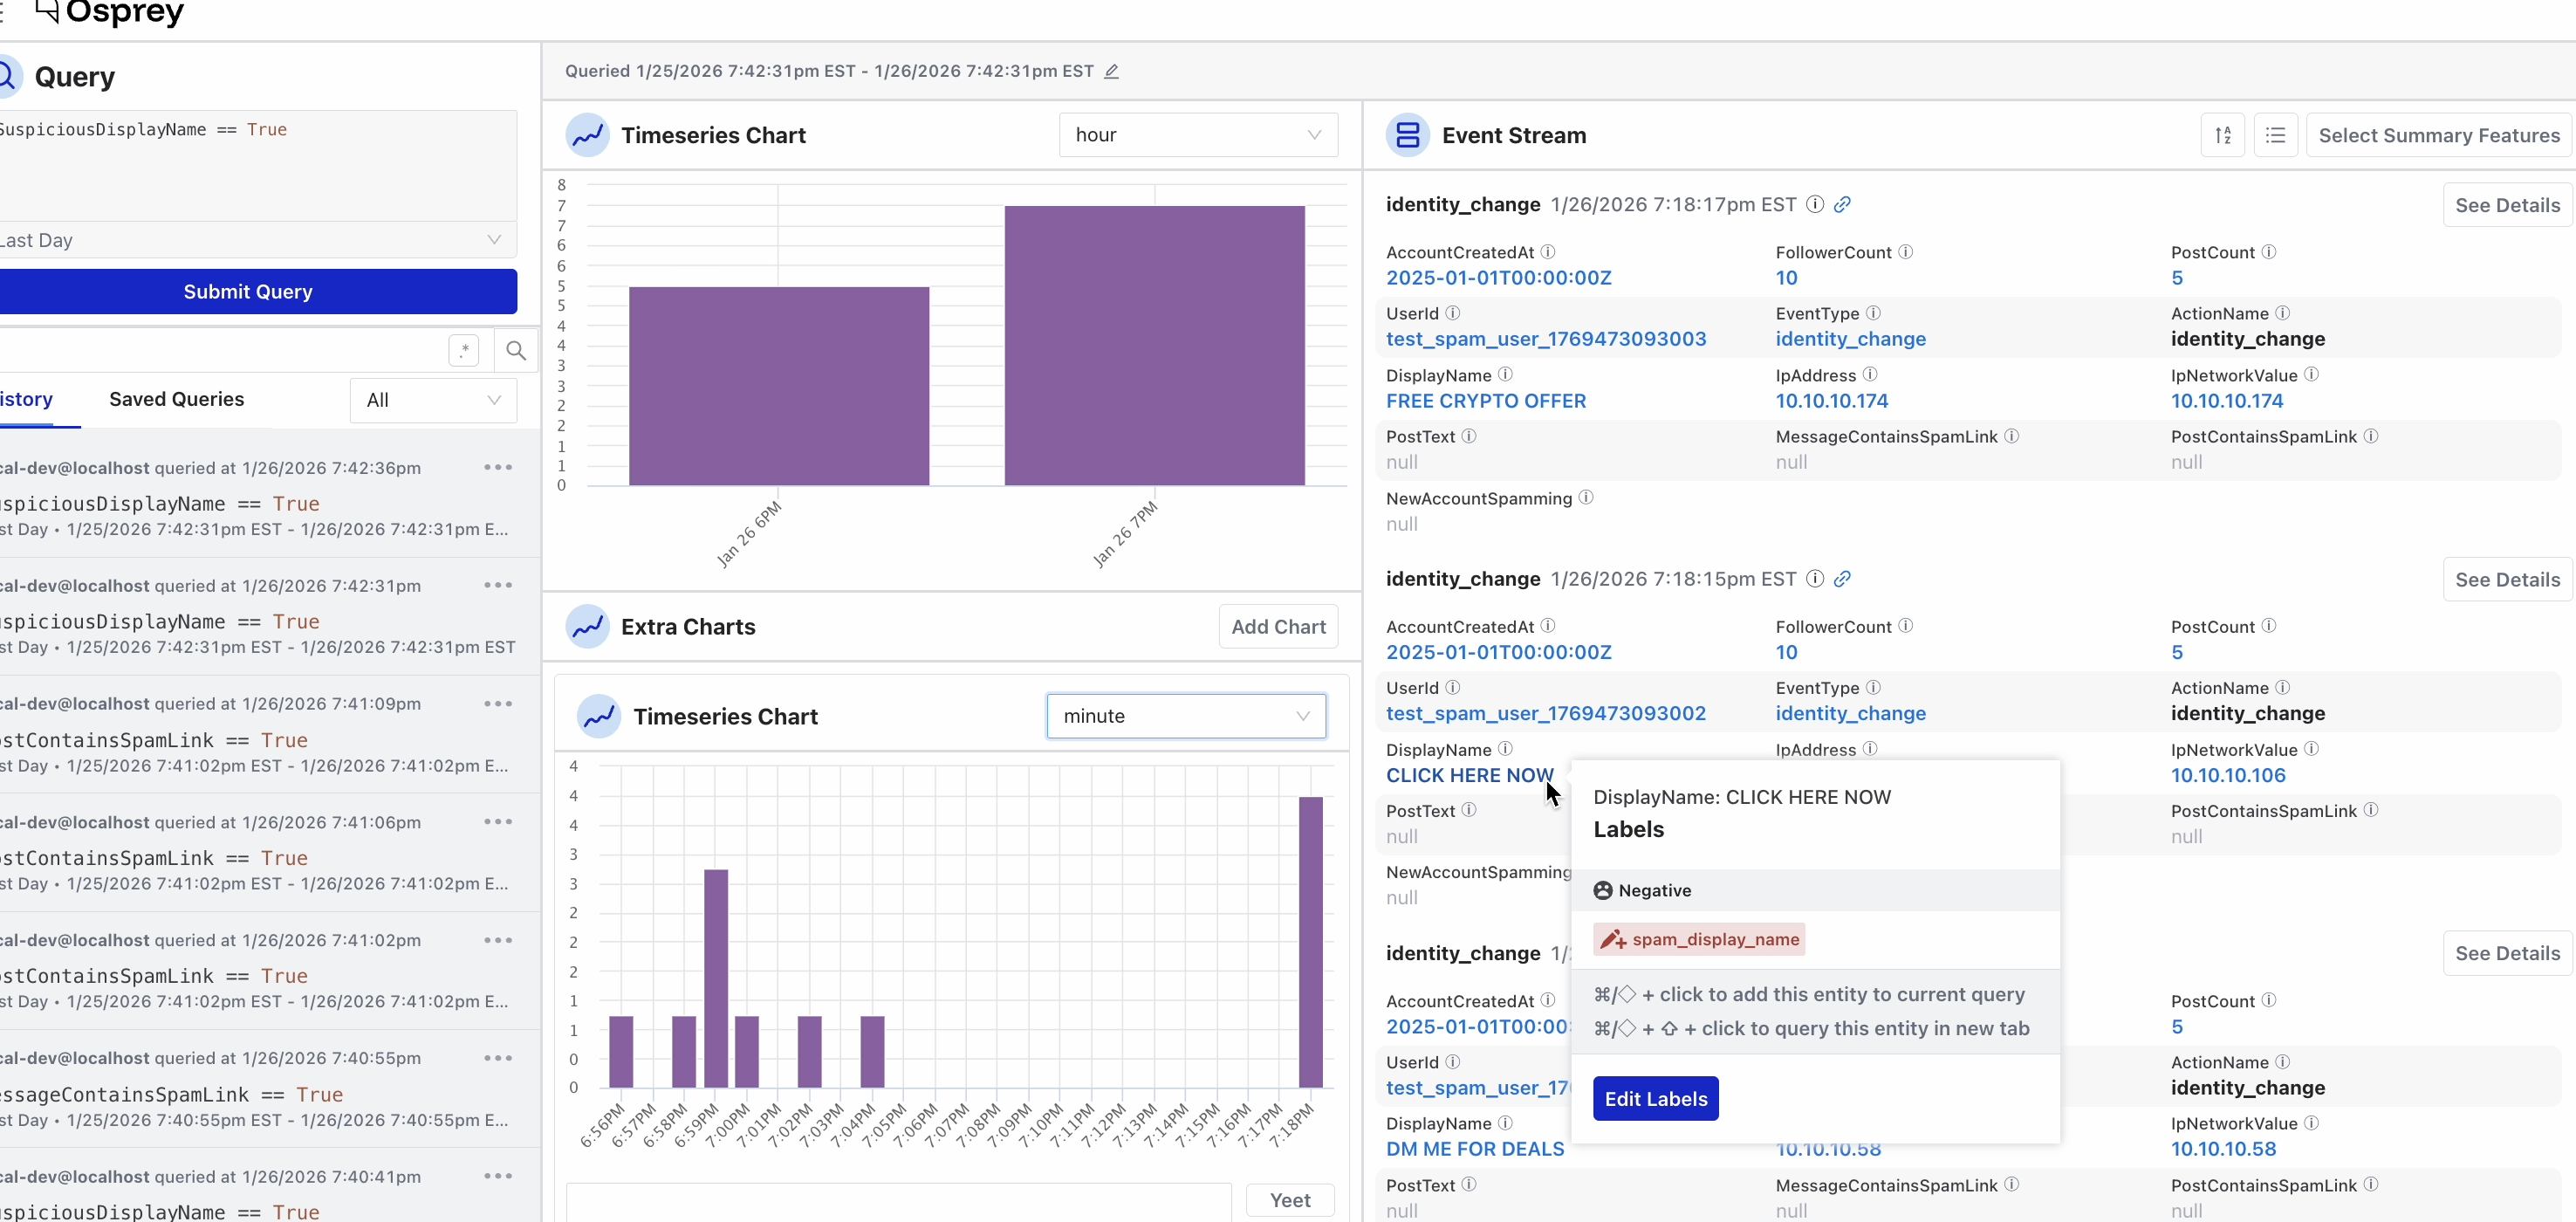
側欄會依工作類型整理 Osprey 工具,本指南也採用相同分類。
-
調查 即時查詢 Events、以圖表呈現結果,並深入查看個別 Events 與 Entities。查詢歷史與已儲存查詢可供再次開啟或分享先前的調查。
-
管理 瀏覽目前部署所設定的 Rules、Features 與 UDFs,並以視覺化方式了解 Rules 與 Labels 的關係。
-
操作 針對查詢結果執行批次 Label 工作,並查看過去的 Jobs。
使用側欄底部的切換按鈕,可以將側欄收合成只顯示圖示的窄列。收合狀態會保留至後續 sessions。介面預設跟隨作業系統或瀏覽器的色彩偏好,也可以使用導覽列中的切換按鈕選擇亮色或暗色樣式。
調查
日常工作大多在「調查」區進行,其中包含主要查詢介面、查詢歷史與已儲存查詢。
查詢
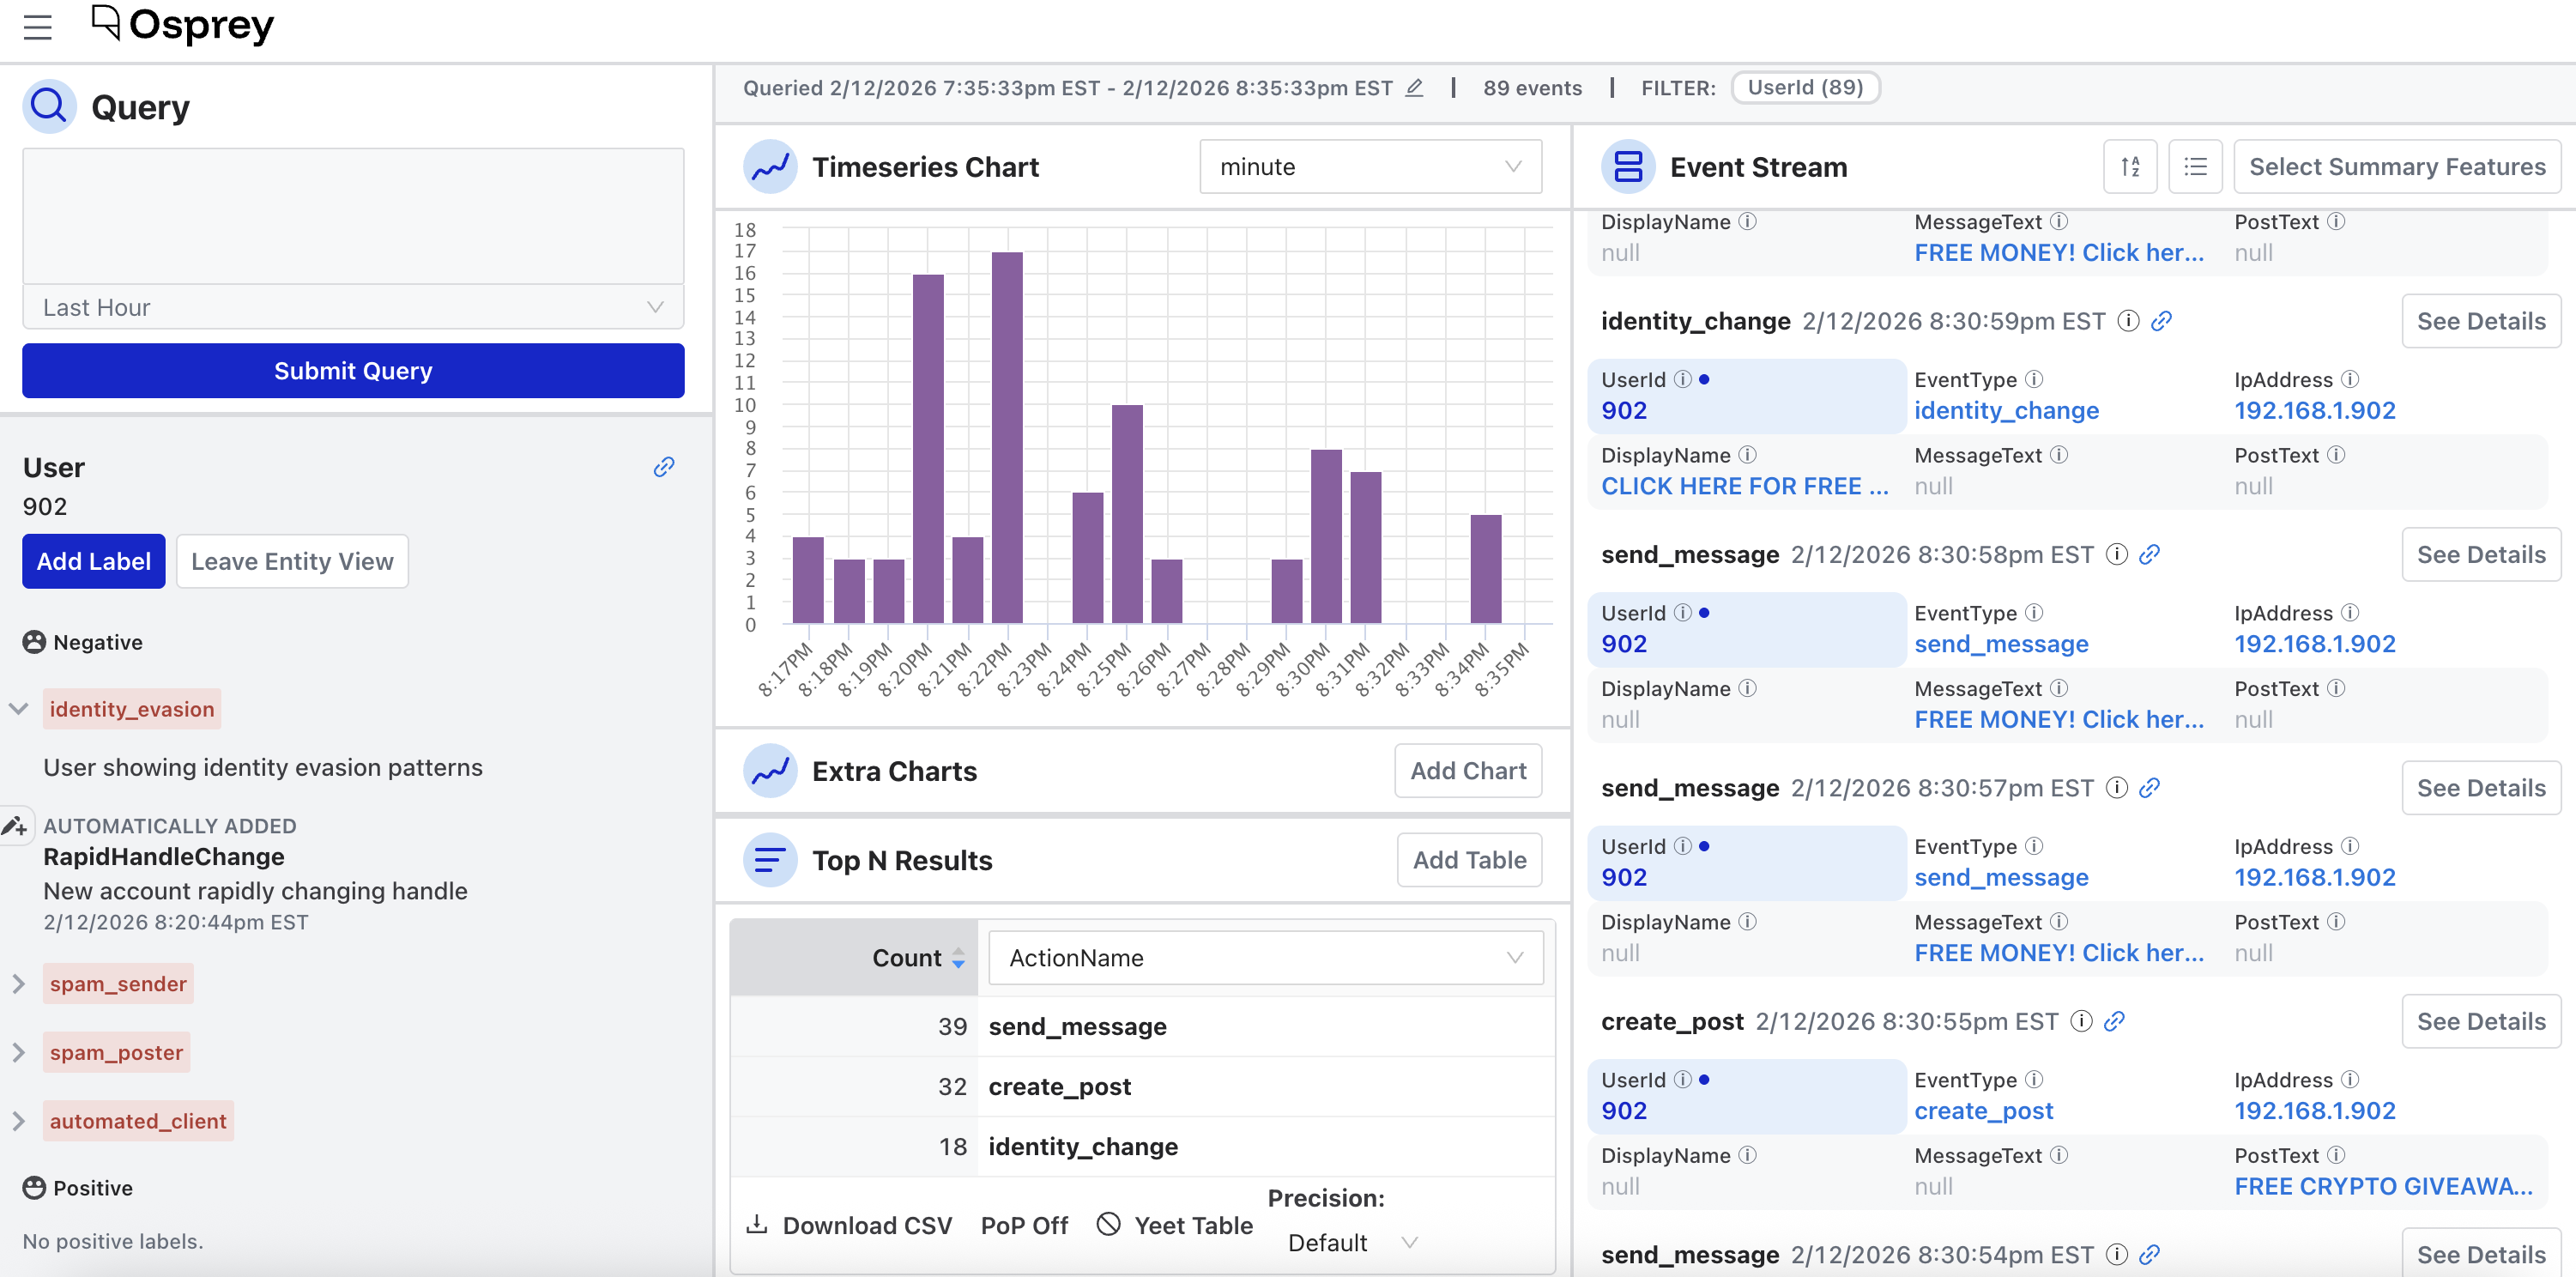
Query 頁面是 Osprey 的首頁,也是由三個面板組成的即時調查工作區。
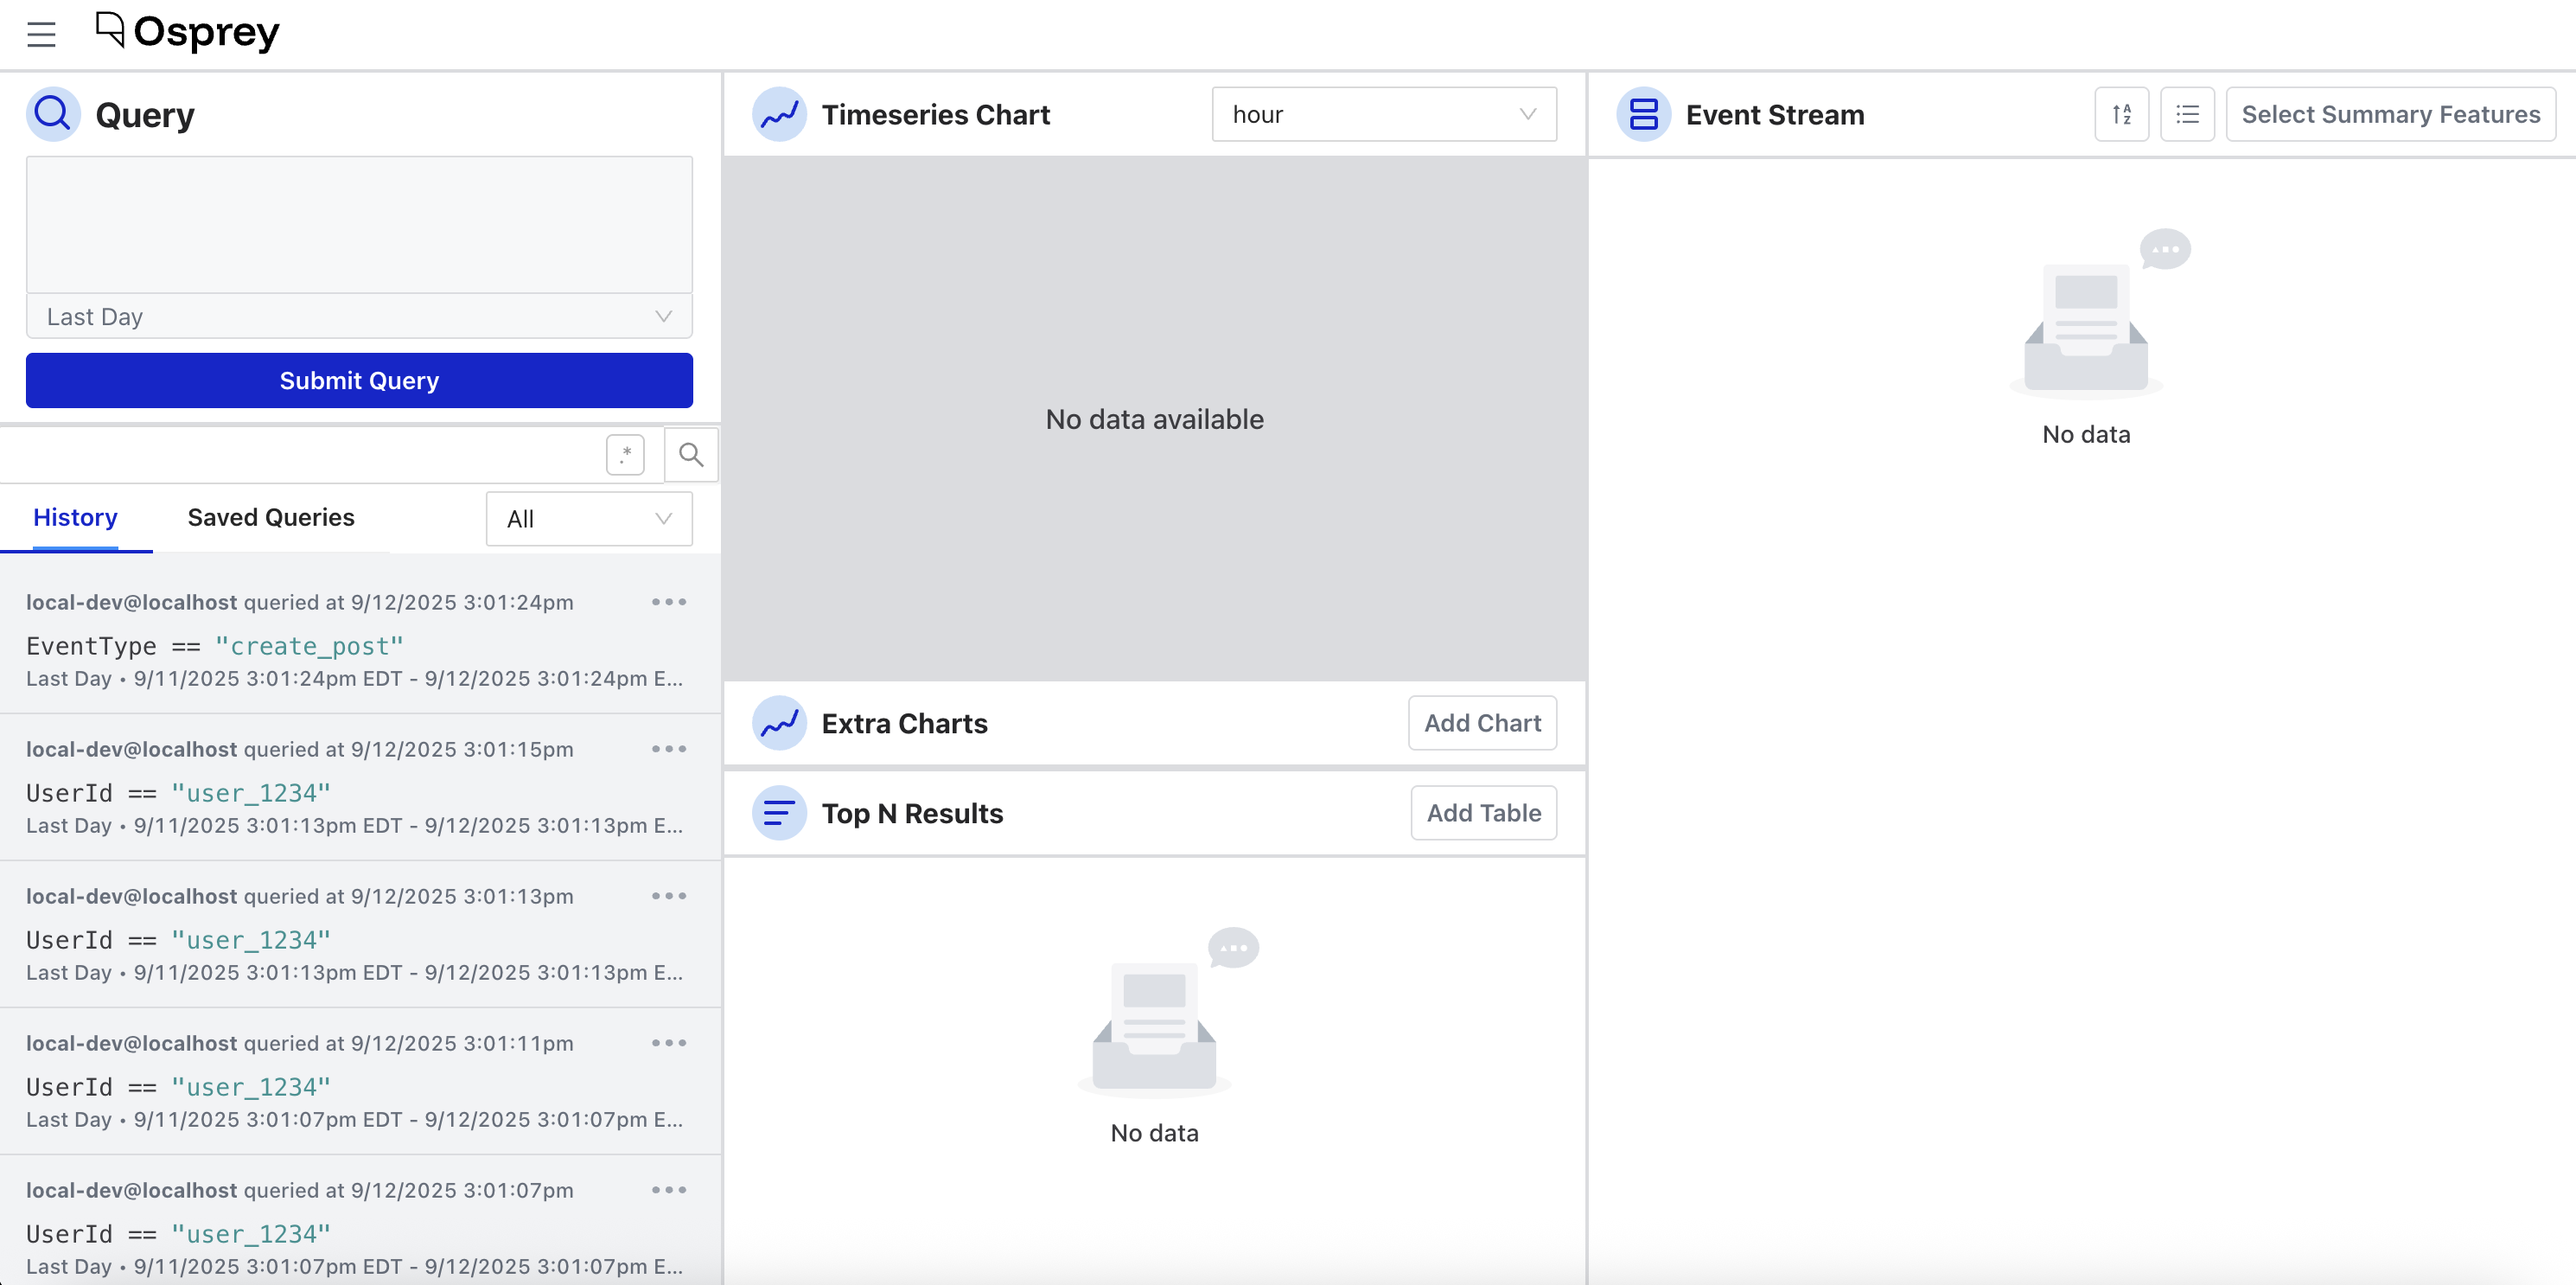
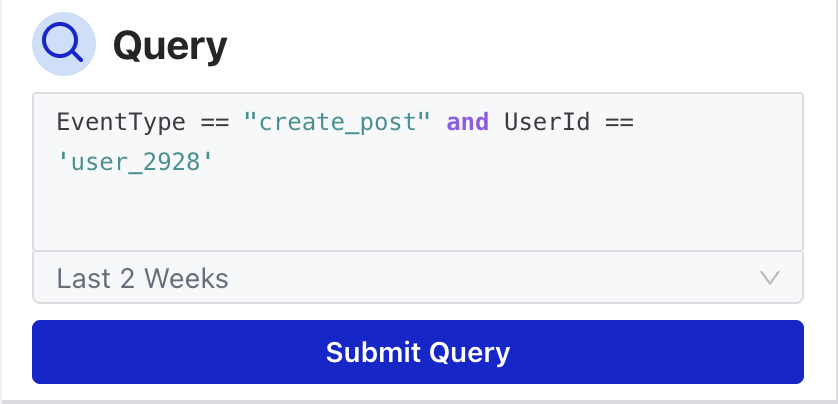
查詢輸入框
在左側面板撰寫及執行查詢。Osprey 使用 SML 語法篩選及搜尋 event 資料,與撰寫 Rules 使用的語言相同。完整參考請見查詢語法。
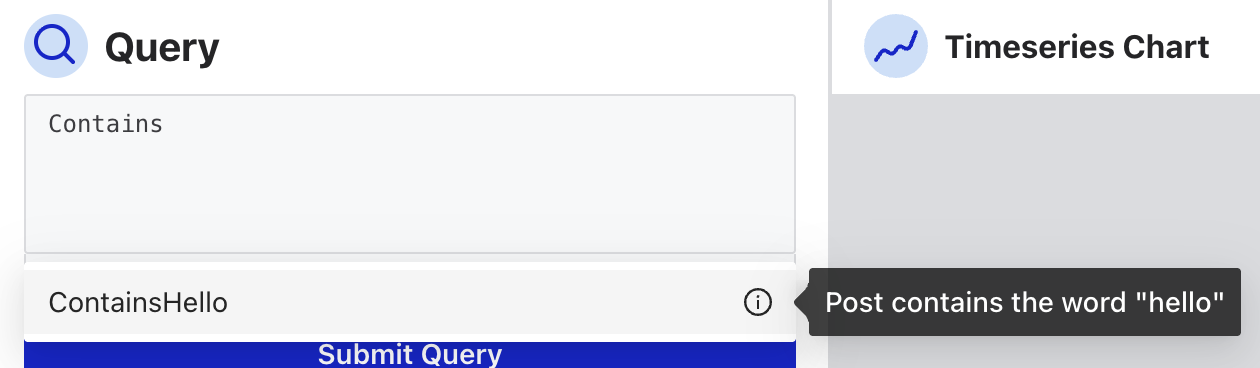
輸入時,介面會自動建議 Feature names、Action names 與 UDFs。將游標停在 UDF 名稱上方,可以看到包含說明的提示框。
目前使用的查詢會反映在頁面 URL 中,因此可以將特定調查分享給團隊成員。URL 可能暴露敏感查詢參數,分享前應先檢查內容。
時間範圍
每個查詢都會針對一段時間執行。可以選擇從最近一秒到最近三個月的預設區間,也可以使用日期選擇器設定自訂日期範圍。
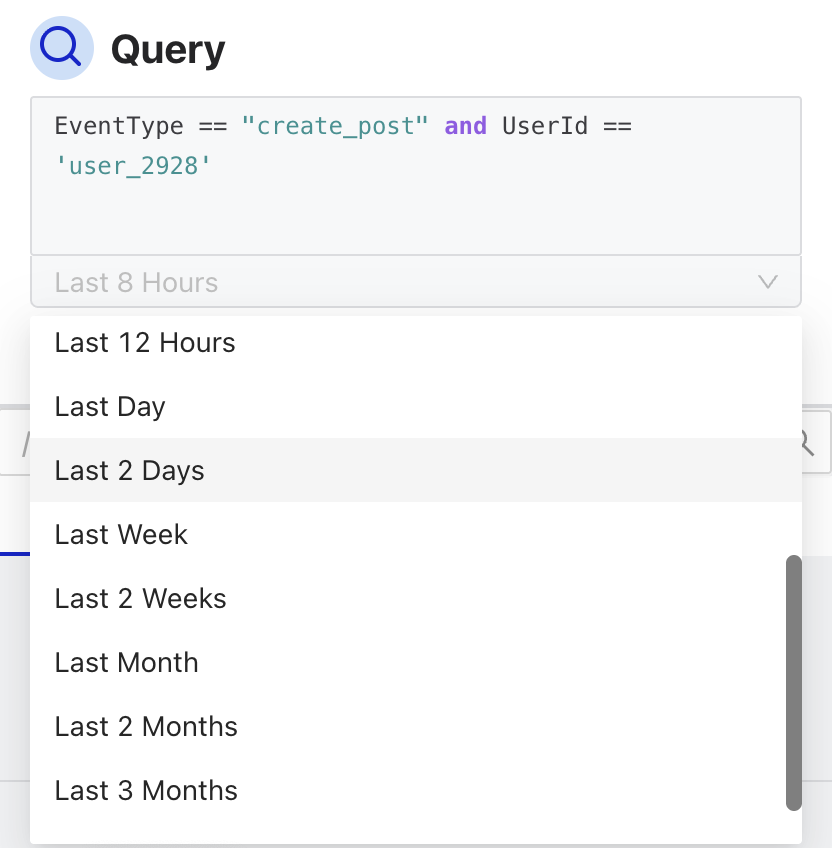
查詢或時間範圍變更後,整個頁面會動態更新。與圖表或 Event Stream 等其他面板互動時,也可能反過來更新查詢。
圖表
中央面板提供兩種視覺化方式。
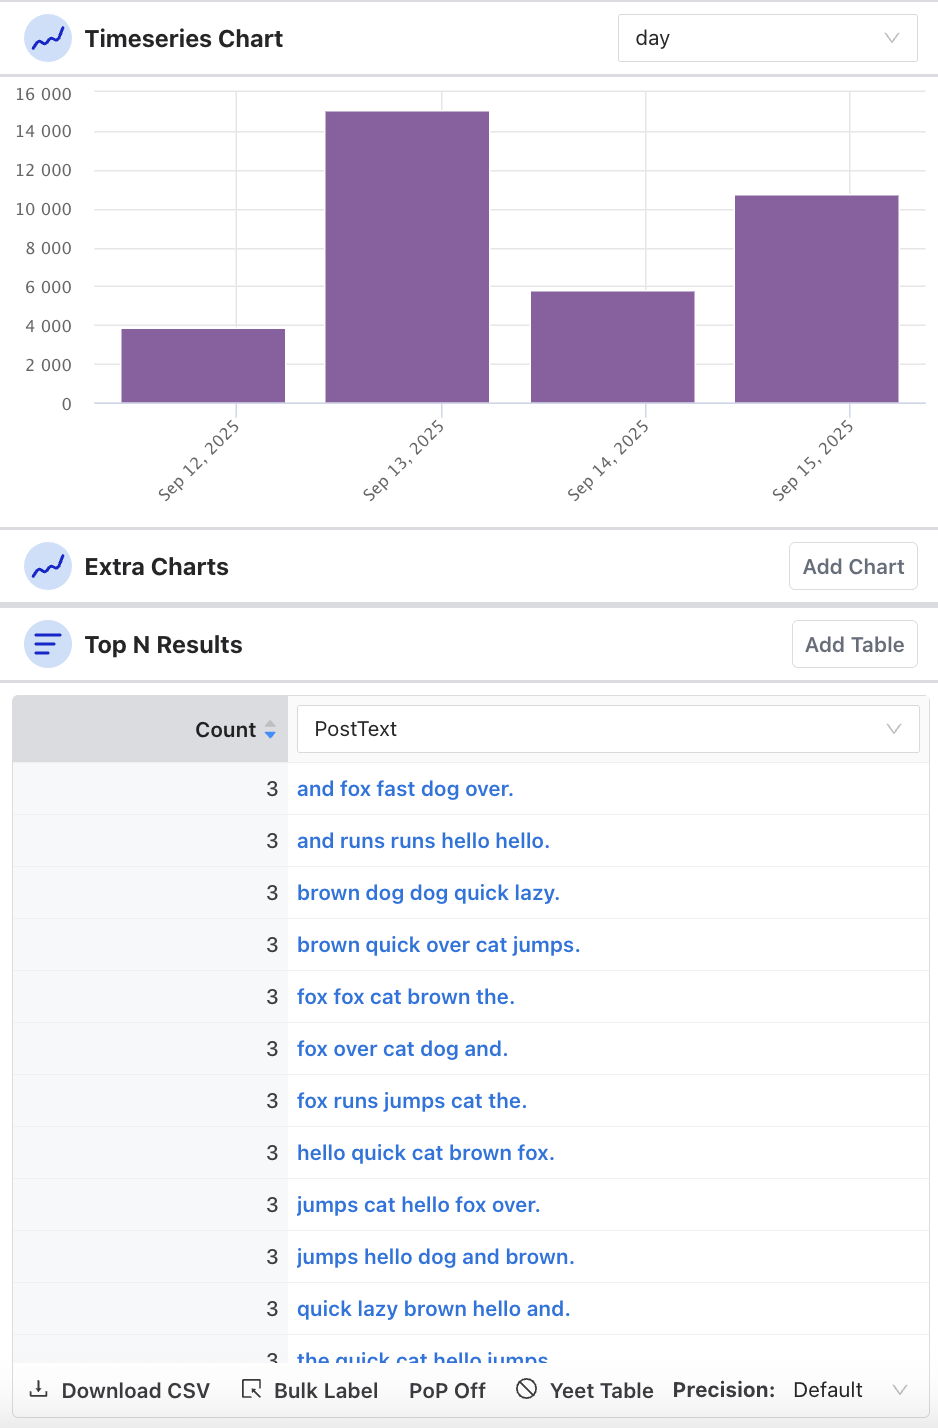
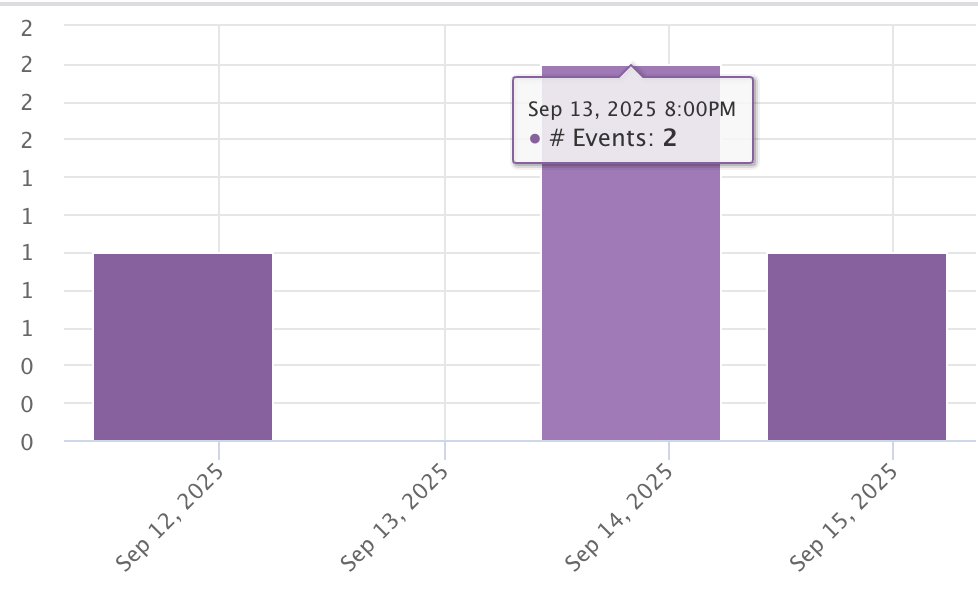
Timeseries 呈現一段時間內符合條件的 event 數量。粒度可以設定為分鐘、15 分鐘、半小時、小時、日、週或月。將游標停在個別長條上方,可以查看該期間的數量。
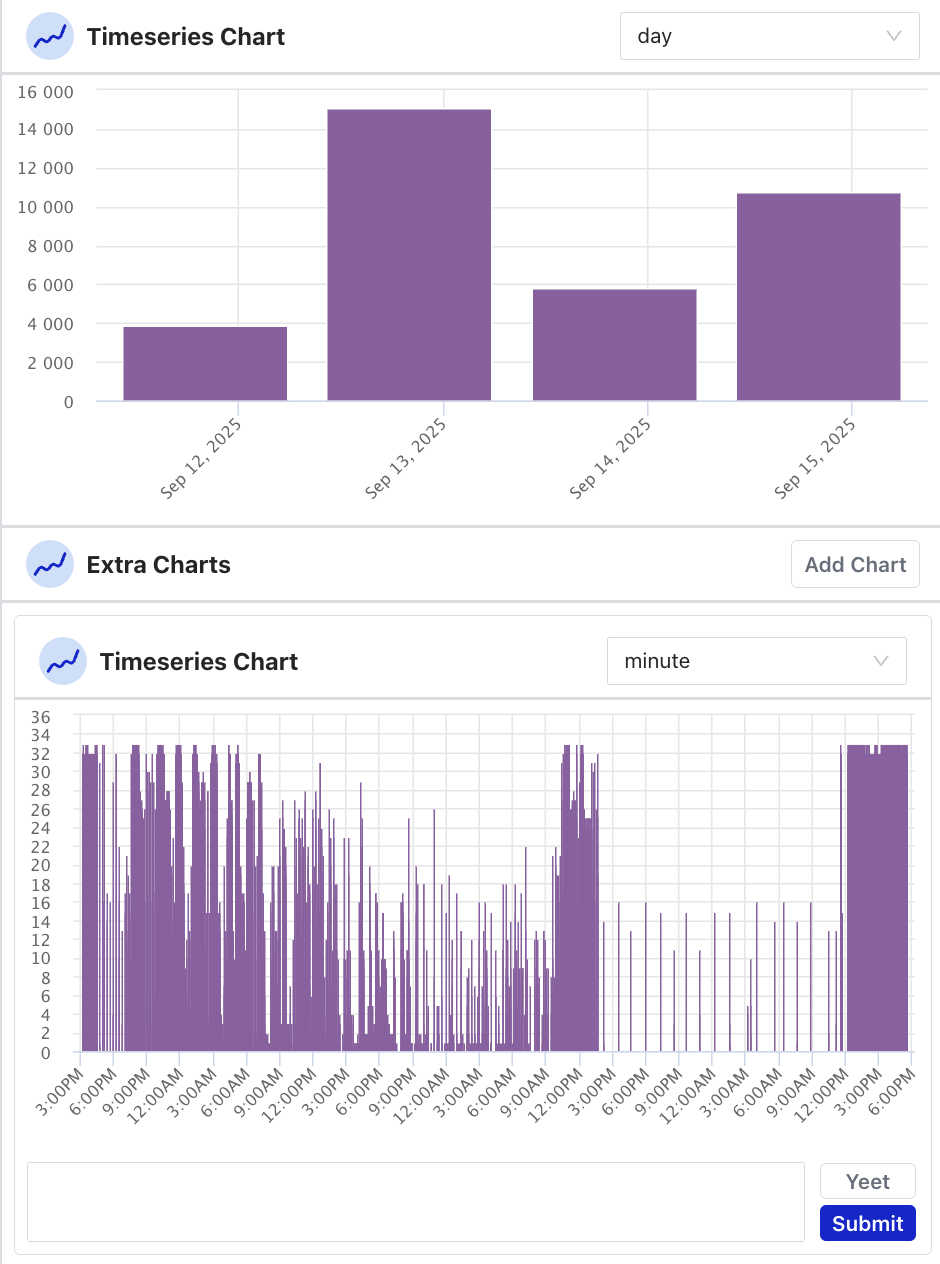
可以加入更多 timeseries charts,並排比較不同時間粒度。不再需要的圖表可使用 Yeet 按鈕移除。
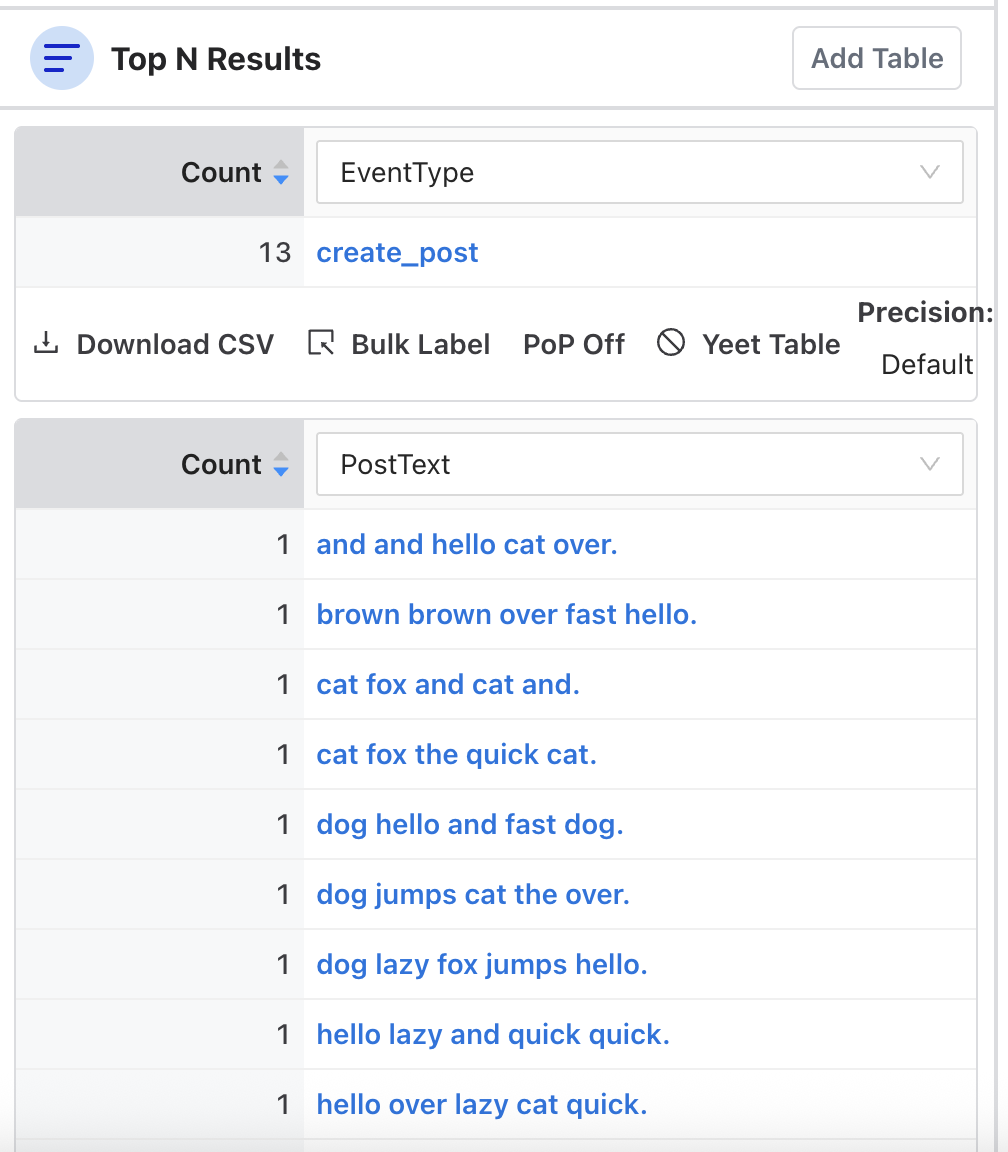
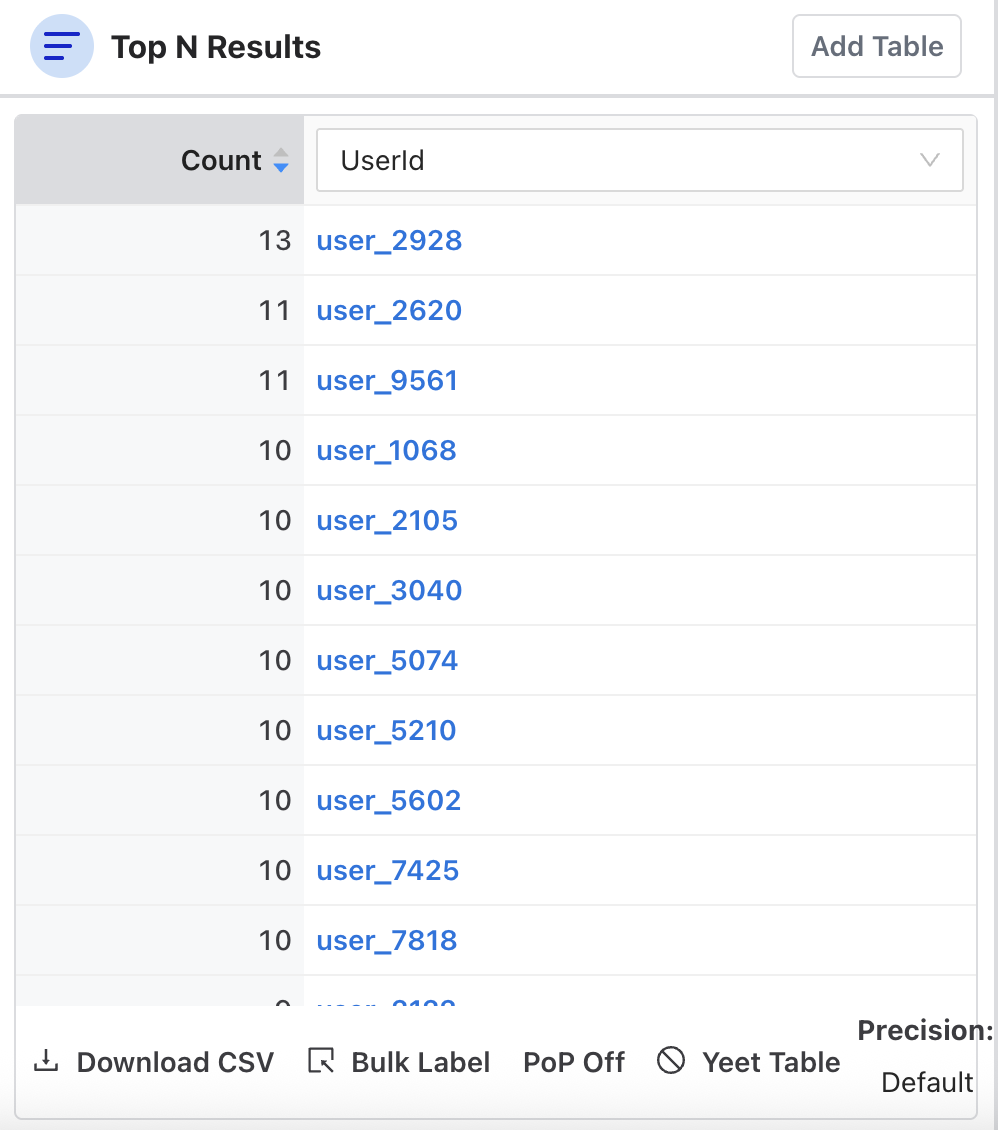
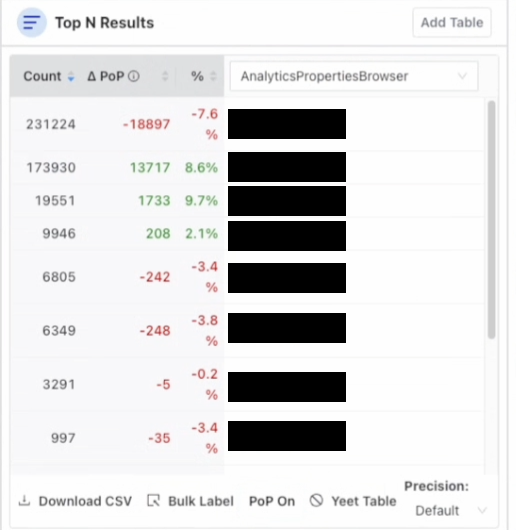
Top N 會以表格呈現目前查詢的最高排名結果,並依選擇的 dimension 分組。可以執行下列操作。
- 新增或移除 dimension columns
- 使用 Precision 調整顯示的結果數量
- 開啟 PoP,也就是 period over period,將目前結果與過去的時間區間比較並查看差值
- 將表格匯出為 CSV
- 使用 Yeet Table 按鈕移除表格
Event Stream
右側面板是 Osprey 的即時動態,會近乎即時顯示符合目前查詢條件的個別 Events,也可以用來搜尋歷史 Events。
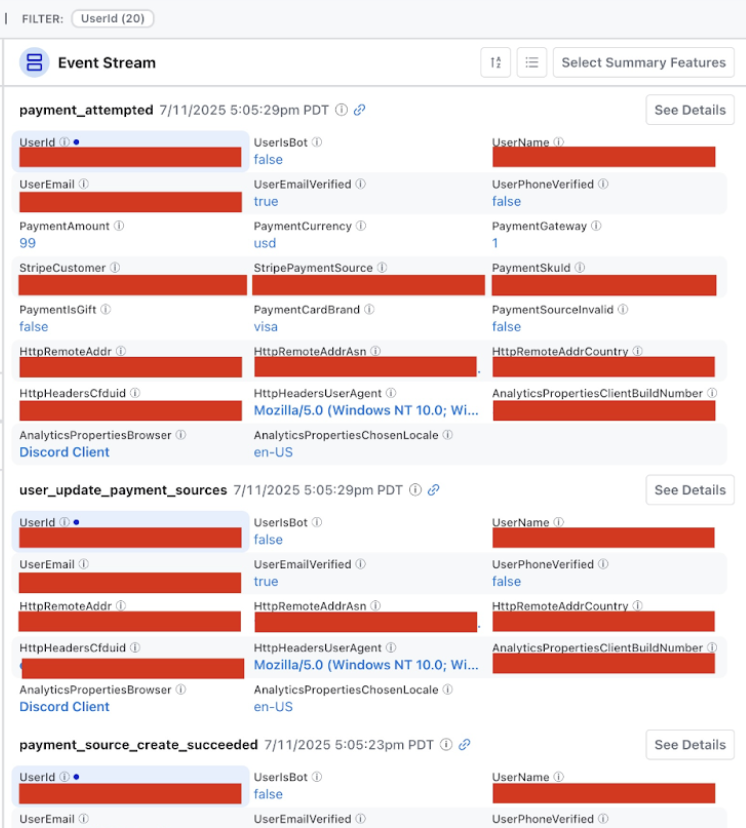
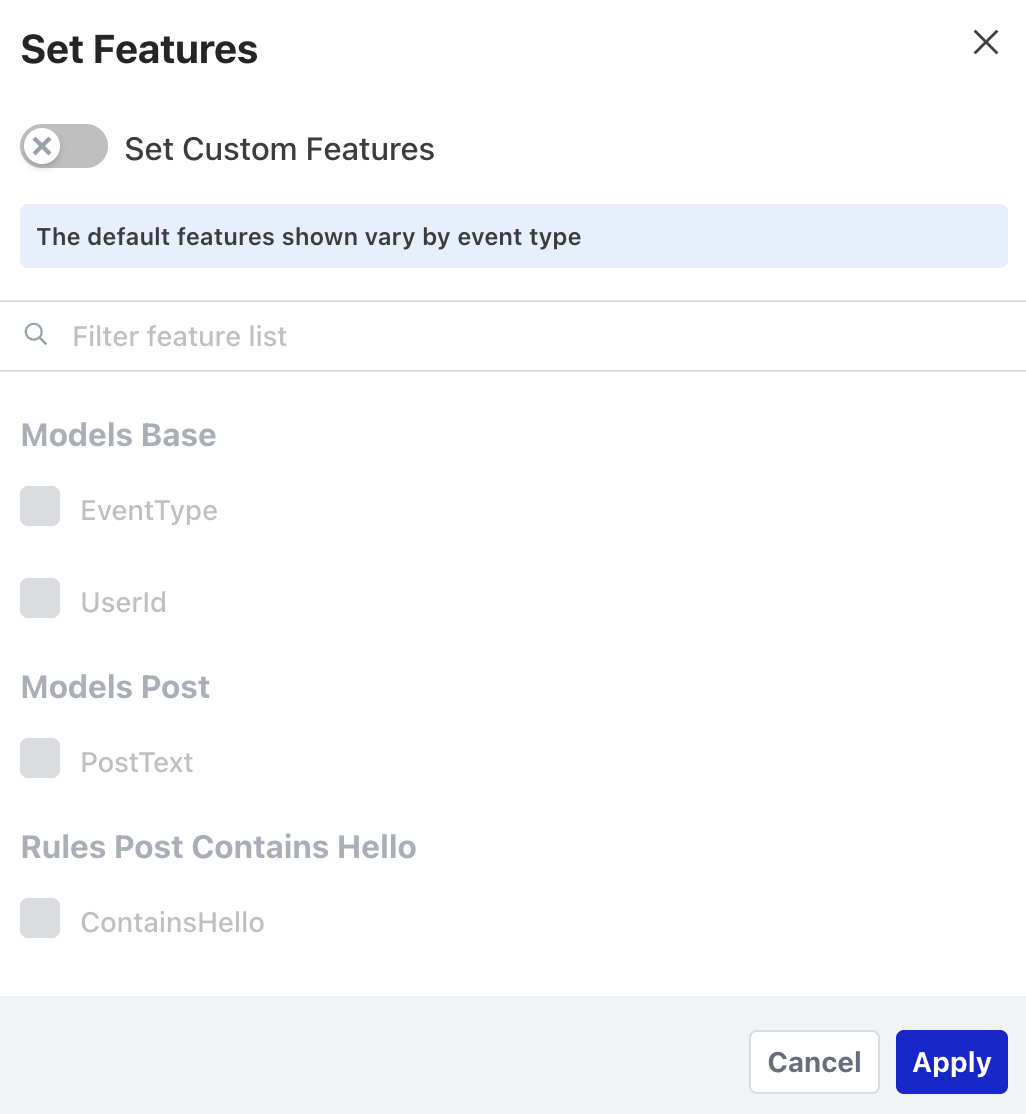
Event Stream 可以用卡片或清單格式顯示。首次載入時,每張 event 卡片會顯示所有擷取的 Features;若該 event type 已設定 summary Features,則顯示這些摘要欄位。因此,即使尚未完成其他設定,Event Stream 仍可直接使用。透過 Select Summary Features,可以自訂各 event 顯示的欄位,配合不同團隊成員關注的 metadata。
在 Event Stream 選取 user ID 或 IP address 等 Entity,會開啟 Entity Details 檢視。按住 Ctrl,macOS 使用 ⌘ Cmd,同時點選即可選取多個 Events 進行批次 Label 操作。
選取 event 後,會開啟 /events/:eventId 的詳細資料檢視,顯示該 event 擷取的所有 Feature values。
查詢歷史
執行的每個查詢都會自動儲存至歷史紀錄。
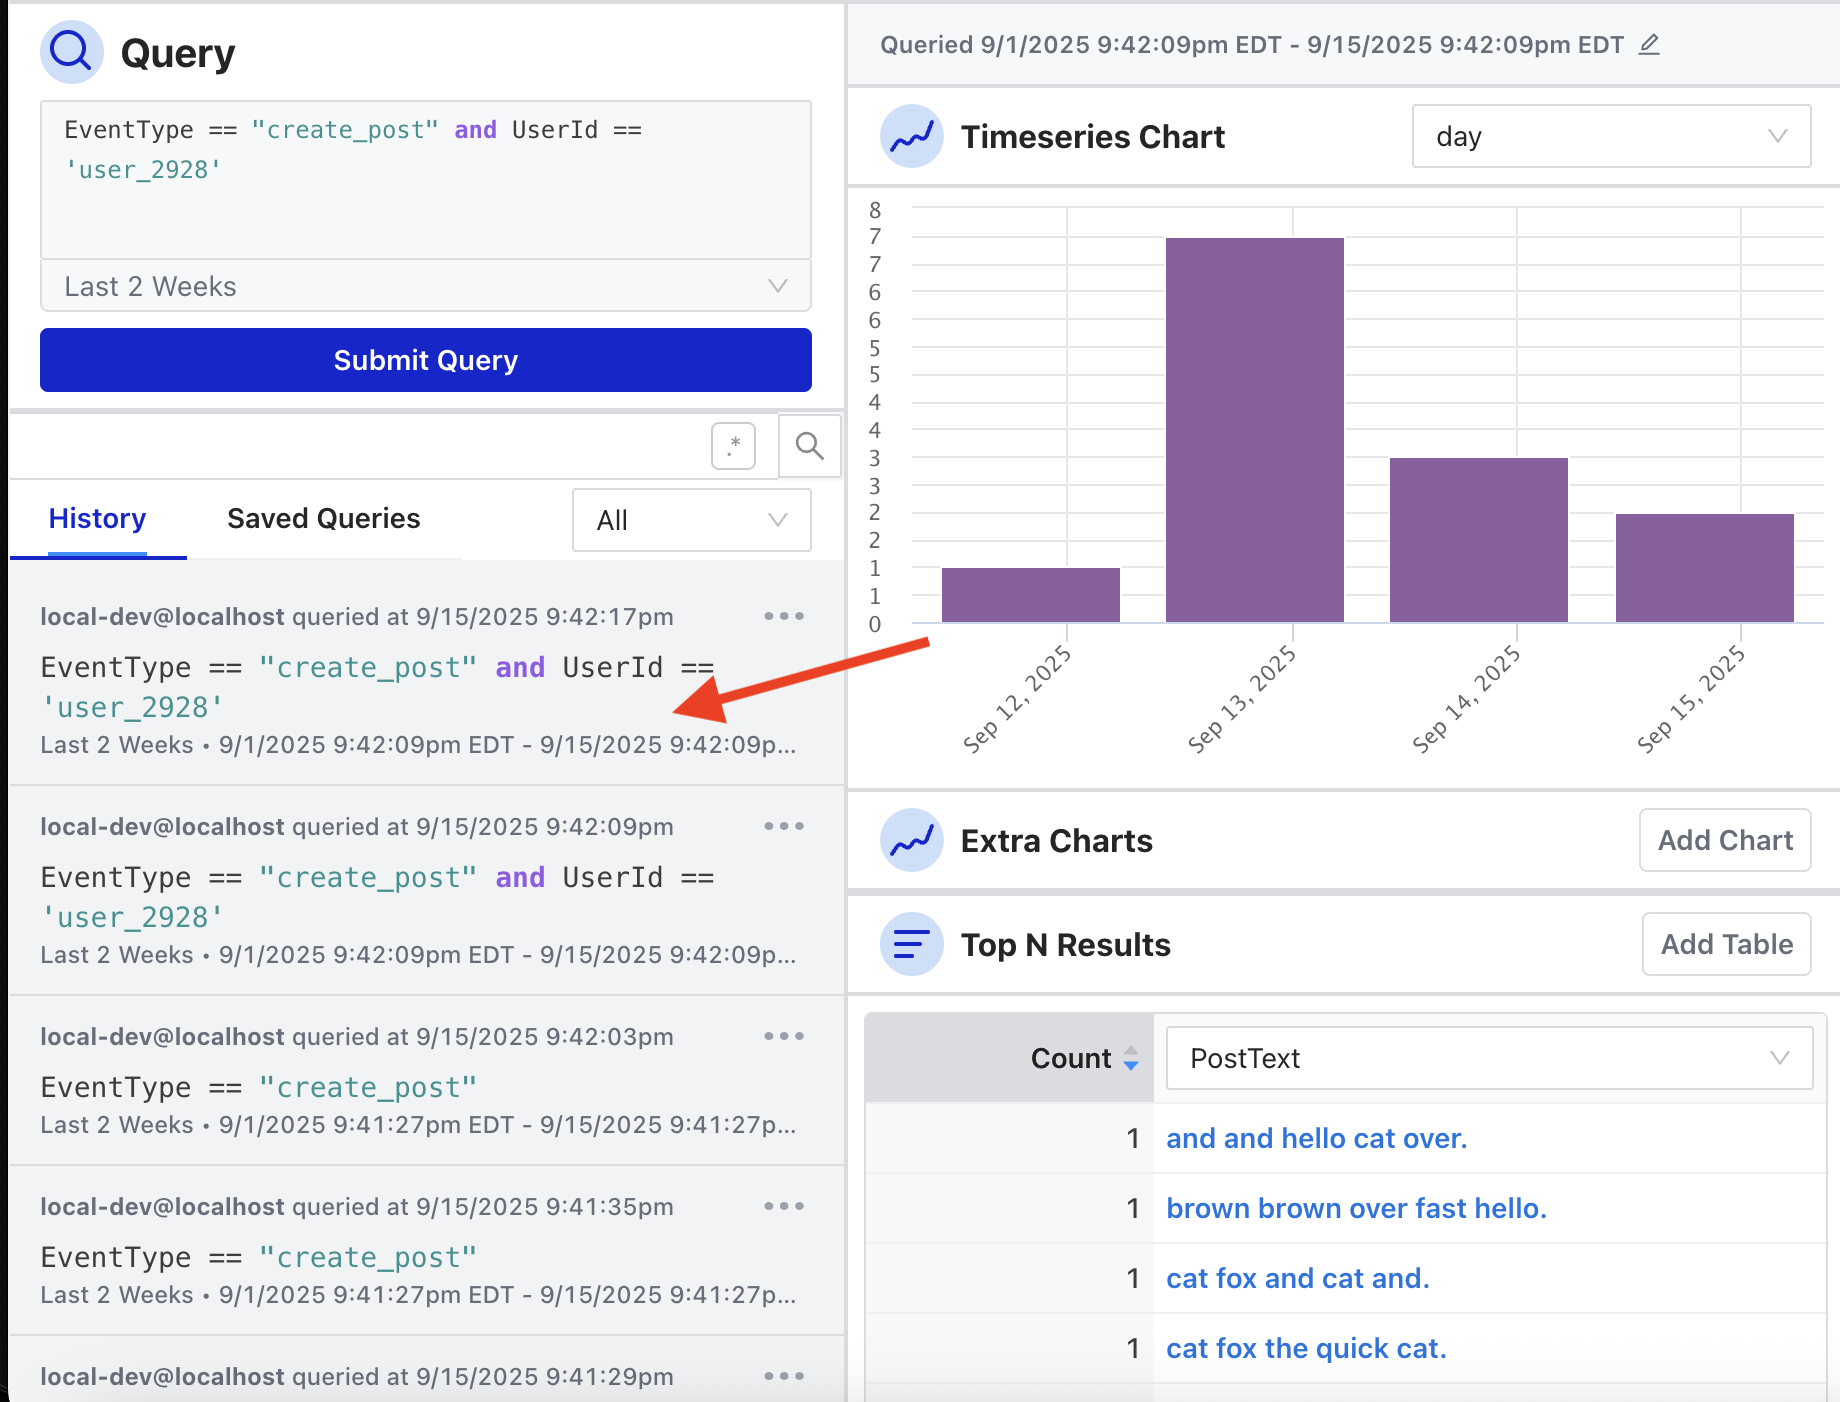
將游標停在側欄中的查詢上方,可以看到該次 session 使用的 Top N dimensions。
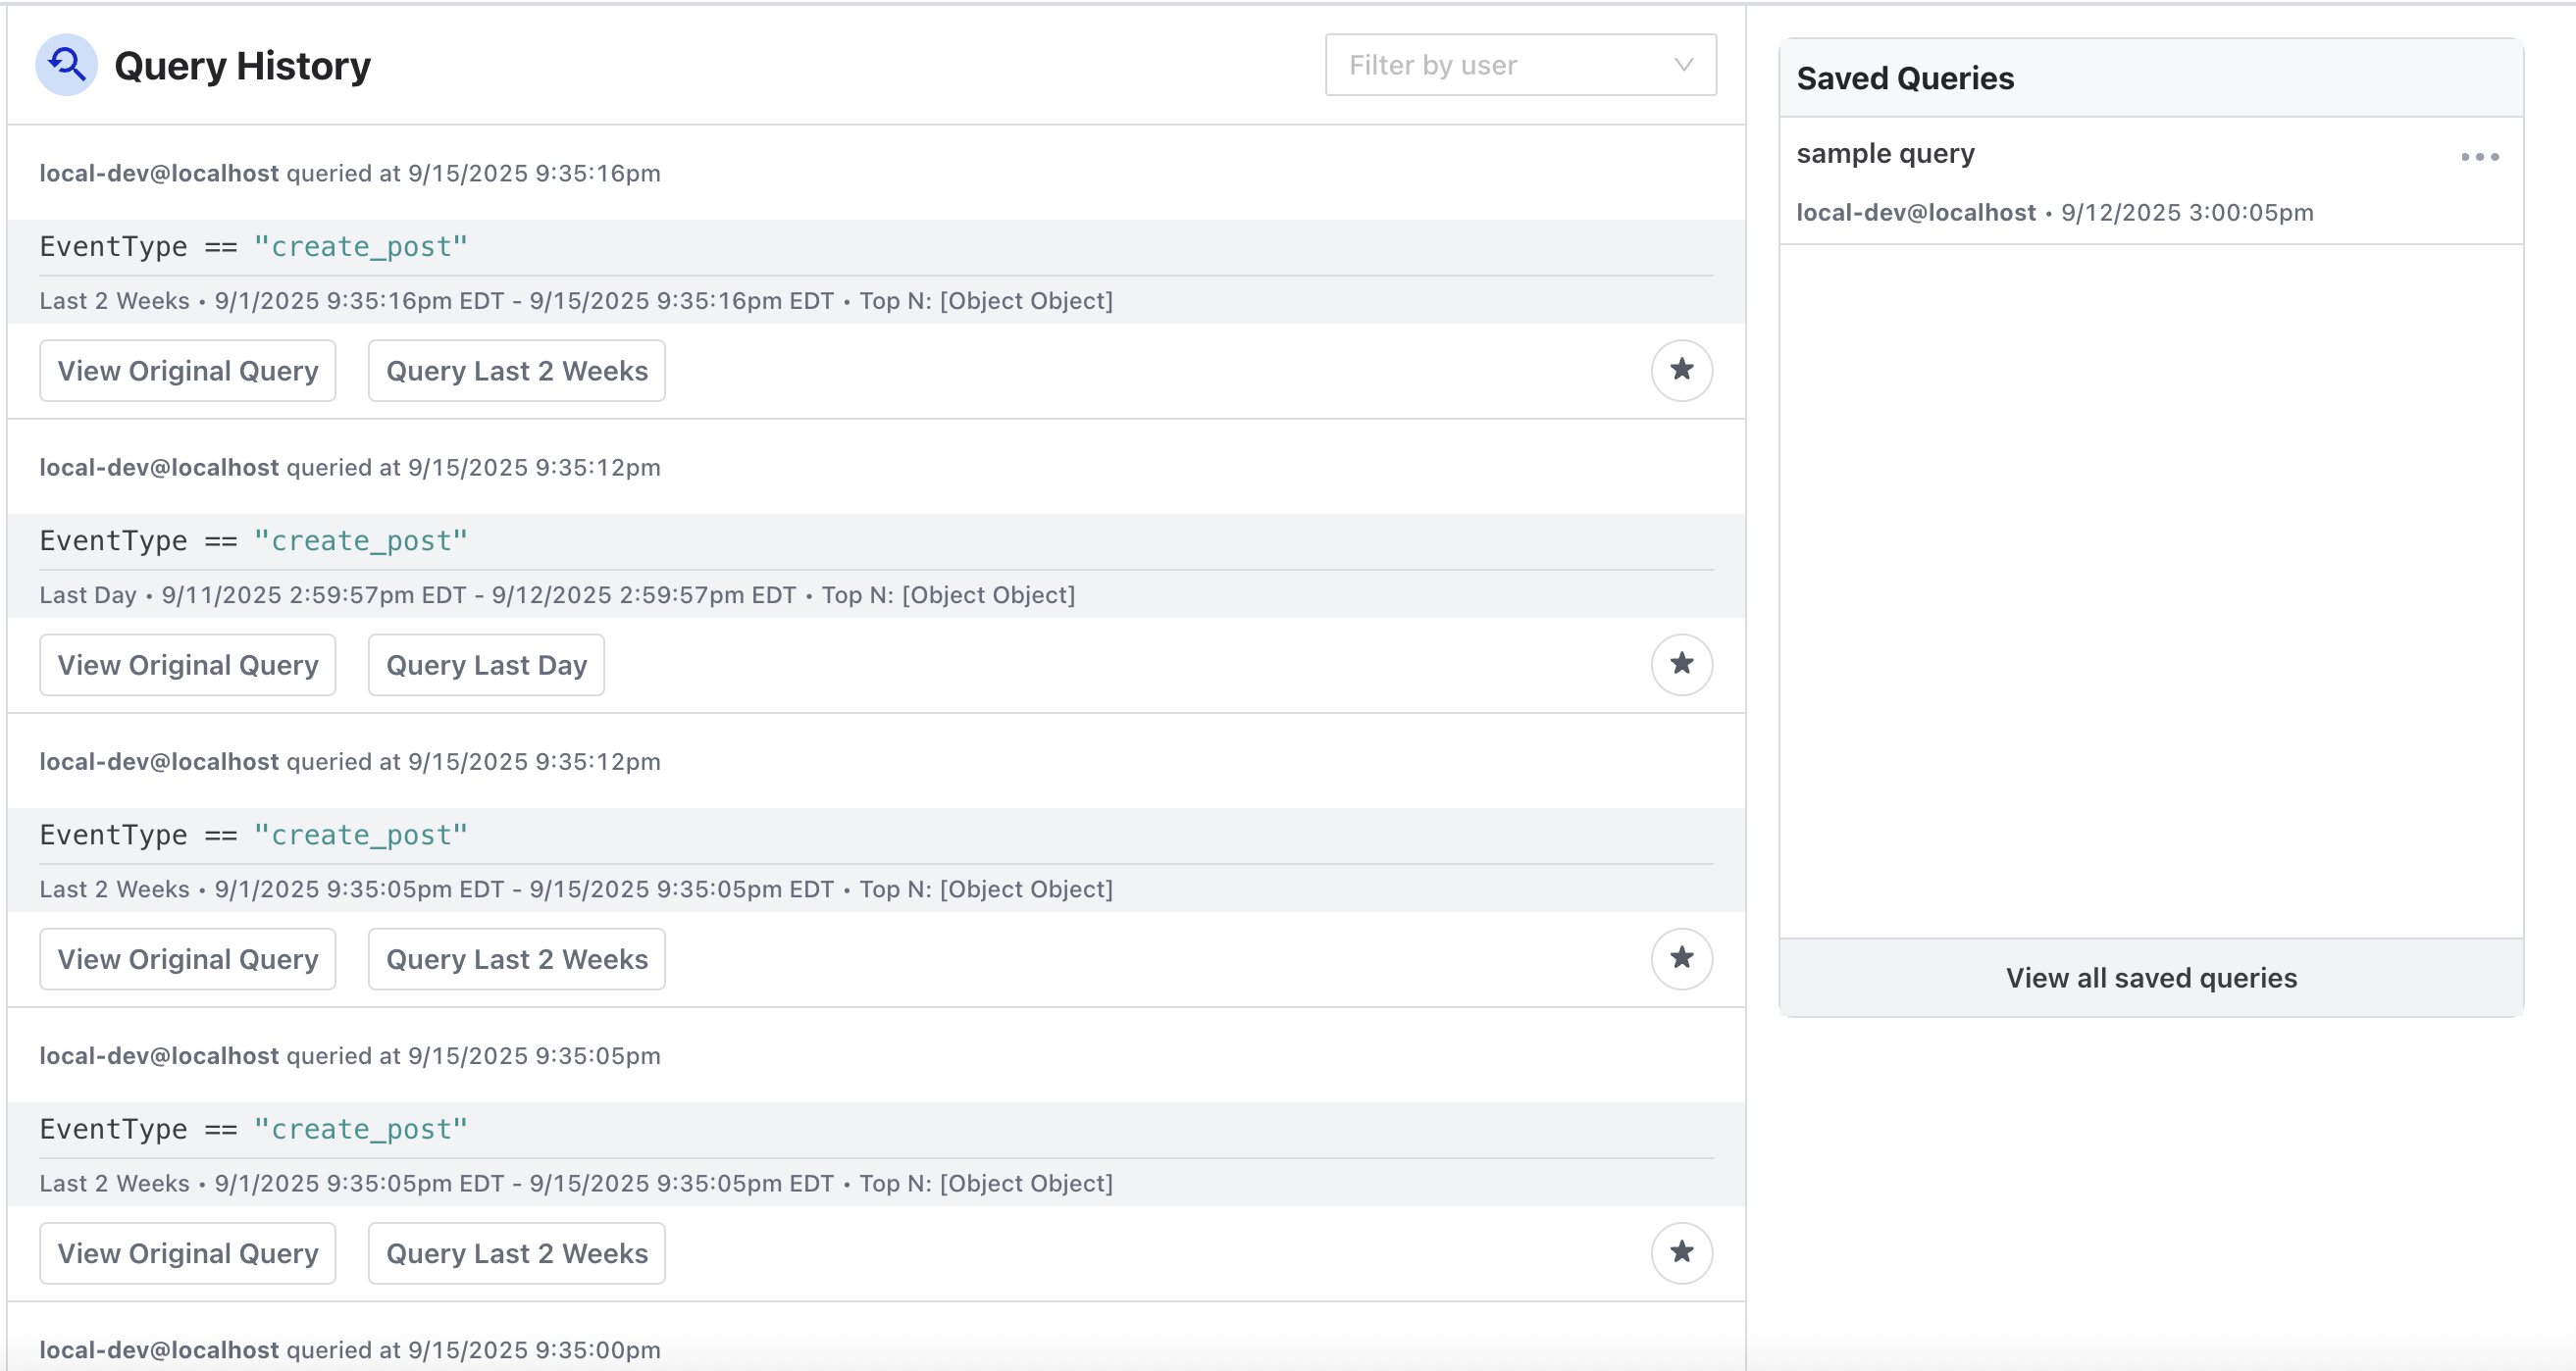
從側欄進入完整 Query History 頁面,可以看到整個團隊執行過的可搜尋查詢清單。可依使用者電子郵件篩選、查看原始查詢文字,並使用原本執行時的時間範圍重新執行過去的查詢。
已儲存查詢
經常重複使用的查詢可以命名並儲存。
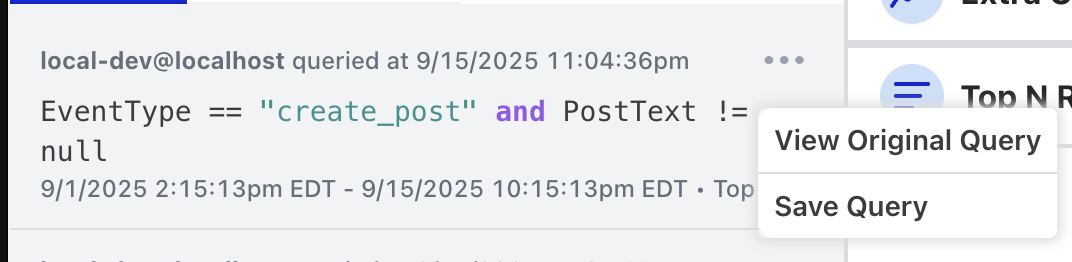
從側欄進入 Saved Queries 頁面,可以看到所有已儲存查詢、查詢文字、儲存者及儲存時間,並能依使用者電子郵件篩選。
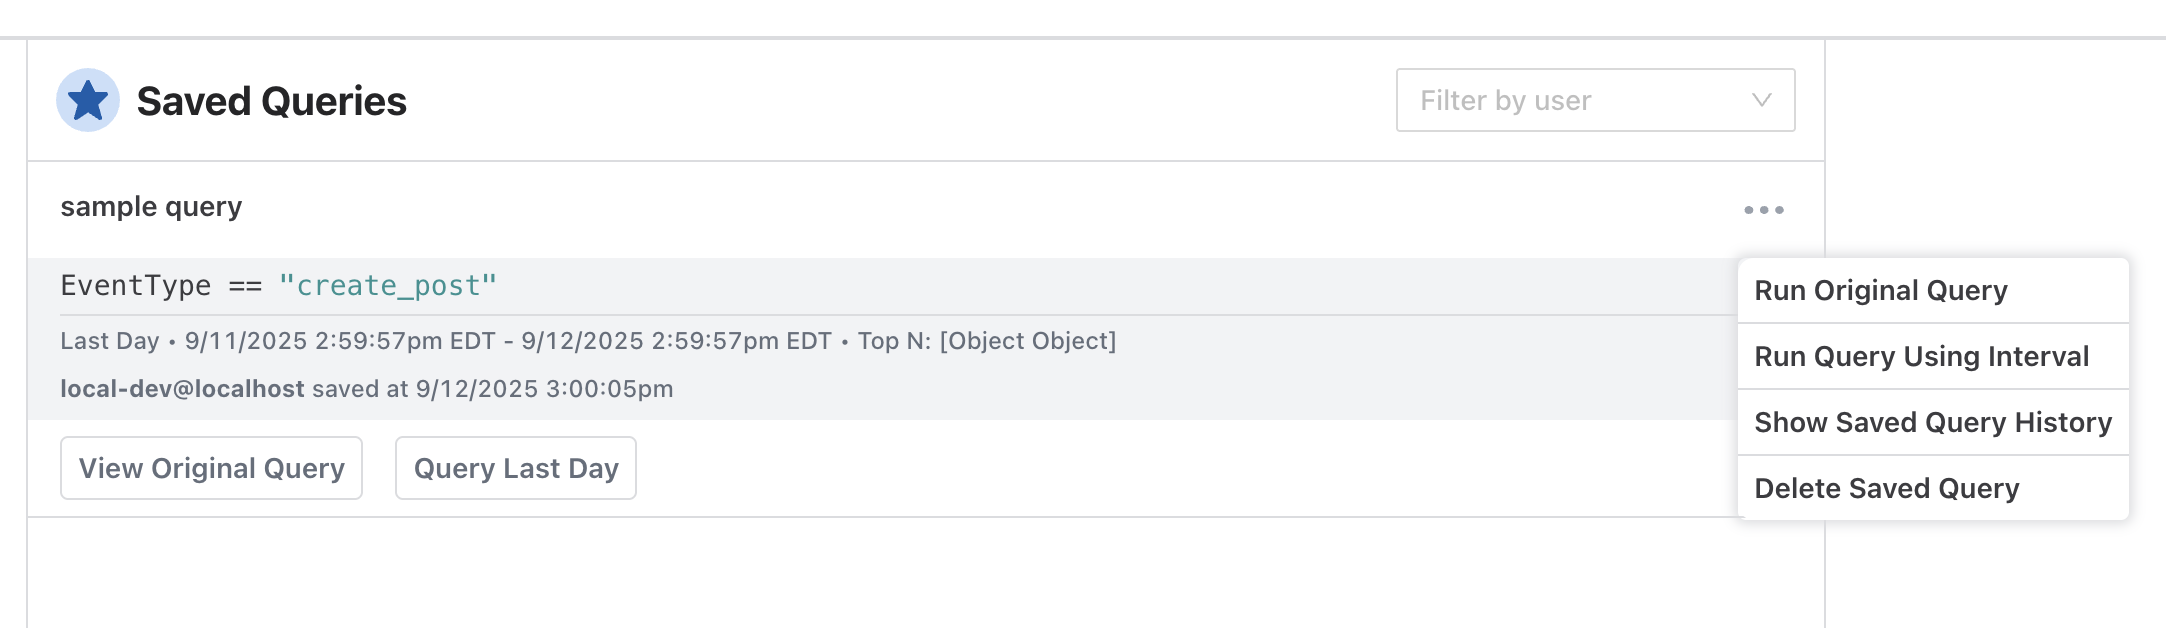
每個已儲存查詢的選單提供下列功能。
- Run Original Query 以原本的時間範圍重新執行
- Run Query Using Interval 以儲存的區間,例如 Last Day,相對於目前時間執行
- Show Saved Query History 查看過去的執行紀錄
- Delete Saved Query 在確認後刪除已儲存查詢
若要重新命名已儲存查詢,先執行查詢,再選取 Query 頁面名稱旁的編輯圖示。
已儲存查詢也有直接 URL。/saved-query/:savedQueryId/latest 會自動載入並執行該查詢。
Labels
Labels 是套用於 Entities 的註記,適用對象包括使用者、IP addresses、電子郵件及其他受追蹤物件。Labels 連接人工判斷與 Osprey 自動規則系統;手動套用的 Label 可以成為 Rules 的依據,讓 Rules 自動處理後續 Events。
Labels 分成三種 connotations。
- Negative 有害或有問題,例如
spammer、bot、banned、suspicious - Positive 受信任或已驗證,例如
verified、trusted、premium_user - Neutral 提供資訊,例如
new_user、from_mobile、beta_tester
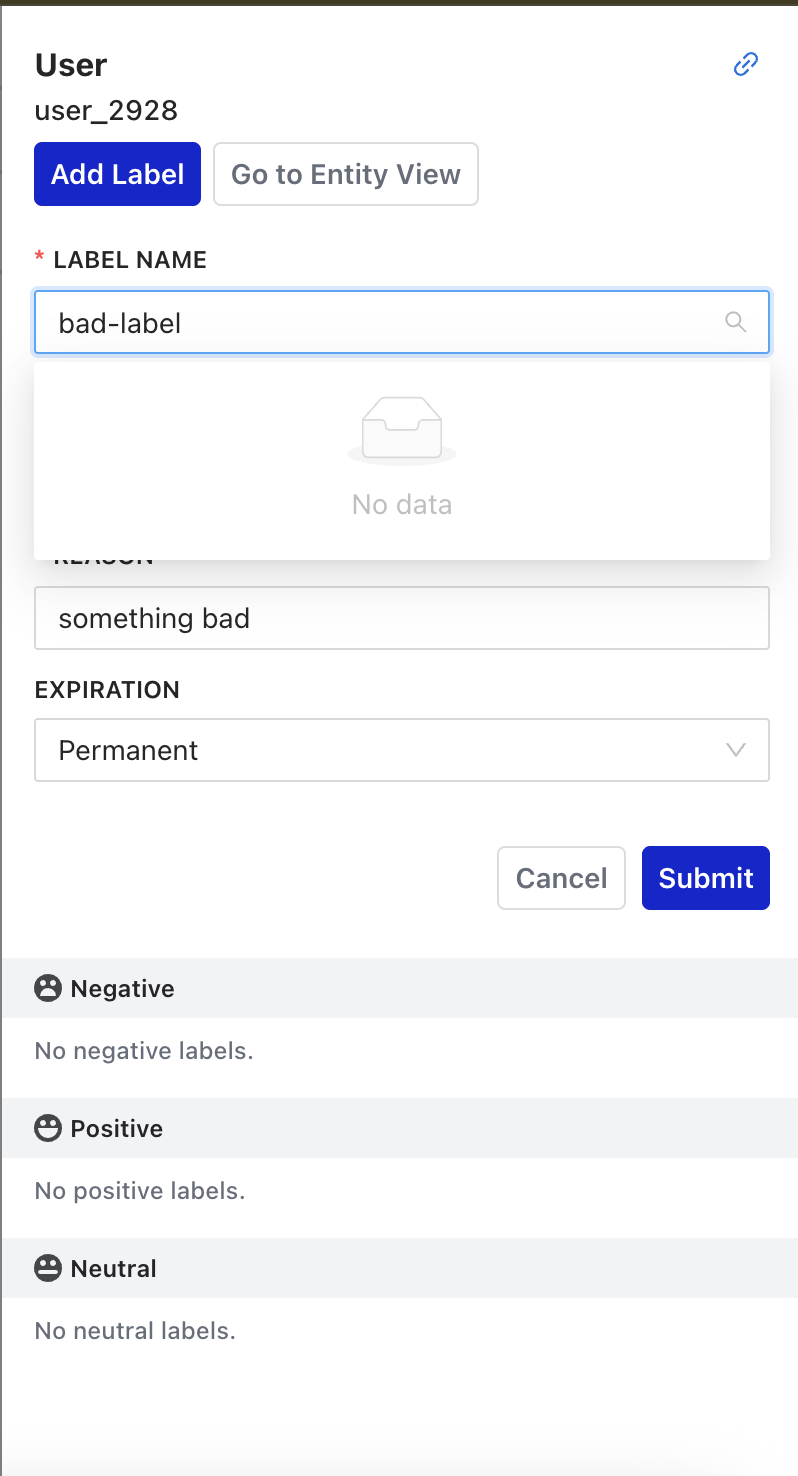
每次套用 Label 時都必須提供原因。
Entity Details
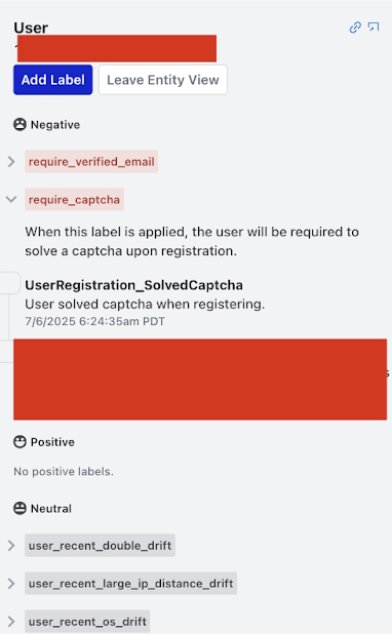
在介面任何位置選取 Entity,都會進入 Entity 檢視,並依 Label 名稱分組顯示曾套用於該 Entity 的所有 Labels。
每筆 Label 紀錄會顯示下列資訊。
- Label value 與 type
- Label 是由 Rule 自動套用、手動套用,或透過批次 action 套用
- 提供的原因
- 套用者與套用時間
手動新增
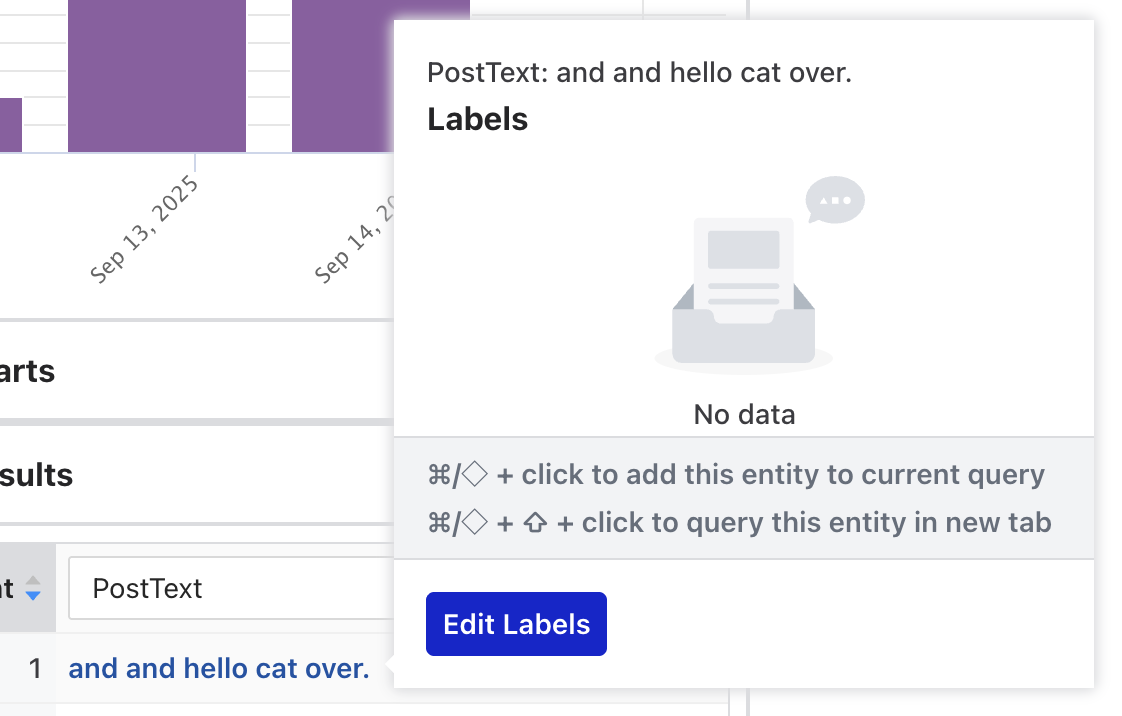
在 Top N 表格中,將游標停在 Entity row 上方,再選取 Edit Labels。
在 Event Stream 中選取任一 Entity,可以開啟該 Entity 的 Label drawer。
Labels 的其他使用方式請見英文官方文件的撰寫規則與 Labels章節。
治理提醒
Labels 可能持續影響後續自動判斷。正式導入時應限制存取權限、記錄套用原因、設定必要的保存或到期規則,並提供誤標修正與複核方式。
查詢語法
Osprey 使用 SML 進行查詢。SML 全名為 Some Madeup Language,是加入額外限制的 Python 子集。查詢會比對 Features,也就是 Rules 從每個 event 擷取的具名值,其中包含 Entities 與 Labels。若尚不熟悉這些術語,請先閱讀基本概念。
基本比較
EventType == "create_post"
UserId == 12345
MessageText != None
組合條件
# AND: all conditions must match
EventType == "user_login" and LoginAttempts >= 3

# OR: any condition may match
(UserId == 123) or (UserId == 456)

# in: match any value in a list
EventType in ["create_post", "send_message"]
查詢函式
查詢支援一組固定且數量不多的 built-in functions。Rules 使用的 UDFs 可以透過 Plugins 擴充,但查詢函式不會隨著新增 Plugins 增加。
RegexMatch(target=..., pattern=...)使用 regular expression 比對 FeatureDidAddLabel(...)與DidRemoveLabel(...)比對新增或移除 Label 的 Events,詳見 Label 查詢DidDeclareVerdict(...)比對宣告 Verdict 的 Events
# Regex match against a feature
RegexMatch(target=MessageText, pattern="(buy|sell|deal)")
Note
查詢只能使用上述函式。UDF Registry 會列出所有 UDFs,但大多數只能用於 Rules。若在查詢中使用這些 UDFs,目前會發生沒有可見訊息的 500 error。
Label 查詢
查詢介面搜尋的是 Events,不是 Entity 目前的狀態,因此無法在此使用 HasLabel()。請改用 DidAddLabel(),比對曾新增 Label 的 Events。
# Find events that added a specific label
DidAddLabel(entity_type="User", label_name="likely_spammer")
DidAddLabel(entity_type="IpAddress", label_name="suspicious")
查詢範例
# Suspicious login attempts
EventType == "user_login" and LoginAttempts >= 5

# Posts matching a pattern
EventType == "create_post" and RegexMatch(target=PostContent, pattern="urgent")

# Users who were flagged
DidAddLabel(entity_type="User", label_name="flagged")

# Complex: messages matching a pattern, from users without a verified label
EventType == "send_message" and
RegexMatch(target=MessageText, pattern="(click|link|urgent)") and
not DidAddLabel(entity_type="User", label_name="verified")
查詢可能包含 user IDs、IP addresses、電子郵件、事件內容或調查策略。分享 URL、匯出結果及保存查詢時,應依最小必要原則處理,避免將敏感參數帶入不受控的記錄或通訊管道。
管理
「管理」區可以查看 Osprey 設定,包括支援偵測的 Rules 與 Features、查詢及 Rule 作者可以使用的函式,以及理解各部分如何連接的工具。
Rules Visualizer
Rules Visualizer 以 dependency graph 顯示 Rules 與 Labels 之間的關係,可用來理解套用某個 Label 後會觸發哪些項目,或產生某個 Label 前必須符合哪些條件。
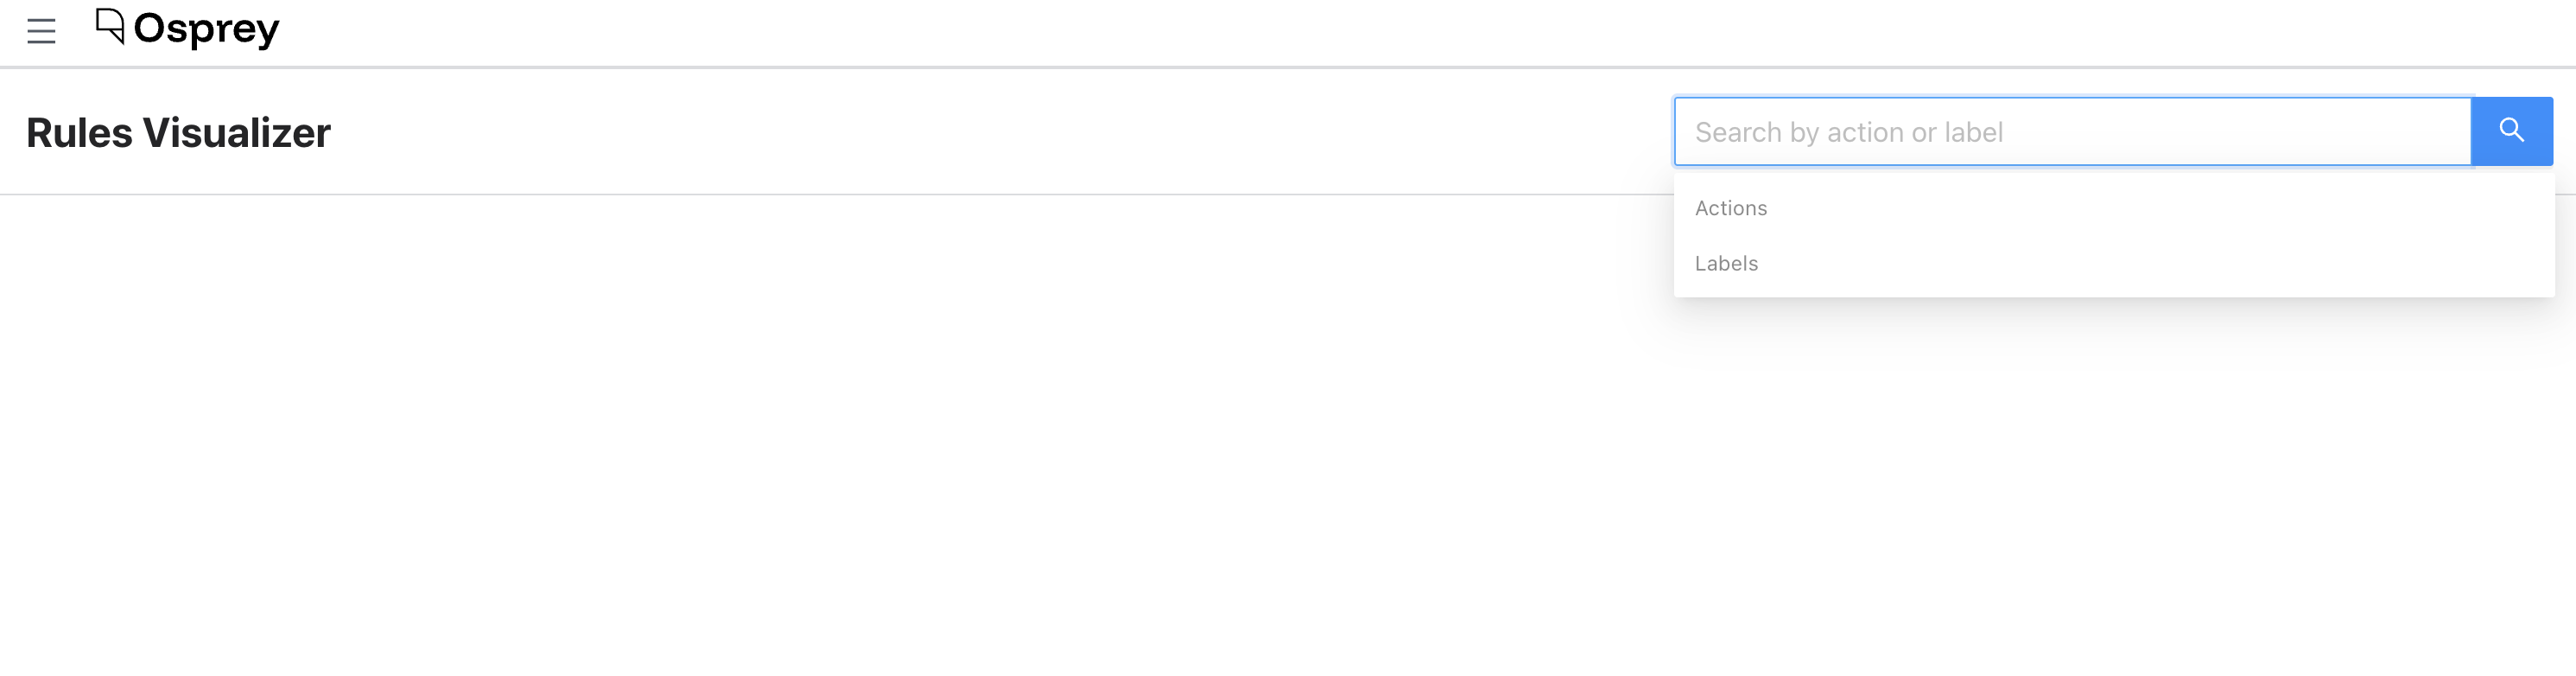
在搜尋框尋找 Action 或 Label 後,介面會顯示所選項目的 upstream 與 downstream 關係圖。兩個方向的顯示可以分別開啟或關閉。
圖中的 node types 如下。
- 紅色橢圓 位於 Rule upstream 的 Label,也就是輸入條件
- 藍色矩形 Rule
- 綠色橢圓 位於 Rule downstream 的 Label,也就是輸出
將游標停在 node 上方,可以看到來源檔案路徑。關係圖支援縮放及平移,方便瀏覽大型 dependency trees。
UDF Registry
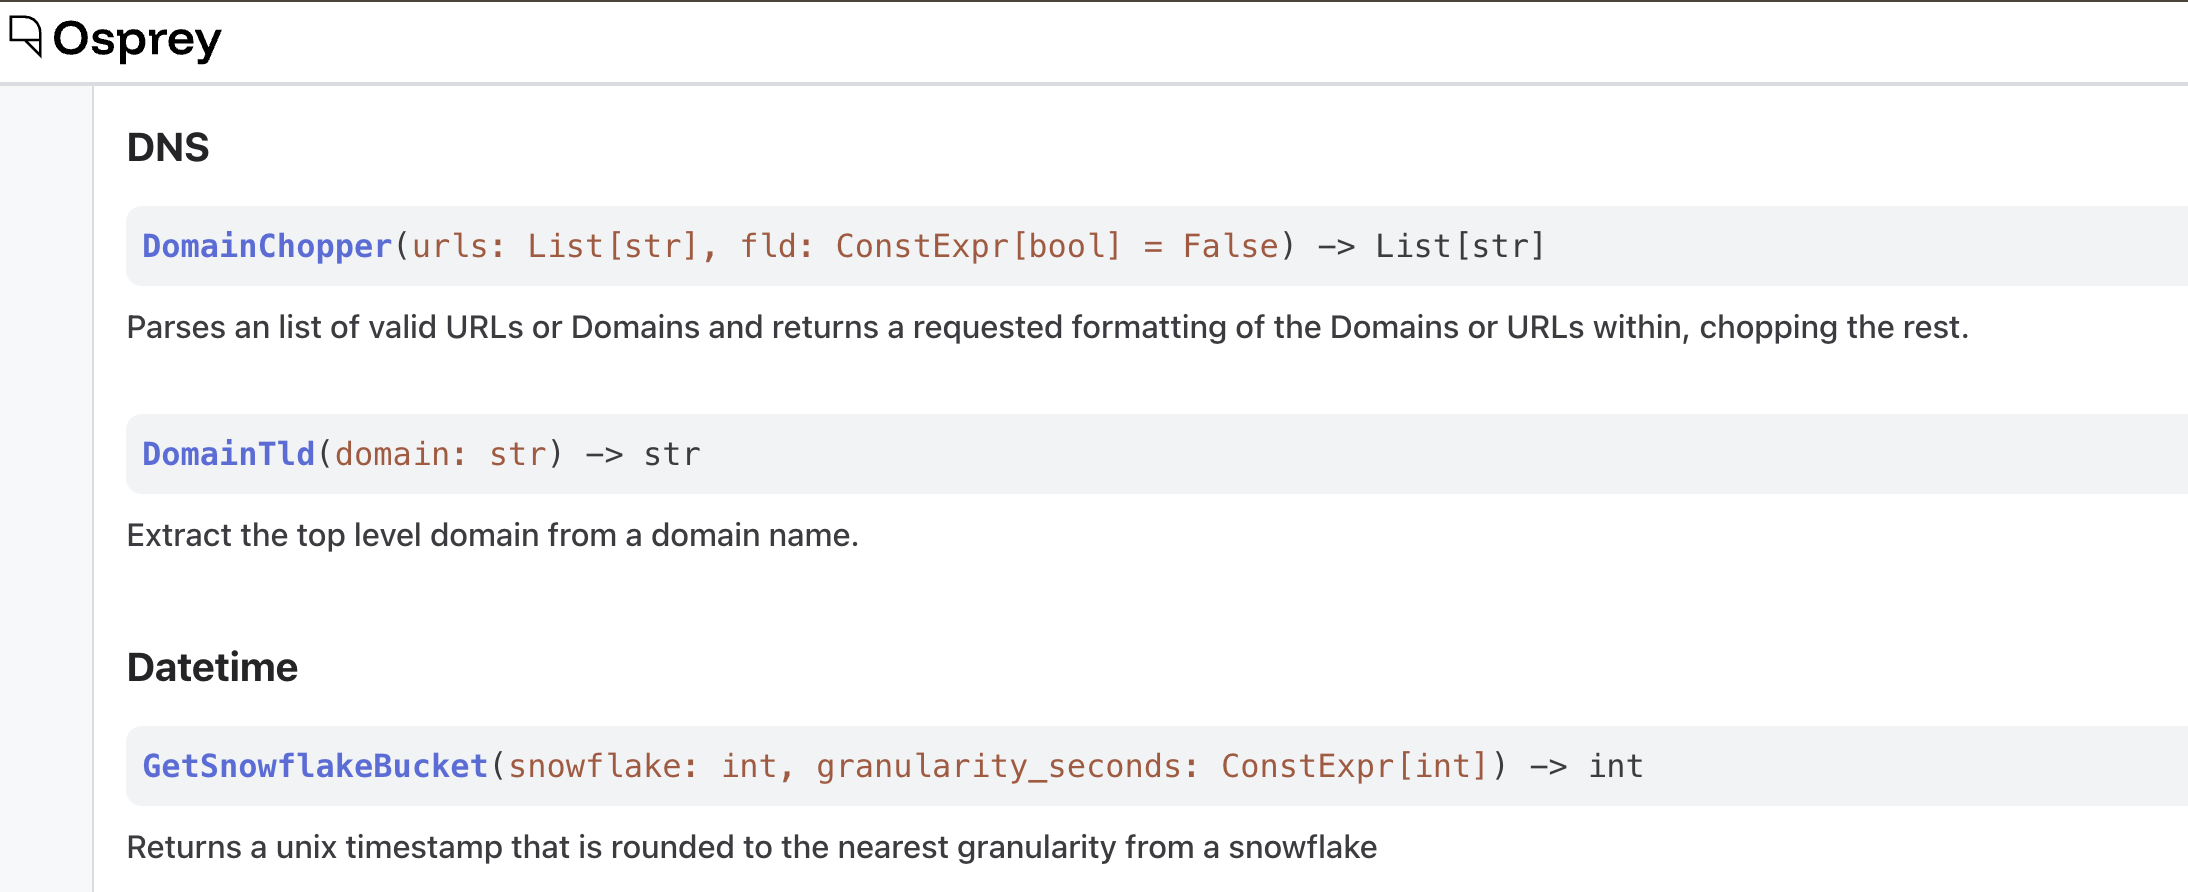
UDF Registry 是 Osprey 中所有使用者自訂函式 UDFs 的自動產生 API 參考。程式碼新增或修改 UDFs 後,內容會動態更新,因此能反映實際可用項目。
UDFs 依類別整理並支援搜尋。每筆項目包含下列資訊。
- 具有 syntax highlighting 的 function signature
- 函式功能說明
- Parameter names、types 與說明
- Return type
撰寫 Rules 時,可用這個頁面確認函式的確切名稱與 parameter order。大多數 UDFs 只能用於 Rules。查詢輸入框只支援 RegexMatch、DidAddLabel、DidRemoveLabel 與 DidDeclareVerdict 四個函式,目前在查詢中使用其他 UDF 會發生沒有可見訊息的 500 error。
Features Registry
Features Registry 列出 Osprey 部署環境中定義的每個 Feature。Features 是從 Events 擷取的具名變數,也是查詢與 Rules 操作的對象。
清單每頁顯示 50 筆,並提供下列篩選及排序方式。
- Search 依名稱、類別或說明篩選
- Category filter 限制為特定 Feature 類別
- Extraction function filter 限制為使用特定 extraction function 的 Features
- Unused only 只顯示未被任何 Rule 參照的 Features
- Sort 依名稱、最多參照或最少參照排序
每一列會顯示 Feature name、category、extraction functions、reference count,也就是使用該 Feature 的 Rules 數量,以及 description、owner 與 last modified date。
Rules Registry
Rules Registry 列出 Osprey 部署環境中載入的每個 Rule。
清單每頁顯示 50 筆,並提供下列篩選及排序方式。
- Search 依名稱、來源檔案或說明篩選
- Unused only 隱藏被其他 when-Rules 參照的 Rules,只顯示 leaf Rules
- Sort 依名稱、最多參照或最少參照排序
每一列會顯示 Rule name、source file、description、reference count 與來源檔案中的 line number。
操作
「操作」區包含執行批次 Label Jobs 及查看結果的工具。這些操作可能一次影響大量 Entities,因此 Osprey 提供防護措施,協助降低非預期影響。
Bulk Actions
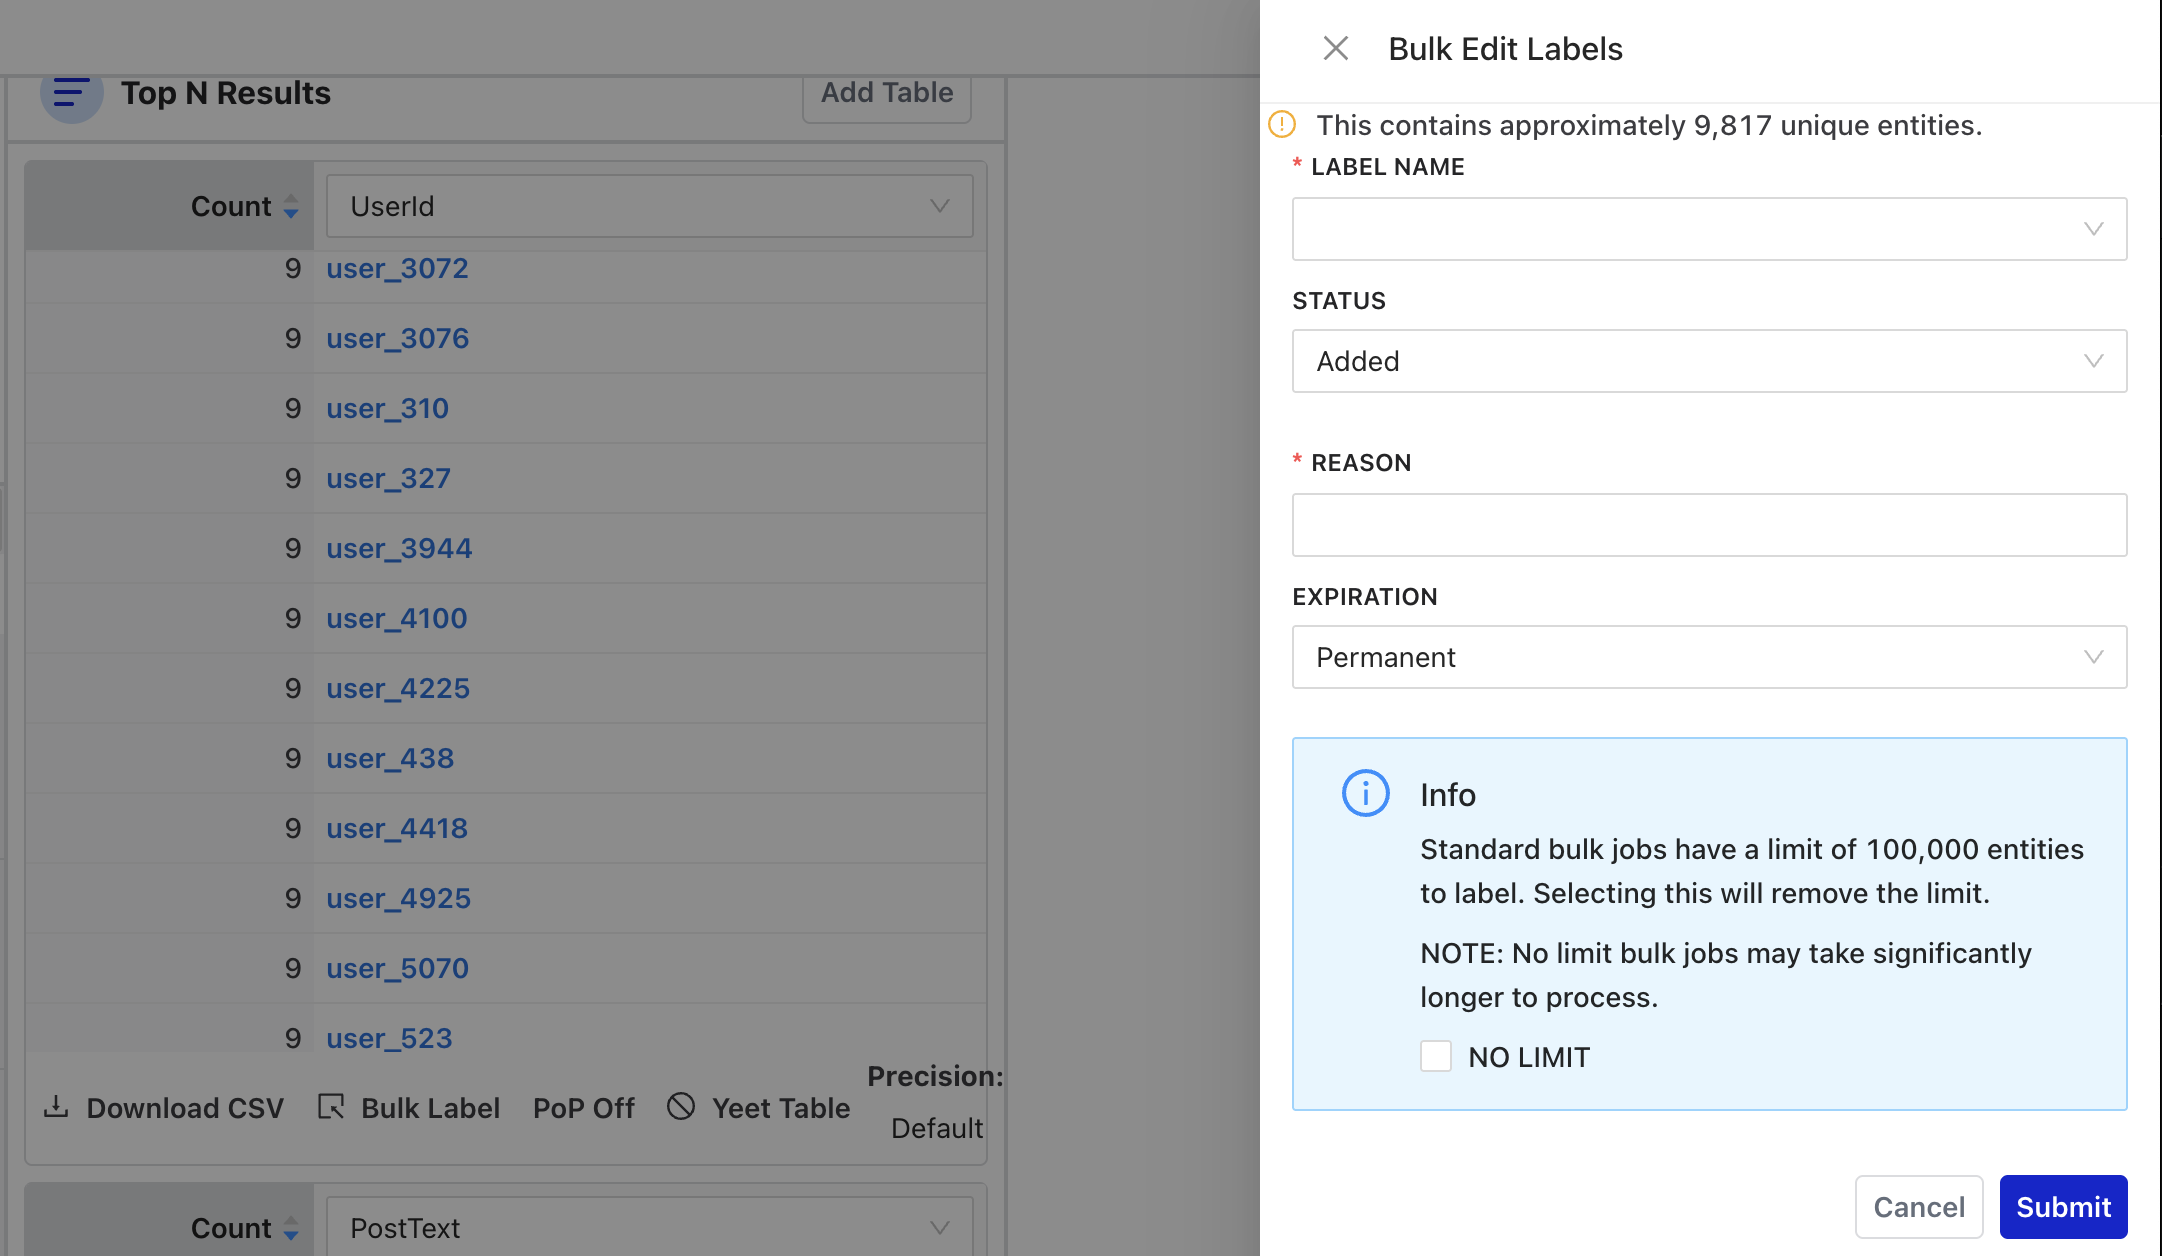
Bulk Actions 可以為符合目前查詢條件的每個 Entity 套用 Label。當團隊已辨識出明確模式,並需要一次處理多個 Entities 時,可以使用這項功能。
Warning
批次 action 的 false positive 可能讓大量 Entities 被錯誤套用 Labels。確認 Job 前,務必先檢查 Entity 數量。
啟動批次 action
有兩種方式可以啟動批次 action。
- 前往 Bulk Actions → Create New Job,從包含 Entities 的上傳檔案建立 Job
- 在 Query 頁面使用圖表欄的 bulk label drawer,系統會自動填入目前 session 的查詢
提交前,Osprey 會顯示即將套用 Label 的 unique Entities 數量。請仔細檢查這個數字,理解批次 action 的影響範圍。
若要從 command line 以 script 或批次方式套用 Labels,例如匯入外部來源的 Label 清單,請參考英文官方文件 CLI Reference 中的
apply_label與bulk_apply_label。
每個 Label Job 包含下列設定。
- 要套用的 Label 及其 status
- 所有 Label 操作都必須提供的原因
- 選填的到期時間
標準批次 Jobs 的上限為 100,000 個 Entities。表單提供核取方塊,可以移除限制以執行更大型的 Jobs。
治理提醒
移除數量上限前,應先使用較小範圍驗證查詢、抽樣檢查 Entities,並確認取消、回復、權限與稽核方式。介面顯示的數量只能協助判斷影響範圍,無法取代複核。
監看 Jobs
Bulk Actions 頁面會以表格列出所有 Jobs,包括 ID、status、progress percentage、建立者及建立時間。仍在執行的 Jobs 會顯示 cancel 按鈕。
頁面會自動輪詢更新,不需要手動重新整理即可看到進度。
Bulk Job History
Bulk Job History 頁面提供過去批次 Jobs 的詳細檢視。
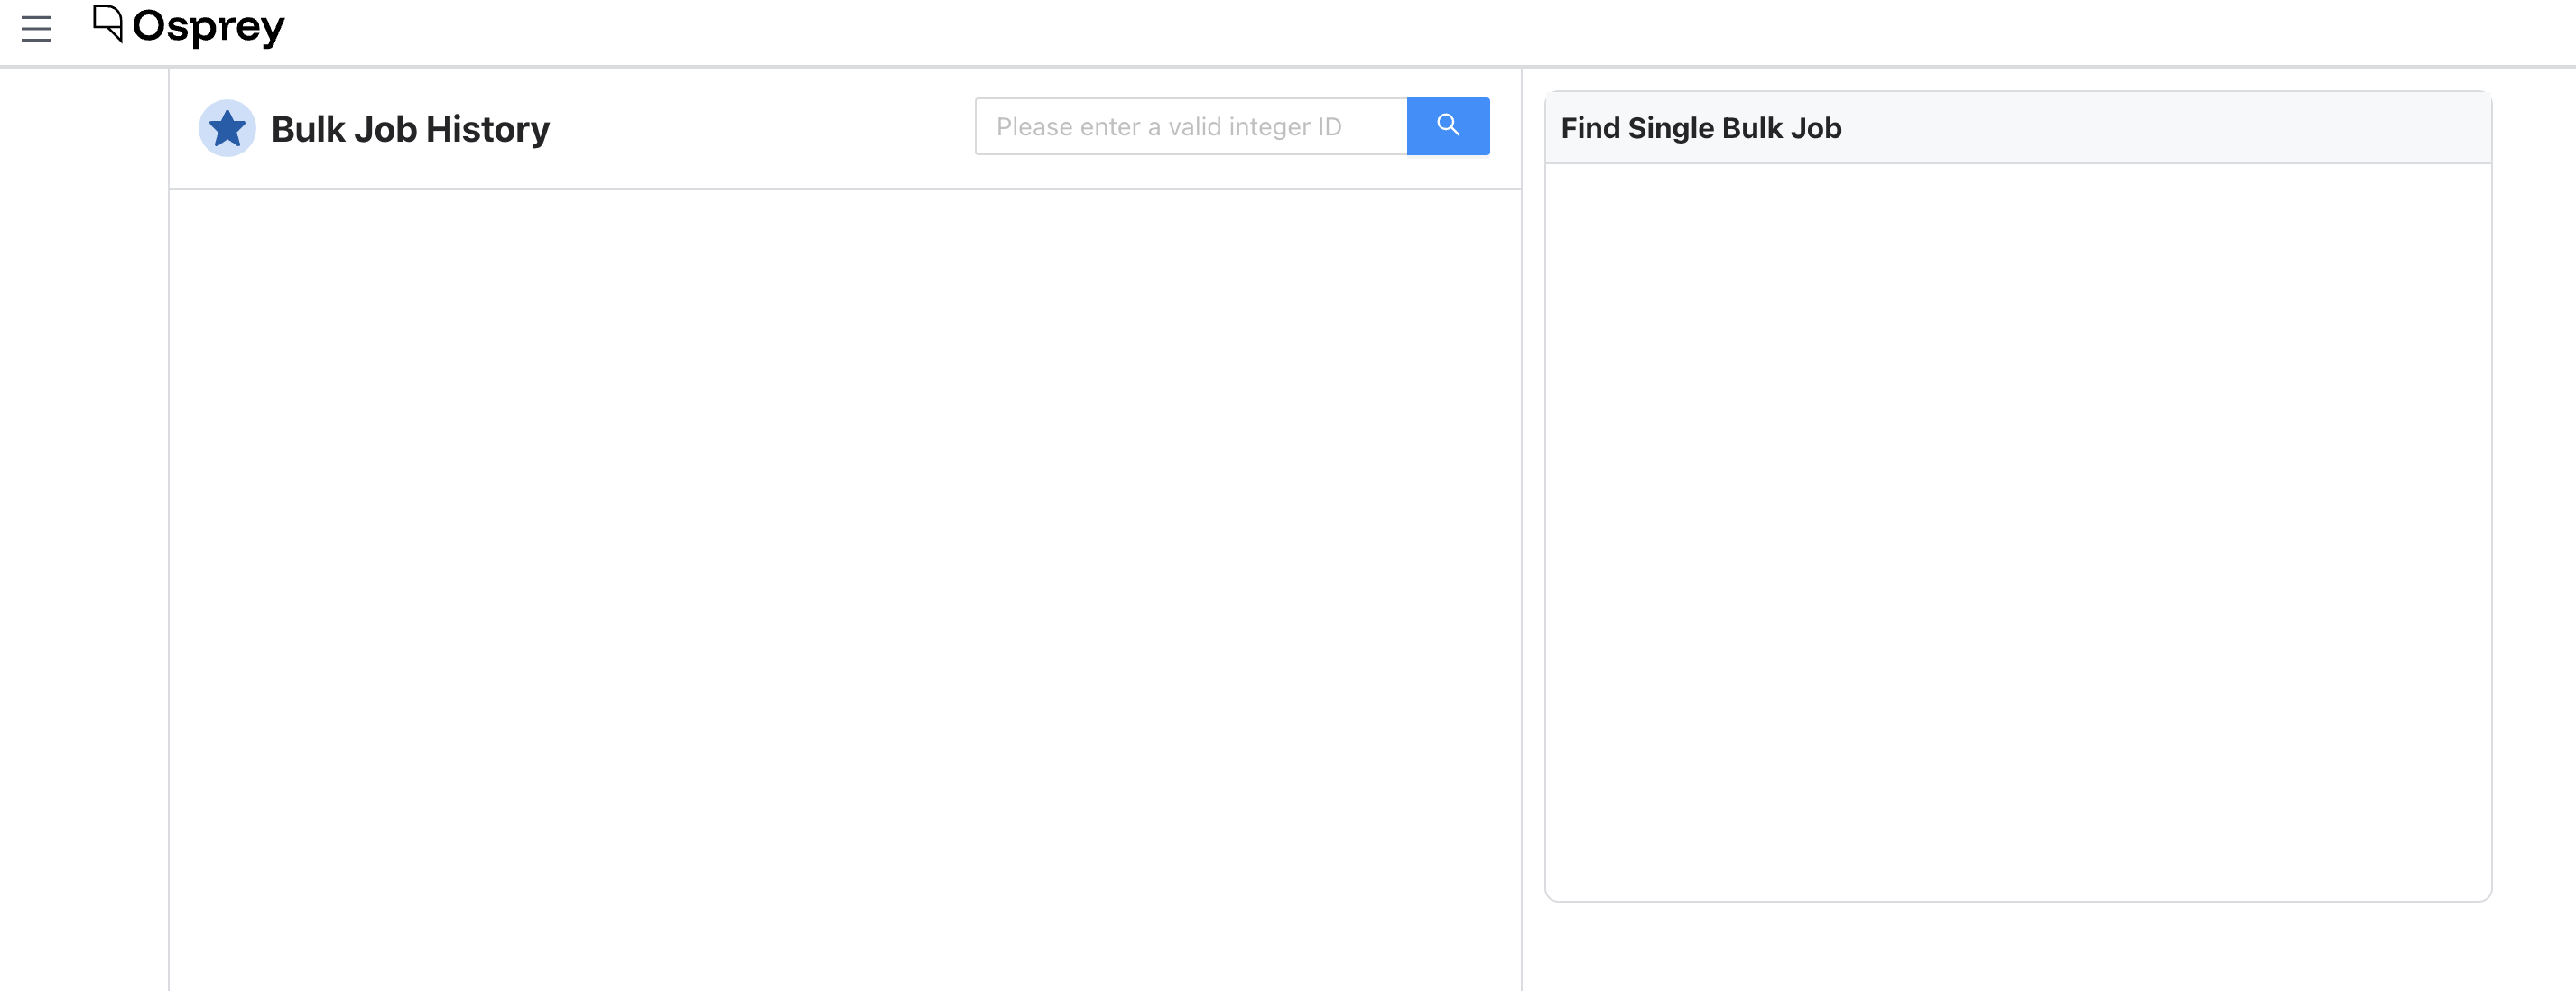
頁面包含兩欄。
- 近期批次 Jobs,包含 status、progress 與 summary statistics,並可依 task ID 篩選
- 單一 Job 的詳細檢視,包含完整結果與 logs
若要尋找特定 Job,請在搜尋欄位輸入 task ID。每個批次 Job 都有 unique ID,並會在建立 Job 時寫入 log。
開始使用
Demo script 可以用範例資料與實際 Rule 快速展示 Osprey 的運作方式,不需要撰寫程式碼或設定,結束後也能用單一 command 清理。若要逐一執行服務、修改程式碼及除錯,請參考英文官方文件的本機開發章節。
執行 demo 的步驟如下。
-
確認已安裝必要工具。 需要安裝支援 Compose v2 plugin 的 Docker,並啟動 Docker daemon。Script 會在進行其他操作前先檢查這些項目。
docker --version && docker compose version技術堆疊也需要多個未使用的 ports,script 會預先檢查並列出已被占用的 ports。實際會開啟的服務包括
5002的 Osprey UI 與8888的 Druid console,worker 與 UI API 則使用5001及5004。 -
從 repository clone 執行 script。
./demo.sh也可以在尚未 clone repository 的情況下執行。這個方式會將 repository clone 到
./osprey-demo。curl -sSL https://raw.githubusercontent.com/roostorg/osprey/main/demo.sh | bashScript 會啟動完整技術堆疊,包括 Kafka、Druid、PostgreSQL、MinIO、Osprey worker、API 與 UI,總共超過 12 個 containers。測試資料 producer 每秒會傳送一個合成貼文 event。若找到先前執行留下的服務,script 會在停止前詢問;不論是否找到服務,先前 demo 的 volumes 都會移除,讓每次 demo 從乾淨狀態開始。首次執行需要下載及建立 images,可能花費數分鐘。
Warning
Demo 會移除先前 demo 使用的 volumes 與其中資料。只應在確認目標是 Osprey demo 資源後執行。直接將網路取得的 script 傳入 shell 前,也應先下載並檢查內容及來源版本。
-
等待
Demo Ready!banner。 Script 會等待所有服務回報 healthy,再等待第一批 Events 流入,整個過程需要幾分鐘。完成後會在瀏覽器開啟介面,或印出可自行開啟的 URL,並預先填入查詢最近一天 Events 的條件。
可以嘗試的操作
Demo ruleset 包含一個 ContainsHello Rule。任何包含 hello 的貼文都會讓作者被停用並套用 meow Label。Producer 會從小型詞庫組成五個字的貼文,因此約三分之一產生的貼文會觸發這個 Rule。
- 查看 Event Stream。 右側面板會顯示處理中的 Events。點選符合
ContainsHello的 event,查看擷取的 Features 與 Effects - 用查詢篩選。 在查詢列輸入
ContainsHello == True,只顯示觸發 Rule 的貼文。其他語法請見查詢語法 - 使用 Top N 分組。 預先填入的查詢會依
UserId分組,顯示哪些合成使用者最常被停用 - 開啟 Rules Visualizer。 從導覽列開啟關係圖,查看 demo 的 Features 與 Rule 之間的 dependency graph
使用者指南說明完整調查流程。SML 與自行撰寫 Rules 的方式目前請參考英文官方文件的撰寫規則章節。
停止 demo
從 repository 目錄執行。若 script 代為 clone,則從 osprey-demo/ 執行。
docker compose --profile test_data down -v
這個 command 會停止所有 containers,並刪除包括全部 demo 產生資料在內的 volumes。
發生問題時
Script 是方便使用的 wrapper。可以直接執行同一套技術堆疊並查看 logs。
docker compose --profile test_data up -d
docker compose logs --follow osprey-worker
服務穩定後開啟 http://localhost:5002。常見問題請見英文官方文件的疑難排解章節;各項 demo 服務的說明則位於本機開發章節。
本機開發
本頁說明如何建立完整的 Osprey 本機開發環境。若只想用範例資料快速啟動,請改用開始使用中的 demo。
必要工具
- 作業系統 macOS、Linux 或 Windows,Windows 建議使用 WSL
- Python 3.11 以上 使用
python --version檢查 - Git 版本控制
- uv Python package management
- Node.js 22 以上 供 UI 使用。Corepack 隨 Node 提供,會從
osprey_ui/package.json的packageManager欄位自動解析 pnpm,不需另外安裝 pnpm
專案設定
1. Clone repository
git clone git@github.com:roostorg/osprey.git
cd osprey
2. 安裝 dependencies
# Install all dependencies including development tools
uv sync
這會建立 virtual environment,並依 uv.lock 的 locked versions 安裝 production 與 development dependencies,包括 ruff、mypy 與 pre-commit。若只需要 production dependencies,使用 uv sync --no-dev。
3. 設定 pre-commit hooks
uv run pre-commit install
這會安裝 Git hooks,在每次 commit 前自動執行 code quality checks。
4. 驗證設定
執行下列 commands,確認各項工具正常運作。
# Check linting configuration
uv run ruff check

# Check formatting
uv run ruff format --diff

# Run type checking
uv run mypy .

# Test pre-commit hooks
uv run pre-commit run --all-files
Ruff 會顯示 All checks passed! 或需要修正的具體問題,mypy 與 pre-commit hooks 則應在沒有 errors 的情況下完成。
5. 啟動服務
docker compose --profile test_data up -d
也可以使用 wrapper script。
./start.sh --profile test_data up -d
test_data profile 包含產生範例 Events 的 producer。沒有這個 profile 時,技術堆疊仍會執行,但在自行傳入 Events 前,介面不會顯示資料。開始使用說明包裝上述流程的單一 command demo。
這個流程會啟動多項服務。
- Osprey Worker 主要引擎,依 Rules 與 UDFs 處理 input Events
- Test Data Producer 由
--profile test_data啟動的範例 event generator
- Test Data Producer 由
- Osprey UI 提供 React 網頁介面並與 UI API 通訊的 frontend service
- Osprey UI API 為網頁介面提供資料與功能的 backend service
- Kafka,KRaft mode 傳送 user-generated Events 的 message streaming system
- Postgres 供 Worker、UI API 與 Druid 等元件使用的 database,例如範例 Plugins 中以 Postgres 為 backend 的 Labels Service
- Druid 消費 Osprey Worker outputs,支援 UI API 即時查詢的 database
- MinIO 與 S3 相容的 object storage,也是此技術堆疊預設的 Execution Result store,設定為
OSPREY_EXECUTION_RESULT_STORAGE_BACKEND=minio
也可以搭配 osprey-coordinator 啟動 Osprey。詳情請見 Coordinator README。
6. 選用,開放 UI 與 UI API ports
docker-compose.yaml 預設將執行中的服務綁定至 127.0.0.1。若在 headless machine 執行 Docker Compose,可能需要修改設定及 firewall,尤其是 ports 5002 與 5004。
例如使用 Tailscale 存取 Osprey instance 時,可以將 127.0.0.1:5002:5002 改為 <Tailscale IP>:5002:5002。若要讓 instance 從 public internet 存取,可以只設定 5002:5002,使服務綁定至 0.0.0.0。
Warning
綁定至
0.0.0.0可能直接將 Osprey UI 或 API 暴露到 public internet。iptables 或 UFW 等部分 firewalls 無法阻止透過 Docker networking 使用的 ports。若沒有明確設定 bind address,只依賴 UFW 並不能防止 public internet 存取,除非已依 ufw-docker 等方式正確設定。開放前應另行確認認證、TLS、network policy 與最低權限。
7. 存取應用程式
UI 會自動連線至在 Docker containers 中執行的 backend services。
- Osprey UI localhost:5002
- Backend API localhost:5004
- Worker Service localhost:5001
Plugins
Osprey 的 UDFs 與 output sinks 可透過以 pluggy 為基礎的 Plugin system 移植。Repository 提供範例 Plugin package,請見 example_plugins/src/register_plugins.py。包含 UDFs、sinks、hash-based lookups、ML models 與 labels service 的完整說明,請見英文官方文件 Integrations & Plugins。
@hookimpl_osprey
def register_udfs() -> Sequence[Type[UDFBase[Any, Any]]]:
    # Register custom user-defined functions

@hookimpl_osprey
def register_output_sinks(config: Config) -> Sequence[BaseOutputSink]:
    # Define output destinations
    # By default it prints the execution results to the console

@hookimpl_osprey
def register_ast_validators() -> Sequence[Type[BaseValidator]]:
    # Register AST validators
可用 hooks
可以在 Plugin 的 register_plugins.py 實作下列項目的任意子集。
| Hook | Returns | Notes |
|---|---|---|
register_udfs | Sequence[Type[UDFBase]] | 自訂 user-defined functions |
register_output_sinks | Sequence[BaseOutputSink] | Execution Results 的輸出位置 |
register_ast_validators | Sequence[Type[BaseValidator]] | 額外 SML validators |
register_action_proto_deserializer | ActionProtoDeserializer | None | 自訂 action proto 轉 JSON |
register_input_stream | BaseInputStream | Single-provider,firstresult |
register_execution_result_store | ExecutionResultStore | Single-provider,firstresult |
register_labels_service_or_provider | LabelsServiceBase | LabelsProvider | Single-provider,firstresult |
register_validation_exporter | BaseValidationResultExporter | None | 選用,在驗證後發布 experiment 與 bucket metadata。Single-provider,firstresult |
register_label_output_sink | BaseOutputSink | None | 選用,自訂 label-mutation sink,取代預設 LabelOutputSink。Single-provider,firstresult |
Rules
Rules 使用 SML 撰寫,example_rules/ 提供搭配 YAML config 的範例。Containers 啟動時會將 Rules mount 至 Worker processes,並透過 environment variables 控制,例如下列 command。
OSPREY_RULES_PATH=./example_rules uv run python osprey_worker/src/osprey/worker/cli/sinks.py run-rules-sink
Rules 的其他說明目前請見英文官方文件撰寫規則。
測試資料
使用下列 command 產生範例 JSON actions。
docker compose --profile test_data up osprey-kafka-test-data-producer -d
這會產生包含 timestamps、user IDs 與 IP addresses 的 synthetic post-creation Events,並傳送至 osprey.actions_input topic。這個 producer 與 test_data profile 啟動的項目相同。
開發工作流程
從 main 建立 branch,並依 github_username/short-description 格式命名,例如 caidanw/fix-database-timeout。
每次 commit 時執行的項目
Commit 時會自動執行 pre-commit hooks,設定檔是 repository root 的 .pre-commit-config.yaml。Hooks 會檢查檔名大小寫衝突、遺留的 merge conflict markers 與未移除的 Python debugger calls;驗證 JSON 與 TOML;將 line endings 統一為 LF;使用 Ruff lint 及 format Python;並以 mypy 進行 type checking。osprey_ui/ 內的變更也會通過 Prettier 與 ESLint。
Hooks 會在第一個 failure 停止,其中一些 hooks 會直接修改檔案。若 hook 修改檔案,請重新 stage 後再 commit。
Push 前檢查變更
CI 會針對整個 repository 執行相同 hooks,可以先使用下列 command 找出問題。
uv run pre-commit run --all-files
也可以直接執行個別工具。
# Lint and format
uv run ruff check
uv run ruff format

# Type check a specific module, or everything with `uv run mypy .`
uv run mypy osprey_worker/src/osprey/worker/lib
Commit messages
使用 Conventional Commits 格式。以下是 repository history 中的實際範例。
fix(ui): show the event-stream timezone once, not twice
build(deps): remove unused Discord-era Python dependencies
開發工具
熟悉下列開發工具,有助於理解如何開發及除錯 Osprey。
Ruff
Ruff 負責 linting 與 formatting,取代 Black、isort、Flake8 等工具。設定位於 pyproject.toml 的 [tool.ruff]。啟用的 Rules 包括 pycodestyle errors E、pyflakes F、import sorting I,以及 flake8-bugbear 的 mutable default arguments 檢查 B006。
Commands 如下。
# Check for issues
uv run ruff check

# Fix auto-fixable issues
uv run ruff check --fix

# Format code
uv run ruff format

# Check specific files
uv run ruff check path/to/file.py
MyPy
MyPy 負責 Python static type checking。pyproject.toml 中的 [tool.mypy] 設定會載入 Pydantic 與 SQLAlchemy Plugins,放寬 strict mode 以配合 codebase 中較舊的部分,並跳過 generated protobuf files。
Commands 如下。
# Type check entire project
uv run mypy .

# Type check specific files
uv run mypy path/to/file.py

# Type check entire module
uv run mypy osprey_worker/

# Check with verbose output
uv run mypy --show-traceback path/to/file.py
Pre-commit
Pre-commit 提供在 commit 程式碼前執行自動品質檢查的 Git hooks,設定位於 .pre-commit-config.yaml。
Commands 如下。
# Run all hooks on staged files
uv run pre-commit run

# Run all hooks on all files
uv run pre-commit run --all-files

# Run specific hook
uv run pre-commit run ruff

# Update hook versions
uv run pre-commit autoupdate

# Bypass hooks (emergency only)
git commit --no-verify
git commit --no-verify 只適合已理解並記錄檢查失敗原因的緊急情況,不應用來略過需要修正的品質或安全問題。pre-commit autoupdate 會變更工具版本,執行及提交前須依 Osprey 的 dependency approval 規則取得維護者同意。
UV
UV 負責 Python packages 與 environments 管理,主要 commands 如下。
# Install dependencies
uv sync

# Add new dependency
uv add package-name

# Add development dependency
uv add --group dev package-name

# Remove dependency
uv remove package-name

# Run command in environment
uv run command-name

# Update dependencies
uv lock --upgrade
新增、移除或升級 dependency 會改變專案供應鏈與 lockfile。依 Osprey 規則,執行 uv add、uv remove 或 uv lock --upgrade 前,須取得維護者對 dependency 與授權相容性的明確同意。
CLI 參考
Osprey 包含下列以 console scripts 安裝的 command-line tools。可從 repository root 使用 uv run <command> 執行,若 package 已安裝在 environment 中,也可以直接使用 <command>。
osprey-cli
通用 Worker 管理工具,可以 push Rules、開啟 debug shell,以及手動套用 Labels。
osprey-cli push-rules
osprey-cli push-rules RULES_PATH [--dry-run/--no-dry-run] [--suppress-warnings]
驗證 RULES_PATH 的 Rules 並 push。使用 --dry-run 可以只驗證而不 push。驗證失敗時會以非零狀態結束。
osprey-cli compute-and-upload-dependencies-mapping
osprey-cli compute-and-upload-dependencies-mapping RULES_PATH [--suppress-warnings]
計算 RULES_PATH 中 Rules 的 dependency graph 並上傳,供 Rules Visualizer 使用。
osprey-cli shell
osprey-cli shell [-i / --auto-import / --no-auto-import]
開啟 interactive shell。若已安裝 IPython 則使用 IPython,否則使用備用的 code.InteractiveConsole。Shell 會預先 import labels、access_audit_log、stored_execution_result storage modules,以及 EntityT、EntityLabelMutation 與 LabelStatus。使用預設啟用的 --auto-import 時,也會 import 在 osprey_lib 中找到的所有 model classes,適合互動檢查已保存資料。
Interactive shell 可能直接讀取或修改敏感資料。正式環境應限制使用權限,避免將查詢結果、tokens 或個人資料留在 shell history,並記錄必要的管理操作。
osprey-cli apply-label
osprey-cli apply-label ENTITY_TYPE ENTITY_ID LABEL_NAME LABEL_STATUS \
  [--reason REASON] [--description DESCRIPTION] [--expire-instantly]
手動為單一 Entity 套用 Label,主要用於除錯或從外部來源匯入個別 Labels。--reason 預設為 CliLabelMutationWithoutEffects;--description 預設為 "Manually changed from the command line for debugging."。--expire-instantly 會讓 Label 幾乎立即到期,而非持續存在。
Osprey instance 必須先設定 labels provider,否則 command 會以 assertion error 失敗。
osprey-cli bulk-apply-label
osprey-cli bulk-apply-label ENTITY_TYPE ENTITY_IDS_FILE_PATH LABEL_NAME LABEL_STATUS \
  [--reason REASON] [--description DESCRIPTION] [--expire-instantly]
功能與 apply-label 相同,但會從 ENTITY_IDS_FILE_PATH 逐行讀取 Entity IDs,為全部 Entities 套用 Label,並在過程中印出進度。這是從外部來源匯入大量 Label 清單的 CLI 路徑。透過介面操作的流程請見 Bulk Actions。
批次套用前應先驗證檔案來源、Entity type、數量、Label、原因與到期設定,並以小型樣本 dry run 或在隔離環境測試。這個 command 可能大量改變後續 Rule 判斷,應搭配授權、稽核及回復流程。
osprey-stress
由 osprey_worker 安裝,entry point 是 osprey.worker.stress.cli:main。工具會對執行中的 Osprey Worker 進行 end-to-end stress test,產生 synthetic Events、消費產生的 Execution Results,再回報 drop rate 與 latency。適合驗證 dependency bumps、測量 throughput regressions,以及用 pipeline health 作為 CI gate。
osprey-stress run
osprey-stress run \
  --events 10000 --rate 1000 \
  --threshold-drop-rate 0.01 --threshold-p95-ms 500 \
  --report json
以每秒 --rate 個 Events 的速度產生 --events 個 synthetic Events 至 input topic。--events 預設為 1000,--rate 預設為 100.0。接著最多等待 --drain-seconds,預設 30.0 秒,讓 Worker 完成處理再回報。
常用 flags 如下。
--report {human,json}輸出格式,預設為human--verbose定期將進度輸出至 stderr,頻率由--verbose-interval-seconds控制,預設為2.0--bootstrap-servers預設localhost:9092、--input-topic預設osprey.actions_input、--output-topic預設osprey.execution_results--threshold-drop-rate與--threshold-p95-ms設定後,若觀察到的 drop rate 或 p95 latency 超過 threshold,command 會以非零狀態結束,可用來阻擋 CI Job
Stress test 會向指定 topic 寫入大量 Events,只能針對已確認的測試環境執行。執行前應確認 bootstrap servers、topics、速率與資料隔離,避免對正式流量或共用資源造成影響。
osprey-stress measure
osprey-stress measure [--duration SECONDS] [--report {human,json}]
此 command 保留給針對外部產生 Events 的 open-loop measurement,例如 JetStream input stream sample #236。Measurement layer 尚未完成,目前只會印出 stub message 並以非零狀態結束。現階段請使用 run 進行 closed-loop synthetic testing。
osprey-async-cli
由 osprey_async_worker 安裝,entry point 是 osprey.async_worker.cli.main:cli。這是 experimental 的 asyncio-native Worker prototype,不使用 gevent 或 monkey-patching,用來驗證 asyncio-based executor 能否取代 gevent 版本。目前不適合正式環境。
osprey-async-cli run
osprey-async-cli run --rules-path PATH [--input-file PATH] [--max-concurrent 12] \
  [--with-plugins] [--input-source {file,kafka}] \
  [--kafka-topic TOPIC] [--kafka-bootstrap-servers SERVERS] \
  [--kafka-group-id GROUP] [--kafka-offset-reset {latest,earliest}]
使用必要的 --rules-path 指定 static Rules directory,執行 async Worker。預設只使用 stdlib UDFs,並將 Results 印至 stdout。--with-plugins 會載入完整 async Plugin system,包括透過 osprey_async_plugin entry-point group 註冊的 UDFs、validators 與 output sinks,因此需要相關外部服務都能使用。
使用 --input-source 控制 input source。
file,預設值 從--input-file讀取 JSONL actions。省略時不提供 input,適合只驗證 Worker 能否啟動kafka從--kafka-topic消費資料,預設為osprey.actions_input,並透過--kafka-bootstrap-servers連線,預設為localhost:9092
osprey-async-cli benchmark
osprey-async-cli benchmark --rules-path PATH --input-file PATH \
  [--max-concurrent 12] [--iterations 1000] [--warmup 50]
若能 import gevent,此 command 會使用相同 Rules 與 input data,比較 async executor 與 gevent executor。先執行 --warmup 次 iterations,再執行 --iterations 次計時 iterations,最後印出 throughput 與 latency 比較。
疑難排解
本頁整理常見問題的處理方式。
Druid schema 沒有更新
若修改 Rule output structure 後,Druid 沒有 ingest 資料或仍停留在舊 schema,可以 reset Kafka supervisor,再重新提交 ingestion spec。
curl -X POST http://localhost:8888/druid/indexer/v1/supervisor/osprey.execution_results/terminate
docker compose restart druid-spec-submitter
若要刪除全部 Druid 與 MinIO state 並重新開始,同時保留 Postgres 資料,可使用下列 commands。
docker compose down
docker volume rm osprey_middle_var osprey_historical_var osprey_broker_var osprey_coordinator_var osprey_router_var osprey_druid_shared osprey_minio_data
docker compose up -d
若要連同 Postgres 在內刪除所有資料,可使用下列 command。
docker compose down -v && docker compose up -d
Warning
docker volume rm與docker compose down -v會刪除 volumes 及其中資料,難以復原。執行前應確認目前目錄、Compose project 與確切 volume names,並確認不需要保留其中資料或已完成可用備份。正式環境不可直接照用本頁的本機重建步驟。
測試資料沒有出現在介面中
介面預設查詢最近 24 小時。若選擇的時間範圍過大,例如數週或數月,Druid 需要掃描許多 segments,結果可能很慢或看起來是空白。
- 將時間範圍縮小至產生測試資料前後的 1 至 4 小時
- 點選顯示時間範圍旁的編輯圖示,切換至自訂日期與時間選擇器
- Druid 的 Kafka consumer 使用
auto.offset.reset: latest,只會取得第一次執行docker compose up後產生的 Events。更早的 Events 不會出現,與選擇的時間範圍無關
Kafka topic disk 使用量增加
Topics 建立時會設定 48 小時與每個 partition 8 GB 的 retention limit。若部署時間早於這項設定,可以將設定套用到既有 Topics。
for topic in osprey.actions_input osprey.execution_results; do
  kafka-configs --bootstrap-server localhost:9092 \
    --entity-type topics --entity-name $topic --alter \
    --add-config retention.ms=172800000,retention.bytes=8589934592,segment.bytes=1073741824
done
uv: command not found
使用 installation script 或 pip 安裝 uv。
curl -LsSf https://astral.sh/uv/install.sh | sh
# Then restart your terminal
將網路取得的 installation script 傳入 shell 前,應先檢查官方來源與 script 內容。
Pre-commit hooks 失敗
手動執行 hooks 以查看詳細 errors。
uv run pre-commit run --all-files
Protobuf files 發生 MyPy errors
處理方式 Protobuf generated files 已在設定中排除。若仍看到 errors,請檢查 files 是否符合 pyproject.toml 中的 exclusion patterns。
Type checking 時發生 import errors
確認已安裝所有 dependencies。
uv sync
IDE 設定
可以使用自己選擇的 IDE 開發 Osprey。
VS Code
若使用 VS Code,建議安裝下列 extensions,以取得較完整的開發體驗。
- Python,Microsoft
- Ruff,Astral Software
- MyPy Type Checker,Microsoft
將下列 Settings 加入 .vscode/settings.json。
{
  "python.defaultInterpreterPath": ".venv/bin/python",
  "ruff.enable": true,
  "ruff.organizeImports": true,
  "python.analysis.typeCheckingMode": "basic"
}
SML files
目前沒有 SML 專用的 editor tooling。SML 是合法的 Python syntax subset,因此將 .sml files 與 Python 建立關聯,即可取得基本 syntax highlighting。在 VS Code 中使用下列設定。
"files.associations": {
  "*.sml": "python"
}
發佈流程
Osprey 使用 Semantic Versioning 的 SemVer 1.x.y 系列。這套輕量初始流程讓 downstream users 可以依賴 version tags,而不必使用 commit hashes。隨著專案使用增加,流程仍可能調整。
Patch releases,1.x.y
Patch releases 包含已合併至 main 且向後相容的修正或小型改善。
符合下列情況時,可以建立 patch release。
- Downstream users 需要穩定的 version tag
- 已累積具實質意義的修正,且 CI 為 green
發佈沒有固定週期,而是依事件需求進行。
Patch release checklist
建立 release 前,確認下列事項。
-
main的 code quality CI 通過,請見 Code Quality Checks - 沒有 breaking changes
- 已視需要更新 CHANGELOG.md
建立 release
- 確認完成上述 checklist
- 在 GitHub 選擇 Releases → Draft a new release
- 從
main選擇或建立X.Y.Ztag,例如1.0.1 - 發佈 release
發佈 release 會觸發既有自動化。
- osprey-rpc 建立 sdist 與 zip 並附加至 release,請見 release-osprey-rpc
- Osprey Coordinator 建立 Docker image 並以 version tags push 至 GHCR,請見 publish-coordinator-image
Downstream projects 可以依賴 1.0.1 等 version tags,不必使用 commit SHAs。
翻譯狀態提醒
本頁只翻譯上游既有流程,不授權建立 tag 或發佈 release。實際操作前仍須由具有 repository 發佈權限的 maintainer 確認 checklist、version 與 artifacts。
整合指南
Osprey 的設計目標是接入既有平台,而非取代平台。系統將 Events 傳入 Osprey,由 Rules 做出判斷,再由平台系統執行輸出結果。本指南說明兩者銜接的界面。
- Data Flow 概念說明,包括 Events 如何進入 Osprey,以及 Results 與 Effects 如何回到平台
- Integrations & Plugins 實作方式,包括透過 Plugin system 撰寫 UDFs、input 與 output sinks、labels service,以及整合 ML models
若仍在評估 Osprey,可先使用開始使用中的單一 command demo。若要修改 Osprey 本身,而非將它連接至既有平台,請參考開發指南。
資料治理提醒
接入實際平台前,應先畫出資料進出方向,確認 Events 與 Results 中的個人資料、內容及識別資訊,並設定權限、保存期限、刪除、稽核及事件應變方式。Plugin 能力會直接影響 Osprey 與外部系統之間的信任邊界。
資料流
本頁說明 Events 如何實際進入 Osprey、Results 如何輸出,以及平台架構與預設 docker-compose 設定不同時,應調整哪些擴充點,而不必 fork Osprey。
架構概覽
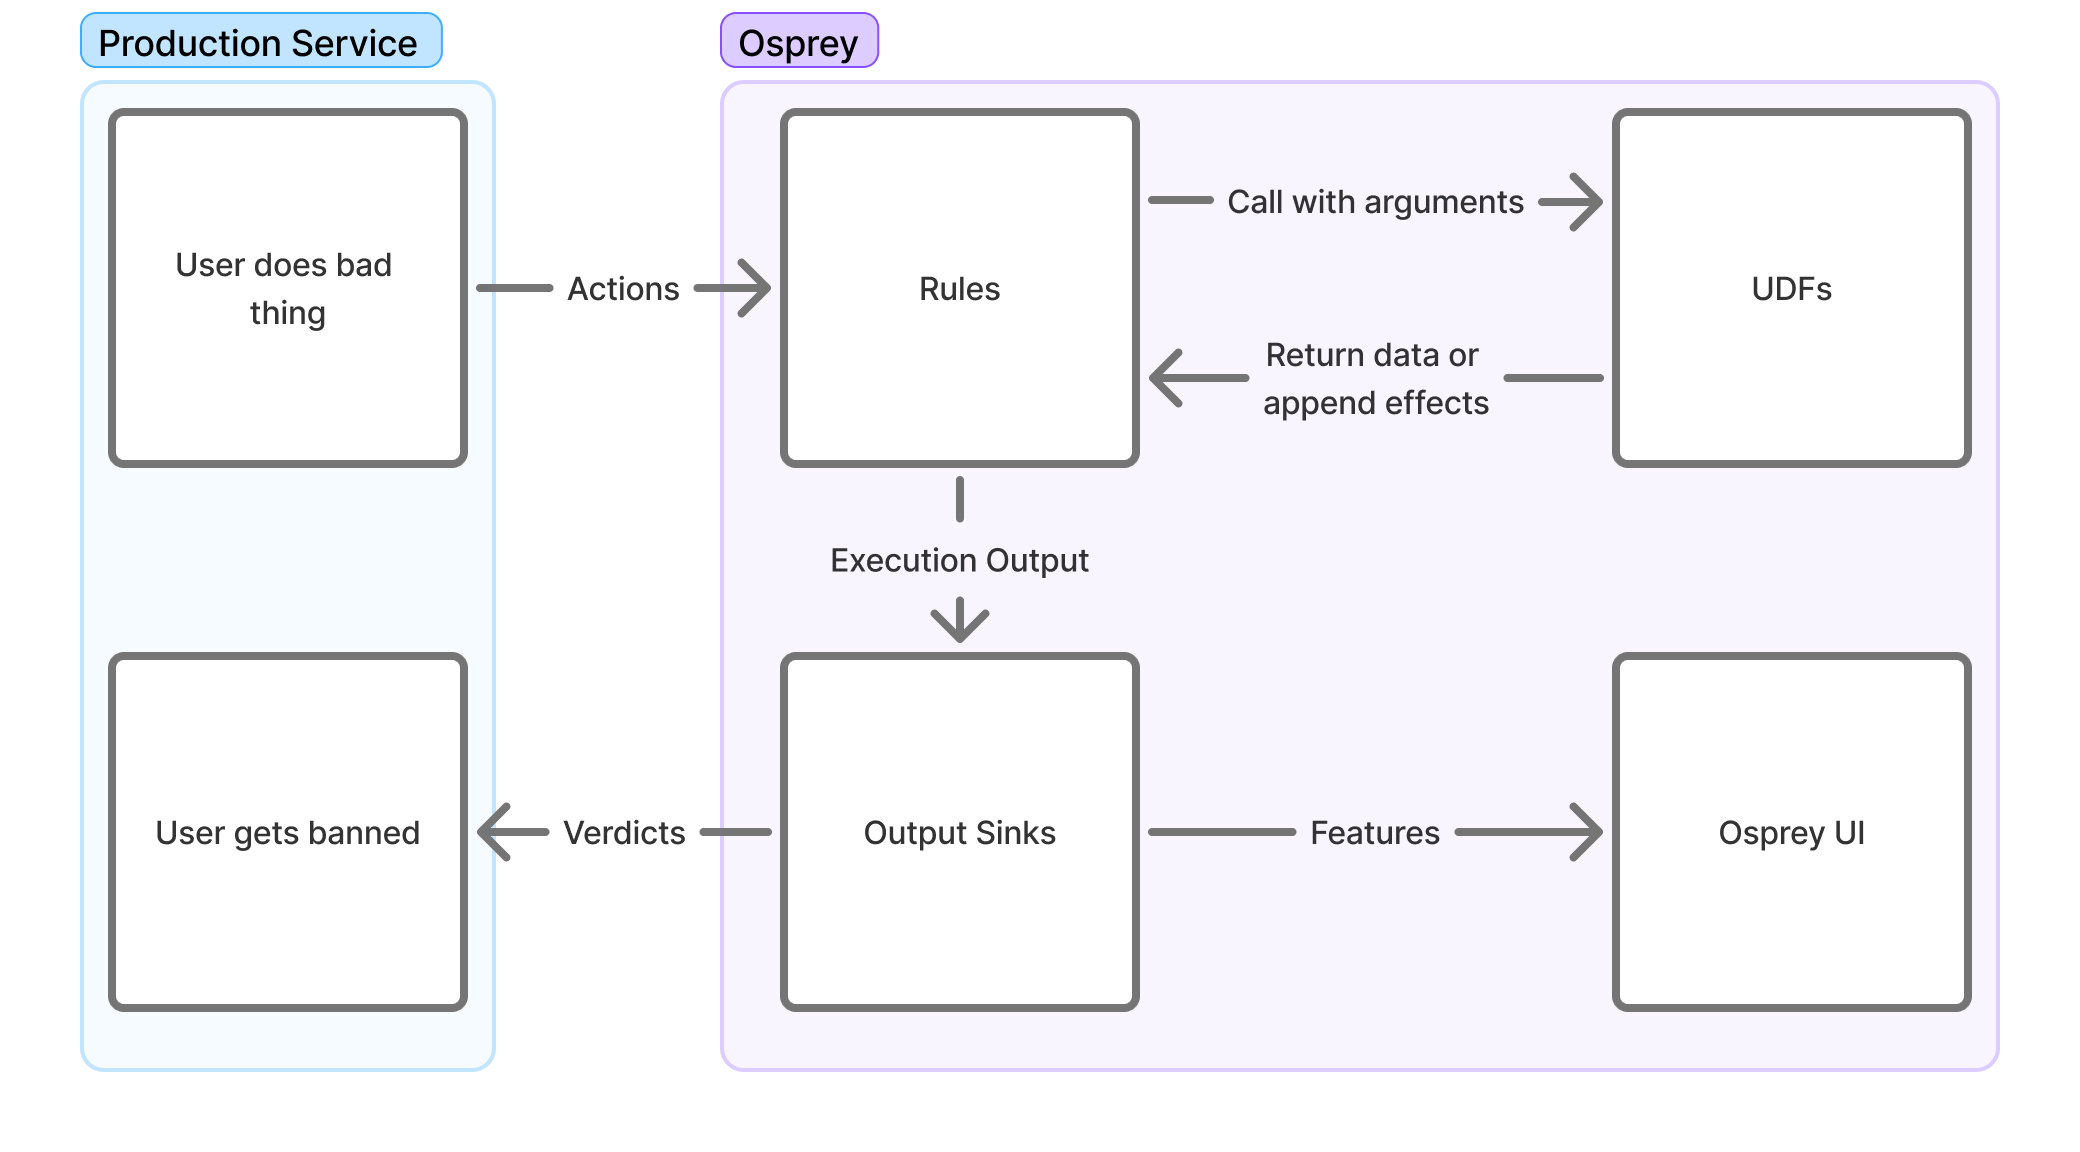
Osprey 的核心是一條 pipeline。Events 傳入後由 SML Rules 評估,再輸出 Verdicts 與 Effects。
   Kafka topic(s) / PubSub / gRPC
                │
                ▼
   Osprey Coordinator (Rust, optional)
                │
                ▼
       Osprey Worker (Python)
     evaluates rules against the
      event, produces an
      ExecutionResult
                │
                ▼
   Output sink(s) + execution result store
   (stdout, Kafka, Postgres, GCS, MinIO, BigTable, or your own plugin)
                │
                ▼
        Druid + UI API → Osprey UI
Worker 評估 Rules 的架構,也就是單一 event 如何依 Rules 計算結果,請見英文官方文件撰寫規則開頭的圖。Coordinator 的 priority queues、bidirectional streaming 與 synchronous API 等內部設計,請見 Coordinator README,其中包含更完整的 component diagram 與可執行範例。
輸入資料
有三種方式可以將 event 傳入 Osprey。
1. Kafka,預設方式
Worker 預設從 Kafka topic osprey.actions_input 消費資料。這個值是 docker-compose.yaml 中的 OSPREY_KAFKA_INPUT_STREAM_TOPIC,實作位於 osprey_worker/src/osprey/worker/sinks/sink/input_stream.py 的 KafkaInputStream。每則 message 是下列結構的 JSON blob。
{
  "send_time": "<Go-formatted timestamp>",
  "data": {
    "action_id": 123,
    "action_name": "user_login",
    "data": { "...": "your event's actual fields" }
  }
}
Rules 會比對 action_name。內層 data object 則包含 event 的實際欄位,並成為 UDFs 與 Feature extractors 讀取的值。
2. Google Cloud PubSub
另一個 input source 是 InputStreamSource.PUBSUB,實作位於 osprey_worker/src/osprey/worker/sinks/input_stream_chooser.py。設定時使用 PUBSUB_OSPREY_PROJECT_ID 與 PUBSUB_OSPREY_RULES_SINK_SUBSCRIPTION。
3. Coordinator 的 synchronous gRPC API
若執行選用的 Rust coordinator osprey_coordinator/,外部服務可以直接提交單一 action 並立即取得回覆,完全不經過 Kafka。當呼叫端需要 synchronous Verdict,而非只將 event 傳入 Queue 時,可以採用這個方式。Sync Action API 使用 port 19951;workers 使用的 bidirectional streaming 是另一個 port 19950。可執行的 grpcurl 範例與完整設定請見 Coordinator README。
不 fork Osprey,改用自己的平台資料
若 Events 不是來自 Kafka、PubSub 或 coordinator,或沒有使用上述 JSON envelope,不需要 fork Osprey。下列兩個 Plugin hooks 專門處理這類情況。
register_action_proto_deserializer將自有 protobufActionmessage 轉換為引擎預期的 JSON dict 結構register_input_stream換成完全自訂的 input source,例如不同的 Queue system 或 database poller
兩者都是 pluggy hooks,註冊方式與 UDFs 及 output sinks 相同。Plugin 機制請見英文官方文件 Integrations & Plugins,可執行範例位於 example_plugins/src/register_plugins.py。
輸出資料
Rule 完成評估後,Result 會透過兩套大致獨立的機制輸出。
Output sinks
每個註冊的 BaseOutputSink 都會收到一份 ExecutionResult,註冊 hook 為 register_output_sinks。Stdlib 內建下列項目。
StdoutOutputSink將結果印到 stdout。若沒有其他設定,這是預設值,適合本機開發KafkaOutputSink預設寫入osprey.execution_results,對應OSPREY_KAFKA_OUTPUT_TOPICStoredExecutionResultOutputSink透過目前設定的ExecutionResultStore保存資料
可以使用相同 hook 註冊自己的 output sink。這個擴充點可將 Results 傳入 review Queue、webhook 或其他外部系統。
Execution result storage
ExecutionResultStore backends 會另外保存完整 Execution Results,供後續查詢。使用 OSPREY_EXECUTION_RESULT_STORAGE_BACKEND 選擇啟用的 backend,選擇器位於 osprey_worker/src/osprey/worker/_stdlibplugin/execution_result_store_chooser.py。
| Value | Backend |
|---|---|
bigtable | Google Cloud BigTable |
gcs | Google Cloud Storage |
minio | MinIO,與 S3 相容,使用 OSPREY_MINIO_ENDPOINT、OSPREY_MINIO_ACCESS_KEY、OSPREY_MINIO_SECRET_KEY、OSPREY_MINIO_EXECUTION_RESULTS_BUCKET |
postgres | Postgres |
plugin | 自訂的 register_execution_result_store 實作 |
none,預設值 | 不保存 |
Results 如何進入介面供查詢
Druid 會消費 Worker 的 Kafka output,並支援 UI API 的即時查詢。調查查詢介面、Rules與 Features Registries 都使用這些資料。若執行環境沒有啟用 Kafka output,Druid 就沒有資料可以建立索引。此時即使 Rules 正常評估,查詢介面仍會是空白。
資料治理提醒
輸入 Events、完整 Execution Results 與 Druid 索引可能保存不同範圍及期間的資料。正式導入前,應逐一確認欄位、保存位置、存取者、保留時間與刪除方式,並避免把 production secrets 寫入設定檔、Events 或 logs。
Integrations 與 Plugins
Osprey 可以在不修改核心 codebase 的情況下擴充。平台可以透過 Osprey 啟動時自動發現的 Plugin packages,接入偵測函式、output destinations、Entity state storage 與 ML models 等自訂邏輯。Plugin package 可以實作可用 hooks表格中的任意子集。本頁說明採用團隊最常詢問的 integration points。
可執行的參考 package 請見 example_plugins/ directory。
Plugins 載入方式
Osprey 使用 pluggy 發現 Plugins。Plugin package 會在 pyproject.toml 宣告下列一個或兩個 entry-point groups。
osprey_plugin由標準 gevent Worker 載入osprey_async_plugin由 experimental asyncio Worker 載入
例如下列設定。
[project.entry-points.osprey_plugin]
register_plugins = "register_plugins"

[project.entry-points.osprey_async_plugin]
register_async_plugins = "register_async_plugins"
每個 entry point 都會解析到包含 hook functions 的 module,並以 @hookimpl_osprey 或 @hookimpl_osprey_async 裝飾。Osprey 啟動時會呼叫各 hook 收集註冊項目。詳情請見 example_plugins/src/register_plugins.py 與 register_async_plugins.py。
撰寫 UDFs
User-defined function,UDF,是可從 Rules 呼叫的 Python class。UDFs 將文字比對、DNS lookups、hash comparisons 或 ML inference 等可重複使用的偵測邏輯,包裝成規則語言中的具名函式。語言層級的說明目前請見英文官方文件 Writing Rules § User Defined Functions。
UDF 的結構
UDFs 需要兩個部分。
- Arguments class 繼承
ArgumentsBase,以 Types 宣告 UDF 接受的 parameters - UDF class 繼承
UDFBase[Arguments, ReturnType],並以executemethod 實作邏輯
例如下列程式碼。
# example_plugins/src/udfs/text_contains.py
import re

from osprey.engine.executor.execution_context import ExecutionContext
from osprey.engine.udf.arguments import ArgumentsBase
from osprey.engine.udf.base import UDFBase


class TextContainsArguments(ArgumentsBase):
    text: str
    phrase: str
    case_sensitive = False


class TextContains(UDFBase[TextContainsArguments, bool]):
    def execute(self, execution_context: ExecutionContext, arguments: TextContainsArguments) -> bool:
        escaped = re.escape(arguments.phrase)

        pattern = rf'\b{escaped}\b'

        flags = 0 if arguments.case_sensitive else re.IGNORECASE
        regex = re.compile(pattern, flags)

        return bool(regex.search(arguments.text))
完成註冊後,可以在 Rules 中呼叫 TextContains。
TextContains(text=SomeFeature, phrase="spam")
具有 side effects 的 UDFs
UDFs 也能產生 Effects,也就是供 downstream systems 執行的 structured outputs,例如停用使用者或標示內容。Effects 使用 EffectBase 作為 return type。範例請見 example_plugins/src/udfs/ban_user.py。
Async UDFs
執行 network calls 或 database reads 等 I/O 的 UDFs,在 async Worker 中使用時應繼承 AsyncUDFBase。範例請見 osprey_async_worker/src/osprey/async_worker/stdlib_udfs/async_mx_lookup.py。TextContains 等只進行運算的 UDFs,可以不修改而同時用於兩種 Workers。
註冊 UDFs
從 register_udfs hook 回傳 UDF classes。
from osprey.worker.adaptor.plugin_manager import hookimpl_osprey

@hookimpl_osprey
def register_udfs():
    return [TextContains, BanUser]
使用 UdfCategories 為每個 UDF 指定 category。定義位於 osprey_worker/src/osprey/engine/stdlib/udfs/categories.py,例如 STRING、HASH、ENTITY、HTTP,讓 UDF 在 UDF Registry 中依合理類別分組。
Hash-based lookups
Osprey standard library 內建 Hash* UDF family,包括 HashMd5、HashSha1、HashSha256 與 HashSha512,歸類於 HASH 且不需額外註冊。這些 UDF 接受 string input 並回傳 hex digest。搭配 SML 的 in operator 或 HasLabel,可以在不保存 raw data 的情況下比對 known-bad sets。
# Check a hashed value against a small inline set
IsKnownBadHash = HashSha256(input=SomeValue) in ['abc123...', 'def456...']

# Or check membership via a label that was set by some other process
IsKnownBadActor = HasLabel(entity=SomeEntity, label='KnownBad')
Inline sets 適合小型且穩定的清單。Osprey 沒有 bulk-import 或 lookup-table primitive;若外部清單包含數百萬筆 hashes 且經常更新,應撰寫自訂 UDF 查詢自己的 store。
設定 input sinks
Input sink 是 Events 進入 Osprey 的位置。Osprey 內建 Kafka、Google Pub/Sub、Osprey Coordinator,以及供本機測試使用的 synthetic generator,並以 InputStreamSource config value 選擇。若都不符合平台需求,可以註冊 custom input stream Plugin。概念請見資料流的輸入資料。
內建 sources
Worker 依 InputStreamSource 選擇 input stream。
| Source | Config | Use case |
|---|---|---|
KAFKA | OSPREY_KAFKA_INPUT_STREAM_TOPIC, OSPREY_KAFKA_BOOTSTRAP_SERVERS | 從 Kafka topic 消費 Action Events |
PUBSUB | PUBSUB_OSPREY_PROJECT_ID, PUBSUB_OSPREY_RULES_SINK_SUBSCRIPTION | 從 Google Pub/Sub 消費 |
OSPREY_COORDINATOR | OSPREY_COORDINATOR_SERVICE_NAME | 從 Osprey Coordinator service 取得工作 |
SYNTHETIC | 產生隨機假 Events,適合沒有 upstream system 的本機開發 | |
PLUGIN | 委派給註冊的 register_input_stream hook |
若 Events 已經由 Kafka 傳送,設定 InputStreamSource.KAFKA;使用 Google Pub/Sub 時則設定 InputStreamSource.PUBSUB。其他情況可以實作 custom input stream,並在 config 設定 InputStreamSource.PLUGIN。若 Events 使用 protobuf 而非 JSON,另可透過 register_action_proto_deserializer hook 提供 deserializer。
撰寫 custom input stream
若 event source 不是 Kafka 或 Pub/Sub,例如 webhook receiver、其他 message Queue 或 polling API,可以繼承 BaseInputStream 並實作 _gen generator。每個 event 會 yield 一個包在 AckingContext 中的 Action。
from collections.abc import Iterator

from osprey.engine.executor.execution_context import Action
from osprey.worker.sinks.sink.input_stream import BaseInputStream
from osprey.worker.sinks.utils.acking_contexts import BaseAckingContext, NoopAckingContext


class MyInputStream(BaseInputStream[BaseAckingContext[Action]]):
    def __init__(self, my_client):
        super().__init__()
        self._client = my_client

    def _gen(self) -> Iterator[BaseAckingContext[Action]]:
        while True:
            raw_event = self._client.poll()  # block until the next event
            action = Action(
                action_id=int(raw_event['id']),
                action_name=raw_event['type'],
                data=raw_event['payload'],
                timestamp=raw_event['timestamp'],
            )
            yield NoopAckingContext(item=action)
_gen 只會呼叫一次並重複使用。它應持續 block 與 yield,不應 return。若 source 不需要明確 ack 或 nack,使用 NoopAckingContext;若 Queue 提供 at-least-once delivery 等機制,則實作 custom BaseAckingContext,在成功時 ack。
從 hook 註冊 input stream,並在 config 設定 InputStreamSource.PLUGIN。
@hookimpl_osprey
def register_input_stream(config):
    return MyInputStream(my_client=build_client(config))
設定 output sinks
Rule 評估後,每個 ExecutionResult 都會傳給 output sink,由 sink 決定如何處理,例如寫入 log、轉送至 Queue、呼叫 webhook 或寫入 database。概念請見資料流的輸出資料。若要將 Results 保存至 BigTable、GCS、MinIO、Postgres 以外的 backend,應改用 register_execution_result_store hook。
Sync output sink
繼承 BaseOutputSink 並實作 methods。
from osprey.worker.sinks.sink.output_sink import BaseOutputSink
from osprey.engine.executor.execution_context import ExecutionResult


class MyOutputSink(BaseOutputSink):
    def will_do_work(self, result: ExecutionResult) -> bool:
        # Return False to skip this result early (e.g. filter by rule hit)
        return True

    def push(self, result: ExecutionResult) -> None:
        # Do something with the result—send to a queue, call an API, etc.
        pass

    def stop(self) -> None:
        # Clean up connections, flush buffers
        pass
從 hook 註冊。
@hookimpl_osprey
def register_output_sinks(config):
    return [MyOutputSink()]
Async output sink
使用 async Worker 時,繼承 AsyncBaseOutputSink,並將 push 與 stop 實作為 coroutines。範例請見 example_plugins/src/async_sinks/example_async_output_sink.py。
from osprey.async_worker.adaptor.interfaces import AsyncBaseOutputSink
import logging

logger = logging.getLogger(__name__)

class ExampleAsyncOutputSink(AsyncBaseOutputSink):
    def will_do_work(self, result: ExecutionResult) -> bool:
        return True

    async def push(self, result: ExecutionResult) -> None:
        logger.info(
            'example async output sink: features=%s verdicts=%s',
            result.extracted_features_json,
            result.verdicts,
        )

    async def stop(self) -> None:
        pass
使用 @hookimpl_osprey_async,在 register_async_output_sinks hook 下註冊。這與 sync register_output_sinks 是不同 hook,應放在連接至 osprey_async_plugin entry point 的 register_async_plugins.py module。
from osprey.async_worker.adaptor.plugin_manager import hookimpl_osprey_async

@hookimpl_osprey_async
def register_async_output_sinks(config):
    return [ExampleAsyncOutputSink()]
Labels service
Osprey 透過 Entity Labels 在 Events 之間追蹤狀態。Labels 是附加於使用者、帳號或其他 Entities 的任意 tags,例如「這位使用者先前有三次違規」。Rule 評估時會讀取 Labels,Rules 也能透過 Label Effects 寫入。若要讓 Labels 在 process restart 後繼續存在,並供多個 Workers 共用,需要透過 register_labels_service_or_provider hook 提供以自有 storage 為 backend 的 LabelsServiceBase 實作。
example_plugins/src/services/labels_service.py 的範例使用 PostgreSQL。
from osprey.worker.lib.storage.labels import LabelsServiceBase

class PostgresLabelsService(LabelsServiceBase):
    def initialize(self) -> None:
        # Called once at startup—open connections here
        ...

    def read_labels(self, entity) -> EntityLabels:
        # Return labels for this entity from your store
        ...

    @contextmanager
    def read_modify_write_labels_atomically(self, entity):
        # Yield the current labels; caller mutates them in place;
        # persist the result before the context manager exits
        ...
從 hook 註冊 service。
@hookimpl_osprey
def register_labels_service_or_provider(config):
    return PostgresLabelsService()
連接審查工具
Osprey 目前沒有直接整合審查工具,但可利用下列 extension points 完成整合。
register_output_sinks在產生 Execution Results 時將資料傳入 review Queueregister_label_output_sink專門處理 Label mutations 並取代預設LabelOutputSink的 sink- 以上一節所述、使用既有 datastore 的 labels service。Rule 可以將 Entity 標記為
flagged,再由 review Queue 查詢自有 store 的 Label
接入自有 ML model
ML models 可以實作成 UDFs。使用 in-process model 時,在 execute 中包裝 model 的 predict call。UDF 的 __init__ 會從 framework 收到 validation_context 與 arguments,因此 override 時須接受並轉交兩者,再於 super().__init__() 後載入 model。
class Arguments(ArgumentsBase):
    text: str

class MySpamClassifier(UDFBase[Arguments, float]):
    def __init__(self, validation_context, arguments):
        super().__init__(validation_context, arguments)
        self._model = load_model("/path/to/model.pkl")

    def execute(self, execution_context: ExecutionContext, arguments: Arguments) -> float:
        return self._model.predict_proba([arguments.text])[0][1]
回傳的 score 可以在 Rules 中使用。
MySpamClassifier(text=MessageContent) > 0.85
Rules compile 時,Osprey 會為每個 call site 建立一個 UDF instance,而非為每個 event 建立,因此 model 不會在每個 event 重新載入。Instance 是每個 call site 一份,不是每個 class 一份。若多個 Rules 呼叫同一個 UDF,每個 call site 都會建立 instance 並載入各自的 model copy。大型 model 應集中從單一 Rule 呼叫 UDF,或使用 module-level cache 共用 loaded weights,避免從多個位置呼叫。
若 model 由遠端提供,同樣在 execute() 中透過 HTTP、gRPC 或 model server SDK 呼叫。遠端 model calls 通常較慢或有成本,應使用英文官方文件 Writing Rules 的 Require(..., require_if=...) pattern,只在相關情況執行。
Require(rule='ai_services/my_ai_service.sml', require_if=ActionName == 'register')
安全與資料提醒
UDF、input stream、output sink、Labels service 與遠端 ML model 都可能接觸平台 Events 或完整 Execution Results。正式導入時應限制 Plugin 來源與權限、管理 secrets、設定 timeout 與 failure handling,並確認傳往第三方服務的資料範圍、保存及刪除條件。Hashing 也不必然等同匿名化,仍應依資料可連結性與使用情境評估。
封裝 Plugin
Plugin package 需要在 pyproject.toml 宣告 entry points。
[project]
name = "my-osprey-plugins"
version = "0.1.0"
requires-python = ">=3.11"
dependencies = ["pluggy==1.5.0"]

[tool.setuptools]
package-dir = {"" = "src"}

[tool.setuptools.packages.find]
where = ["src"]

[project.entry-points.osprey_plugin]
register_plugins = "register_plugins"
將 package 安裝到與 Osprey 相同的 environment,Osprey 下次啟動時就會自動發現。
另請參考英文官方文件撰寫規則。
撰寫 Rules
Rules 用來教 Osprey 要尋找什麼,以及找到後應採取什麼行動。本頁說明 Osprey 規則語言 SML,也就是 Some Madeup Language,包括以 Models 定義 Features、針對 Features 撰寫 Rules,以及將 Rules 連接至 Effects。
延伸閱讀如下。
建立 Rules
Osprey Rules 使用 SML 撰寫。SML 是加入額外限制的 Python subset,以簡化 Rule 撰寫。Rules 可以只適用於網路上的單一 event type,也可以套用至多種 event types。
Rule 本身只會建立變數。若沒有對應的 WhenRules() function call,Rule 除了評估與查詢之外,不會產生其他 Effects。
Rules 目前透過同名的 Rule(...) function 支援下列概念。
-
Name
Rule_Name = Rule(...)Rule name 同時是 identifier,也是能在 Osprey UI 查詢個別 Rule hits 的 boolean Feature。Rule 啟用後重新命名,會使其與歷史查詢結果失去連結,因此應謹慎命名。
-
Logic
when_all=[]Rule logic 是
when_allparameter 中的 Signals 清單。Signal 可以是針對 Features 的 comparison、Label check、UDF call 或其他 Rule。若清單中任何 Signal 的結果是
None,整個 Rule 會得到None。詳見下方 None values。 -
Description
description=f''以一般文字說明 Rule 尋找的對象,並與 Rule 一起輸出至 logging 或 ticketing 等外部系統。這是 f-string,因此可以插入 Feature values,讓回應人員知道觸發 Rule 的具體原因。
下列簡單 Rule 使用多種 Signal evaluations 與內建 UDFs。
My_Rule_Name_v2 = Rule(
    when_all=[
        # Primary Signal
        MyFirstValue == True,
        HasLabel(entity=MyEntityName, label='MyLabel'),
        ListLength(list=UsersValues) == 5,
        # Secondary Signal
        RegexMatch(target=MyStringValue, pattern='(hello|world)'),
        MySecondValue >= 3,
        MyThirdValue != None,
        # Guardrail Signal
        (_LocalValue in [1, 2, 3, 5]) or (GlobalValue in ['hello', 'howdy']),
        not HasLabel(entity=MySecondEntityName, label='MySecondLabel'),
    ],
    description=f"{UserA} performed {ActionB} in this way. Emit warning",
)
Rule 結構
主要 Rules directory 通常可以維護兩個 subdirectories。rules directory 放置實際邏輯,models directory 定義出現在任何或特定 event types 的 Features。例如下列結構。
example-rules/
|  rules/
|  |  record/
|  |  |  post/
|  |  |  |  first_post_link.sml
|  |  |  |  index.sml
|  |  |  like/
|  |  |  |  like_own_post.sml
|  |  |  |  index.sml
|  |  account/
|  |  |  signup/
|  |  |  |  high_risk_signup.sml
|  |  |  |  index.sml
|  |  index.sml
|  models/
|  |  record/
|  |  |  post.sml
|  |  |  like.sml
|  |  account/
|  |  |  signup.sml
|  main.sml
Rules directory root 的 main.sml 是 entry point。它使用 Import 與 Require statements 控制載入哪些檔案及載入時機,讓專案可以組合不同邏輯。這種結構可以針對特定 event types 定義 Rules 與 Models,只執行必要 Rules。例如部分 Rules 只應用於 post event,因為只有 post 具有 text 或 mention_count 等 Features。
每個 directory 可以維護 index.sml,定義實際加入該 directory Rules 的 conditional logic。也可以將全部 conditional logic 放在單一檔案,但每個 directory 分別維護 index.sml 更容易整理。其他說明請見工作流程結構與檔案位置。
Models
實際撰寫 Rule 前,需要為 event type 定義 Model。下列範例假設社群網站允許使用者在 top level 建立貼文,或回覆其他 top level 貼文。每篇貼文可能包含文字、其他使用者的 mentions,以及選用的 link embed。Event JSON 結構如下。
{
	"eventType": "userPost",
	"user": {
		"userId": "user_id_789",
		"handle": "carol",
		"postCount": 3,
		"accountAgeSeconds": 9002
	},
	"postId": "abc123xyz",
	"replyId": null,
	"text": "Is anyone online right now? @alice or @bob, you there? If so check this video out",
	"mentionIds": ["user_id_123", "user_id_456"],
	"embedLink": "https://youtube.com/watch?id=1"
}
在 models/record directory 建立 post.sml,定義貼文 Features。
PostId: Entity[str] = EntityJson(
	type='PostId',
	path='$.postId',
)

PostText: str = JsonData(
	path='$.text',
)

MentionIds: List[str] = JsonData(
	path='$.mentionIds',
)

EmbedLink: Optional[str] = JsonData(
	path='$.embedLink',
	required=False,
)

ReplyId: Entity[str] = EntityJson(
	type='PostId',
	path='$.replyId',
	required=False,
)
JsonData UDF 會從 event JSON 內容定義 Features。將 models/record/post.sml Model import 至其他 Rules 後,就能參照這些 Features。若 JSON object 中的值不一定存在,可以將 required 設為 False;Feature 不存在時會得到 None。
userId 或 handle 等值出現在任何 event 中,若複製到每個 event type Model 會很繁瑣,因此可以在 models/base.sml 中定義一次。
EventType = JsonData(
	path='$.eventType',
)

UserId: Entity[str] = EntityJson(
	type='UserId',
	path='$.user.userId',
)

Handle: Entity[str] = EntityJson(
	type='Handle',
	path='$.user.handle',
)

PostCount: int = JsonData(
	path='$.user.postCount',
)

AccountAgeSeconds: int = JsonData(
	path='$.user.accountAgeSeconds',
)
此處為 UserId 使用 EntityJson UDF,而非一般 JsonData。UDFs 在下方說明。原則上,user IDs 等 identifiers 應定義為 Entities,方便後續在 Osprey UI 探索資料。
Model hierarchy
實務上可以建立 base Models hierarchy。
base.sml每個 event 都有的 Features,例如 user IDs、handles 與 account statsaccount_base.sml只出現在 account-related Events,但每個 account-related event 都有的 Features。類似方式也可以建立record_base.sml,放置所有 record Events 都有的 Features
這種 hierarchy 可以避免重複,Osprey 不允許重複定義,也能讓 Features 位於適當的 abstraction level。
使用 WhenRules 的 Effects
WhenRules() 將 Rules 連接至 Effects。在 rules_any parameter 列出 Rule objects,當其中任一結果為 true,就觸發 then= 中的 Effects。Osprey 內建 DeclareVerdict()、LabelAdd() 與 LabelRemove() 等 Effect UDFs;Effects 也能透過 output sinks 觸發外部服務。
下列 WhenRules() block 會拒絕 request,並為 user、email 與 domain 套用 Labels,供後續驗證追蹤。
WhenRules(
    rules_any=[
        Enabled_Rule_1,
        Enabled_Rule_2,
        # Disabled_Rule_1,
    ],
    then=[
        # Verdicts
        DeclareVerdict(verdict='reject'),
        # Labels
        LabelAdd(entity=UserId, label='recently_challenged', expires_after=TimeDelta(days=7)),
        LabelAdd(entity=UserId, label='verify', apply_if=NotVerified),
        LabelAdd(entity=Email, label='pending_verify'),
        LabelAdd(entity=Domain, label='recently_seen', expires_after=TimeDelta(days=7)),
    ],
)
WhenRules() 必須位於它參照的 Rules 之後。Effects 分散在檔案各處會難以追蹤,建議集中放在靠近底部的位置。
完成評估後,Effects 與其他 Execution Result 會交給部署環境的 output sinks。資料流說明後續流向,Integrations 與 Plugins說明如何加入自訂 output sinks。
User Defined Functions,UDFs
本頁幾乎所有 functions,包括 Rule、JsonData 與 EntityJson,都是 UDF,也就是以 Python 實作並提供給 SML 使用的函式。Osprey 內建 standard library,部署環境的開發者也能透過 Plugins 註冊自訂 UDFs。以 Python 撰寫 UDF 請見 Integrations 與 Plugins 的撰寫 UDFs。
目前部署環境可呼叫項目的權威清單位於介面中的 UDF Registry,包括 signatures、descriptions 與 categories。Standard library 包含 RegexMatch、ListLength、將 numeric string 轉成 integer 的 ParseInt、依 index range 取得 substring 的 StringSlice、Hash* family,以及取得處理中 event name 與 ID 的 GetActionName()、GetActionId(),和將 Entities 分組、逐步把 Rule rollout 至部分 traffic 的 Experiment、ExperimentWhen。
Custom UDFs 的 SML 呼叫方式與其他 functions 相同。Demo ruleset 的 Rule 建立在 custom TextContains UDF 上。
# example_rules/rules/post_contains_hello.sml
ContainsHello = Rule(
  when_all=[
    EventType == 'create_post',
    TextContains(text=PostText, phrase='hello'),
  ],
  description='Post contains the word "hello"',
)
Effect UDFs
部分 UDFs 不回傳供比較的 value,而是產生 Effect,也就是 Rule 評估後由 Osprey output sinks 執行的 structured output,例如停用使用者或通報貼文。Effect UDFs 會在 WhenRules() block 的 then= list 中呼叫。
# example_rules/rules/post_contains_hello.sml
WhenRules(
  rules_any=[ContainsHello],
  then=[BanUser(entity=UserId, comment='User said "hello"')],
)
實作 Effect UDF 與消費它的 output sink 屬於 Plugin 工作,請見 Integrations 與 Plugins。
Labels
Labels 是支援 stateful Rules 的標準 Plugin,會接觸 Osprey 多個部分。它們是套用於任意定義 Entities 的 tags。Rules 可以用 Effects 新增與移除 Labels,也能將 Labels 當作條件,使過去決定影響未來 Events。完整 pattern 將在範例說明。介面中的行為請見使用者指南的 Labels。
建立 Entities
Labels 會套用至 Entities。Entities 是使用 EntityJson UDF 建立的 Features,通常代表 user ID 或 email address 等能在 Events 之間保持一致的值。
# user.sml
UserId: Entity[str] = EntityJson(
  type='User',
  path='$.user_id'
)
Custom UDF 也能宣告 EntityT 作為 output type 來建立 Entities。
重要注意事項
None values
SML 中不存在的 Rule 或變數會是 None,可能代表資料缺少或 Rule 沒有執行。與許多 programming languages 不同,只要 Rule 具有 None Signal,就會完全跳過該 Rule 及 downstream Rules,除非 Rule 明確檢查 None。
Thing: int = JsonData(path='$.property_that_doesnt_exist')

# Evaluates to False
MyFirstRule = Rule(
    when_all=[
        Thing != None,
    ],
    description=f'Thing is present',
)

# Skips evaluation and sets to None
MySecondRule = Rule(
    when_all=[
        Thing > 1,
    ],
    description=f'Thing is greater than 1',
)

# Skips evaluation and sets to None
MyThirdRule = Rule(
    when_all=[
        MySecondRule,
    ],
    description=f'MySecondRule matched',
)
Workflow structure and file placement
SML files 可以組合,使 Rules 更容易理解。Import statement 會加入其他檔案的 Rules 與變數。
# models/action_name.sml
ActionName = "foo"

# main.sml
Import(
    rules=[
        'models/action_name.sml',
        'models/http_request.sml',
    ]
)

MyRule = Rule(when_all=[ActionName == "foo"], description=f'Action is foo')
Require 會選擇性執行其他 SML scripts。它支援 templating 與 conditionals,因此可以完全跳過 scripts,適合 AI service call 等執行成本較高的 Rule 或 UDF。
# main.sml
Require(rule=f'actions/{ActionName}.sml')  # will execute 'actions/foo.sml'

Require(rule='ai_services/my_ai_service.sml', require_if=ActionName == "register")
請接著閱讀範例,將上述概念組合為可執行及調整的完整 rulesets。
範例
本頁將撰寫 Rules的全部概念套用至完整 rulesets。首先逐一說明 demo 中實際可執行的 ruleset files,再介紹 ruleset 擴大後常用的兩種 patterns,包括使用 Labels 保存 state,以及將 multi-signal Rule 分散整理於多個檔案。範例使用與其他文件相同的小型社群網站。
逐檔說明 demo ruleset
Demo 會執行 example_rules/ 中的實際 ruleset。內容只有兩個 Models、一個 Rule 與一個 Label,可以一次讀完。受治理平台有一項嚴格政策,使用者永遠不能說 hello。
Events 會以 JSON 傳入,包含 event name action_name、ID 與平台送出的資料。
{
  "action_id": 1,
  "action_name": "create_post",
  "data": {
    "user_id": "user_1923",
    "event_type": "create_post",
    "post": { "text": "hello world" }
  }
}
main.sml 是 entrypoint。這個 ruleset 很小,不需要 conditional index.sml files,只要 import base Model,再 require 唯一的 Rule file。
Import(rules=['models/base.sml'])

Require(rule='rules/post_contains_hello.sml')
models/base.sml 定義每個 event 都有的 Features。UserId 與 EventType 會宣告為 Entities,讓 Osprey 把它們視為跨 Events 持續存在的對象,因此後續可以讓 Label 留在使用者上。預設為 true 的 coerce_type=True 會將 numeric user ID 等不符合宣告 Type 的值轉換成指定 Type,而非產生 error。
UserId: Entity[str] = EntityJson(
  type='User',
  path='$.user_id',
  coerce_type=True
)

EventType: Entity[str] = EntityJson(
  type='EventType',
  path='$.event_type',
  coerce_type=True
)

ActionName=GetActionName()

ActionId=GetActionId()
最後兩行從 Osprey 本身取得 event name 與 ID,不從 JSON payload 讀取。GetActionName() 與 GetActionId() 是 stdlib UDFs,將結果公開為 Features 後,就能在介面中查詢。
models/post.sml 加入只適用於貼文的 Feature。
PostText: Entity[str] = EntityJson(
  type='PostText',
  path='$.post.text',
  coerce_type=True
)
rules/post_contains_hello.sml 會 import 兩個 Models、定義 Rule,再將 Rule 連接至 Effects,完整迴路都位於同一個檔案。
Import(
  rules=[
    'models/base.sml',
    'models/post.sml',
  ]
)

ContainsHello = Rule(
  when_all=[
    EventType == 'create_post',
    TextContains(text=PostText, phrase='hello')
  ],
  description='Post contains the word "hello"',
)

WhenRules(
  rules_any=[ContainsHello],
  then=[
    BanUser(entity=UserId, comment='User said "hello"'),
    LabelAdd(entity=UserId, label='meow'),
  ],
)
TextContains 與 BanUser 不屬於 stdlib,而是 example_plugins/ 提供的 custom UDFs。自訂方式請見撰寫 UDFs。LabelAdd 屬於 stdlib。
config/labels.yaml 會宣告 Rule 套用的 Label,包括適用的 Entity types 與 connotation。
labels:
  meow:
    valid_for: [User]
    connotation: positive
    description: testing label
Events 開始流入後,每個處理完成的貼文都會出現在 Event Stream,其中擷取的 Features 包括 UserId、EventType、PostText 與 ContainsHello。查詢 ContainsHello == True 可以只顯示符合 Rule 的貼文。開啟符合條件貼文的作者後,可以看到 User Entity 上的 meow Label,以及記錄於 event 的 BanUser Effect。開始使用會使用即時 demo 資料逐步操作這些介面。
使用 Labels 保存 state
Rules 無法直接查看過去 Events,但 Labels 會跨 Events 保留在 Entities 上,因此某個 Rule 新增的 Label 可以成為另一個 Rule 後續檢查的條件。假設已經標示傳送過多 DMs 的使用者。
WhenRules(
    rules_any=[
        Sent_Too_Many_DMs,
    ],
    then=[
        LabelAdd(entity=UserId, label='likely_spammer')
    ],
)
此後,該使用者的每個 event 都會帶有這項 state,其他 Rules 可以在完全不同的 event type 上使用它。
Should_Warn_User_Of_Spammer = Rule(
    when_all=[
        HasLabel(entity=UserId, label='likely_spammer'),
        This_Is_A_New_DM,
    ],
    description=f'Likely spammer {UserId} started a new DM',
)
Labels 也會顯示在介面的 Entity 上,並可手動新增或移除。需要注意一項不對稱行為。HasLabel() 可以用於 Rules,但不能用於查詢列,因為查詢搜尋的是 Events,不是目前的 Entity state。若要尋找套用某個 Label 的 Events,改為查詢 DidAddLabel(entity_type="User", label_name="likely_spammer")。詳情請見查詢語法。
分散在多個檔案的 multi-signal Rule
下列完整流程使用撰寫 Rules 的 Rule 結構。目標是標示第一篇貼文同時 mention 至少一位使用者並包含 link 的帳號。三個 Signals 各自可能沒有問題,但同時出現時較為可疑。
撰寫 Rule
在 rules/record/post/first_post_link.sml 撰寫 Rule logic。檔案同時定義讓 Rule 得到 True 的條件,以及符合時採取的 actions。
# First, import the models that you will need inside of this rule
Import(
    rules=[
        'models/base.sml',
        'models/record/post.sml',
    ],
)

# Next, define a variable that uses the `Rule` UDF
FirstPostLinkRule = Rule(
    # Set the conditions in which this rule will be `True`
    when_all=[
        PostCount == 1, # if this is the user's first post
        EmbedLink != None, # if there is a link inside of the post
        ListLength(list=MentionIds) >= 1, # if there is at least one mention in the post
    ],
    description='First post for user includes a link embed',
)

# Finally, set which effect UDFs will be triggered
WhenRules(
    rules_any=[FirstPostLinkRule],
    then=[
        # This is a custom effect UDF that we have implemented
        ReportRecord(
            entity=PostId,
            comment='This was the first post by a user and included a link',
            severity=3,
        ),
    ],
)
連接 Rule
這個 Rule 只應在 event 是 post event 時執行。使用上述專案結構時會涉及三個檔案。
首先,project root 的 main.sml 使用單一 Require statement,指向 top-level Rules index。
Require(
    rule='rules/index.sml',
)
接著,rules/index.sml 會在 event type 符合時,有條件地 require post Rules。
Import(
    rules=[
        'models/base.sml',
    ],
)

Require(
    rule='rules/record/post/index.sml',
    require_if=EventType == 'userPost',
)
最後,rules/record/post/index.sml require 新 Rule。
Import(
    rules=[
        'models/base.sml',
        'models/record/post.sml',
    ],
)

Require(
    rule='rules/record/post/first_post_link.sml',
)
可以在 demo ruleset 執行時修改它,例如為 TextContains 加入 phrase,或建立另一個針對 PostText 的 Rule。當所需 pattern 缺少 UDF 時,請前往 Integrations 與 Plugins。
治理提醒
Demo 中「出現
hello就停用使用者」是刻意簡化的測試政策。正式環境的 Rule 應使用具脈絡的 Signals、guardrails、分階段 rollout、誤判監測、人工複核與可回復 Effects。Labels 會跨 Events 影響未來判斷,應同時設計原因、到期、移除及稽核方式。
為什麼使用專用語言
Osprey 為何使用專用的 SML,也就是 Some Madeup Language,而不直接支援一般 Python?簡短的答案是,SML 的限制讓 Osprey 規則引擎可以在正式環境中安全執行不受信任或由第三方撰寫的邏輯,同時保持足以即時處理的速度。
-
Grammar 刻意維持精簡。 SML parser
osprey_worker/src/osprey/engine/ast/py_ast.py只理解受限制的 Python AST nodes,包括 assignments、calls、comparisons、boolean 或 binary operators、literals 及 f-strings。範圍以外的任何內容都會產生 syntax error,因此不能使用for、while、def、class或任意import。這項設計從結構上排除無限 loops 與 recursion,避免 Rule 讓 worker 停滯或遭到 DoS。 -
每個名稱只能指派一次。
UniqueStoredNamesvalidator 會拒絕在 ruleset 中重複宣告同一個名稱,NoUnusedLocals則會拒絕宣告從未讀取的名稱。兩者結合後,每個 Rule 與 Feature 都能編譯為單一、靜態且沒有 cycle 的 dependency graphexecution_graph.py,不會成為帶有 mutable state 的 imperative script。 -
靜態關係圖讓引擎更快,也更容易檢查。 由於邏輯沒有 side effects,也不會在 loop 中執行,executor 可以使用 gevent greenlets
executor.py安全地平行評估關係圖的獨立分支。介面也能為任何 Rule 或 Feature 呈現完整 dependency graph,支援 Rules Visualizer,以及 Rules 與 Features Registry 頁面中的交叉參照。 -
Rules 執行前會先檢查 Types。
validate_static_types.py與validate_call_rvalue.py會在驗證或 push 時找出 type errors 及誤用 return values,避免罕見 code path 第一次於正式環境執行時才發生 runtimeAttributeError。
SML 是合法的 Python syntax subset,因此將編輯器設為 Python mode 即可取得基本 syntax highlighting。目前的編輯器設定請見英文官方文件的 IDE Setup。
使用者研究與角色
Osprey 適合需要調查 Events 並即時採取自動行動的使用者。ROOST 訪談潛在使用者後,整理出下列 personas,協助開發者理解可能對 Osprey 有興趣的對象。這份研究可供開放原始碼社群規劃未來功能優先順序。
信任與安全工程師
可能使用 Osprey 的多數工程師與 Alice 類似。由於成本、缺乏彈性或可用選項有限,他們目前沒有合適的規則引擎,但需要能即時處理 Events 的工具,以大規模因應不良事件。他們也希望最佳化 Osprey 與其他技術堆疊的協作方式。
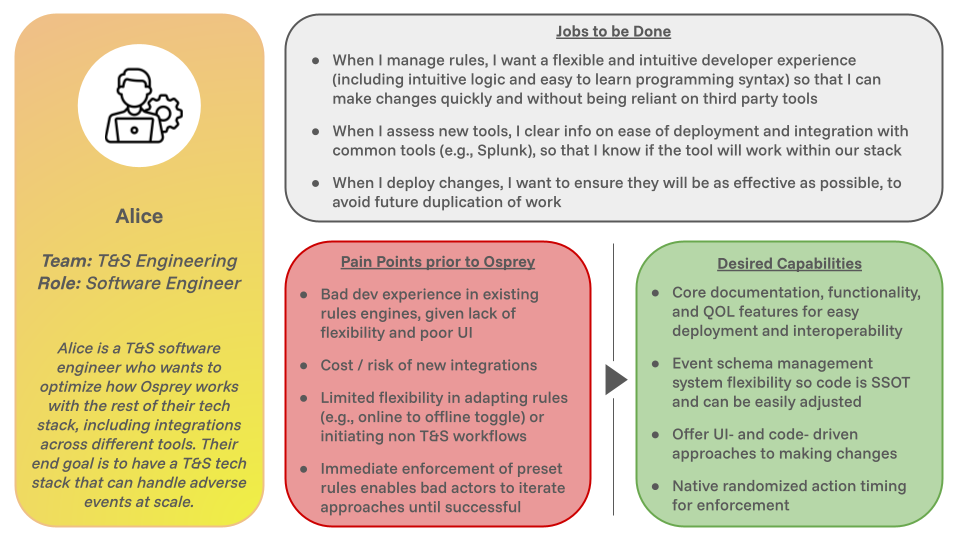
需要完成的工作包括下列事項。
- 管理 Rules 時,希望有彈性且直覺的開發者體驗,包括容易理解的邏輯及好學的程式語法,以便快速修改並降低對第三方工具的依賴
- 評估新工具時,希望清楚了解部署難度及與 Splunk 等常見工具的整合方式,確認工具能否在既有技術堆疊中運作
- 部署變更時,希望盡可能確保成效,避免未來重複投入工作
採用 Osprey 前的痛點包括下列事項。
- 既有規則引擎缺乏彈性且介面不佳,造成不良開發體驗
- 新整合的成本與風險
- 調整 Rules 的彈性有限,例如難以切換 online 與 offline,或難以啟動非信任與安全工作流程
- 預設 Rules 立即執行處置,可能讓惡意行為者反覆調整手法,直到成功避開偵測
希望 Osprey 提供的能力包括下列事項。
- 核心文件、功能與提升使用體驗的項目,讓部署及互通更容易
- 有彈性的 event schema management system,使程式碼成為 single source of truth 並能輕易調整
- 同時提供透過 UI 與程式碼進行變更的方式
- 原生支援隨機化處置時間
信任與安全營運團隊
與 Bob 類似的信任與安全分析人員,主要關心兩項能力,包括直覺分析不良行為的資料趨勢,以及快速迭代 Rules 並採取處置行動。
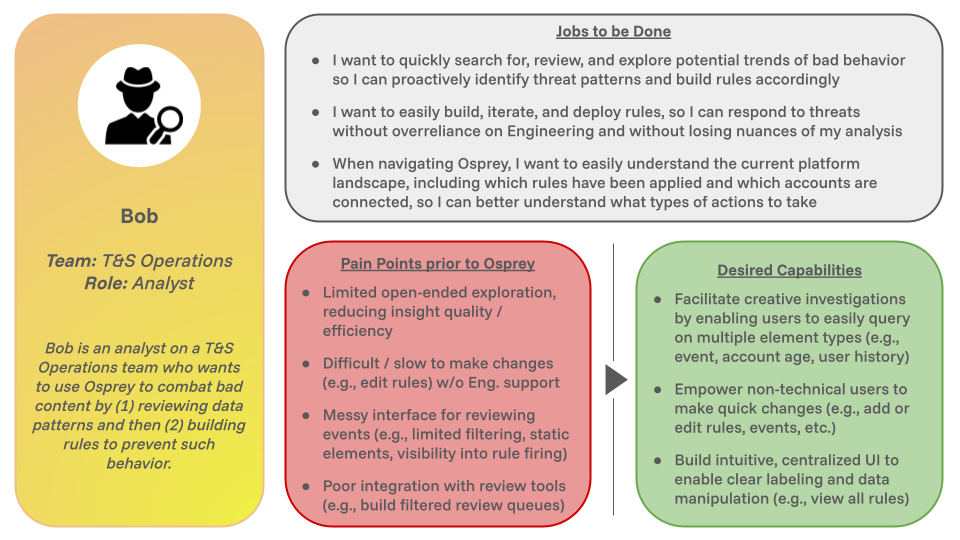
需要完成的工作包括下列事項。
- 快速搜尋、審查及探索潛在不良行為趨勢,主動辨識威脅模式並建立對應 Rules
- 容易建立、迭代及部署 Rules,減少對工程團隊的過度依賴,同時保留分析中的細節
- 瀏覽 Osprey 時,容易理解目前平台狀況,包括已套用哪些 Rules 及哪些帳號互相關聯,以便判斷應採取的行動
採用 Osprey 前的痛點包括下列事項。
- 開放式探索能力有限,降低洞察品質與效率
- 沒有工程團隊支援時,修改 Rules 等變更困難或緩慢
- Events 審查介面混亂,例如篩選能力不足、元素固定,或難以確認 Rule 是否觸發
- 與審查工具整合不佳,例如難以建立已篩選的 review Queues
希望 Osprey 提供的能力包括下列事項。
- 讓使用者可以輕易查詢多種元素類型,例如 event、account age 與 user history,支援有創意的調查
- 讓非技術使用者可以快速變更,例如新增或編輯 Rules 與 Events
- 建立直覺且集中的 UI,支援清楚套用 Labels 與操作資料,例如查看所有 Rules
這些 personas 是產品研究輸入,不能視為所有信任與安全團隊的完整代表。採用與優先順序仍應依實際平台規模、風險、資料條件及工作流程驗證。
參與文件貢獻
Osprey 文件網站使用 mdBook 建立並部署至 GitHub Pages。合併至 main branch 的變更會自動建立及部署。
既有頁面可以直接在 GitHub 網頁介面編輯,也可以使用文件網站上方的 🖉 Suggest an edit 圖示。建立新頁面時,必須同步更新 SUMMARY.md。完成修改後,依其他 GitHub 專案的方式提出 pull request 供審查。
mdBook 的結構請參考官方說明中的 anatomy of a book。
文件準則
為了維持不同專案之間的一致性並降低參與門檻,Osprey 盡可能遵循 ROOST 社群文件準則。
本機開發
若要在本機建立網站,先 clone repository 並安裝 mdbook。安裝方式請見官方說明。
完成後,在 repository root 使用 mdbook command。下列範例會持續監看變更、建立網站並提供本機服務。
mdbook serve docs
修改後,在瀏覽器開啟 http://localhost:3000 預覽,再依一般流程 commit、push 並提出 pull request。
繁中工作區使用獨立的 book.toml 與來源狀態清單。修改繁中內容後,另須執行 ./localization/zh-Hant-TW/scripts/check-all.sh,確認來源、用語、忠實度、建置與內部連結。
授權與翻譯聲明
本工作區翻譯自 ROOST Osprey,來源版本為 699ff64b6ef7891f948a921b05a5d47c91d743e8。
Osprey 原始內容依 Apache License 2.0 授權。本翻譯保留原專案的授權條件與歸屬資訊。
台灣繁體中文內容目前維護於 mashbean/osprey fork。translated 表示完成第一輪翻譯,未表示已通過第二位語言審查者或相關領域專家審查,也不表示已獲 ROOST 上游採納。